Capture video, audio, online tutorial, etc on Windows/Mac, and you can easily customize size, edit the video or audio, and more.
How to Paste A Screenshot on Mac Using Convenient Ways
 Updated by Lisa Ou / August 13, 2024 10:20
Hey guys! Would anyone please tell me how to copy and paste a screenshot on Mac? I'm currently editing a document for a school project and need to include some screenshots of my research. The problem is that I'm unfamiliar with pasting screenshots to a document on Mac. So, I hope someone can save me the hassle and provide some guidelines. Thanks in advance.

Copying and pasting a screenshot on a Mac is stress-free; most macOS users know how it works. Thus, no worries if you're a beginner since learning to paste the screenshot doesn't take much time and effort. You only need the correct information, directions, and understanding to successfully paste your screenshots into a document or Finder on your Mac computer.
Meanwhile, finding the correct methods will not be a problem since you have already stumbled upon the right article. By browsing the parts below, you can enjoy learning the appropriate steps for pasting screenshots on a Mac. Afterward, you will see a bonus part to help you with the screenshots. Hence, keep reading to acquire all the advantageous information provided below.

Guide List
Part 1. How to Paste Screenshot on Mac to Document
People often use the copy-and-paste function for screenshots when adding them to documents, whether on a regular document, presentation, etc. Mostly, it is meant to add visual evidence, keep records, references, documentation, and more. Hence, pasting screenshots directly to the document instead of saving them first is much more hassle-free. Fortunately, Mac computers made it easier by letting users only press keyboard shortcuts to take and copy screenshots quickly. This way, you only need to paste the screenshot to the document afterward.
Conform to the convenient task below to determine how to screenshot and paste on Mac to a document:
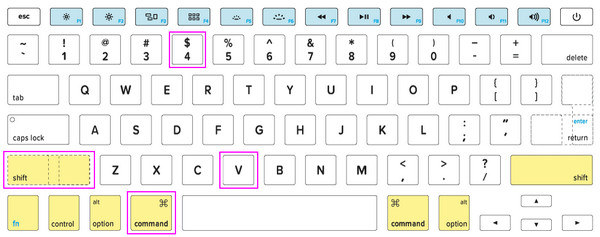
Step 1First, enter or display the interface, page, or screen you wish to capture. When ready, press Shift + Command + 4 on the Mac’s keyboard to capture the screen. It will then be automatically copied and saved to the clipboard.
Step 2Next, open the document where you’d like to paste the screenshot. You can quickly add the photo you have taken to the document by pressing the Command + V keys.

This process can’t only be performed on documents. You may also use the steps above when pasting screenshots to other apps, like editors, messaging apps, emails, etc., making it more effortless to take screenshots. However, since it automatically copies the picture, you won’t have an option to enhance it first. If you’d like a beneficial tool for such concerns, kindly see Part 3.
FoneLab Screen Recorder allows you to capture video, audio, online tutorial, etc on Windows/Mac, and you can easily customize size, edit the video or audio, and more.
- Record video, audio, webcam and take screenshots on Windows/Mac.
- Preview data before saving.
- It is safe and easy to use.
Part 2. How to Paste Screenshot on Mac to Finder
Other than pasting screenshots directly to documents, this may also mean copying and pasting them from a folder to another folder on Finder. In this case, the process below will be more appropriate for your Mac. It can greatly help organize screenshots on the computer. So, if you’d like to manage your screenshots and save them to a certain folder, paste them on Finder with this method. Like the prior section, its process is simple and can be done in minutes.
Have regard to the easy operation below to grasp how to copy and paste a screenshot on a Mac to Finder:
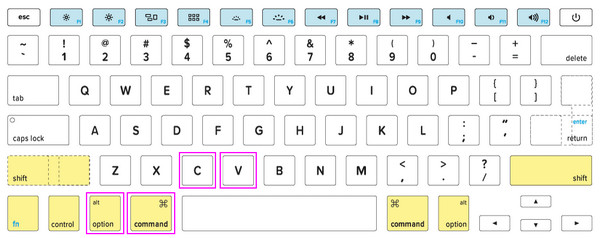
Step 1Open Finder, then access the folder storing your screenshots. If you still haven’t moved them beforehand, they are saved on your desktop by default. Thus, select the items you wish to copy from there. Afterward, press the Command + C keys to copy the screenshots.
Step 2Once copied, head to the Finder interface and open the folder where you intend to store the screenshots. Next, it’s time to move or copy the files to the folder. If you only wish to copy, press Command + V. Meanwhile, press Command + Option + V if you want to move them.

Remember that your screenshots must already be saved if you’d like to paste them to a specific folder on Finder. As you can see, the process requires you to copy the screenshot files from the initial folder first. If not, it won’t be possible to paste them to another since they’re not yet saved.
Part 3. Bonus Tip - Eminent Screenshot Tool for Computers
FoneLab Screen Recorder, on the other hand, is a prominent tool for taking screenshots or screen recordings on a computer. Besides the default screenshot feature on the Mac, you can use this program to capture your screen. It will take a quick installation, but afterward, you can enjoy its snapshot function with the enhancement features. Thus, this program won’t only let you take high-quality snaps. It also allows you to improve them with the photo editing functions.
Meanwhile, as its name indicates, FoneLab Screen Recorder is also a professional that takes screen recordings. It has specialized recorders in every aspect, such as video screen recording on a window, webcam, gaming, mobile phone, and more. It can provide almost everything you need in a screen recorder, so you won’t need to install other tools for various recording features. Thus, install it now to experience the tool’s advantageous snapshot and recording functions.
FoneLab Screen Recorder allows you to capture video, audio, online tutorial, etc on Windows/Mac, and you can easily customize size, edit the video or audio, and more.
- Record video, audio, webcam and take screenshots on Windows/Mac.
- Preview data before saving.
- It is safe and easy to use.
Recognize the unexacting directions underneath as a sample for taking screenshots on a computer with FoneLab Screen Recorder:
Step 1Navigate to the FoneLab Screen Recorder page, and a Free Download tab will be on its left. Before clicking, you must select Go to Mac Version first. This way, the button with the Apple logo will appear. Once ready, click it to acquire the installer, then use the file to install the screen recording program on your Mac.

Step 2The program’s features will greet you on the main interface. To move to the appropriate section, see the smaller feature tabs in the left area to notice the Screen Capture option. Click the tab, and the crosshair feature will then immediately appear. So, long-click and drag it until your desired screen portion is selected.

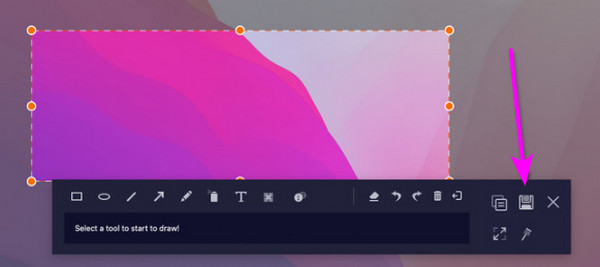
Step 3Once you release the screen, it will quickly be captured. Then, a bar containing various photo editing features will materialize. Use them to modify or enhance your screenshot. You can draw anything on the photo and add shapes, text, and more. Explore them until you’re satisfied with the output. Afterward, save the screenshot by ticking the Save symbol on the right section.

FoneLab Screen Recorder allows you to capture video, audio, online tutorial, etc on Windows/Mac, and you can easily customize size, edit the video or audio, and more.
- Record video, audio, webcam and take screenshots on Windows/Mac.
- Preview data before saving.
- It is safe and easy to use.
Part 4. FAQs about How to Paste Screenshot on Mac
1. Can I paste a screenshot on a PDF file?
Yes, you can. Pasting screenshots on a PDF is also possible, in addition to regular documents and PowerPoint presentations. The process is the same as that for Word documents, so feel free to check this article's Part 1 for the steps. It contains all the information to help you copy and paste screenshots on your PDF files. Besides, it's not only for PDFs but also for other documents and apps.
2. How can I access screenshots on Mac after taking them?
Accessing screenshots on a Mac is stress-free since they are only stored on the desktop by default. After capturing your screen, you may proceed immediately to your computer's home screen and then double-click the screenshot you wish to access.
FoneLab Screen Recorder allows you to capture video, audio, online tutorial, etc on Windows/Mac, and you can easily customize size, edit the video or audio, and more.
- Record video, audio, webcam and take screenshots on Windows/Mac.
- Preview data before saving.
- It is safe and easy to use.
Paste your screenshots on Mac using the most user-friendly techniques above. Their efficiency has been guaranteed many times, so trust that pasting your screenshots will be a success.
