How to Record Sound on Mac: 4 Smoothest Approaches to Discover
 Posted by Lisa Ou / Sept 14, 2024 16:30
Hi! My friend sent me the audio recordings on my social media accounts that we need for our data inputs. These recordings are about the experiences of every individual who suffers from absenteeism in school. In short, they are needed for our research. However, I could not download them and decided to record them on my Mac. Does screen recording on Mac record audio? Please help me. Thanks!

Luckily, there are various ways to record audio on a Mac. You can add or not add its screen, depending on your preference. This post will show you the 4 most helpful ways to record on a Mac. See them as you scroll down.

Guide List
Part 1. How to Record Audio on Mac with Voice Memos
Macs have multiple built-in audio recorders, and Voice Memos is one of them. This program has the simplest interface and features among them. The good thing is you can adjust the settings using its built-in settings. However, this program cannot record your Mac screen because it is only exclusive to audio recording.
FoneLab Screen Recorder allows you to capture video, audio, online tutorial, etc on Windows/Mac, and you can easily customize size, edit the video or audio, and more.
- Record video, audio, webcam and take screenshots on Windows/Mac.
- Preview data before saving.
- It is safe and easy to use.
Learn how to record internal audio on Mac using Voice Memos. Please proceed with the detailed steps below.
Step 1Open the Mac and go to the Launchpad tool to locate the Voice Memos program. You can use the Search Bar button at the top of the main interface to find it. The tool's simple interface will be shown. Adjusting the program settings is recommended. Click the Apple button at the top left and choose the System Preferences options on the drop-down list.
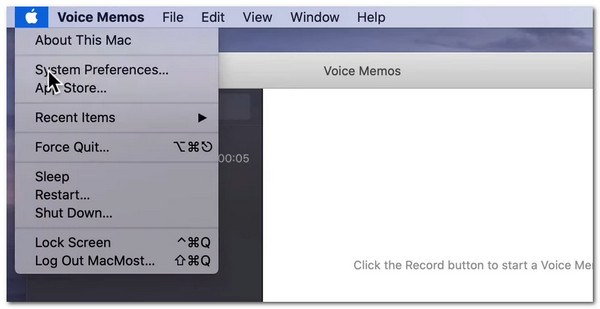
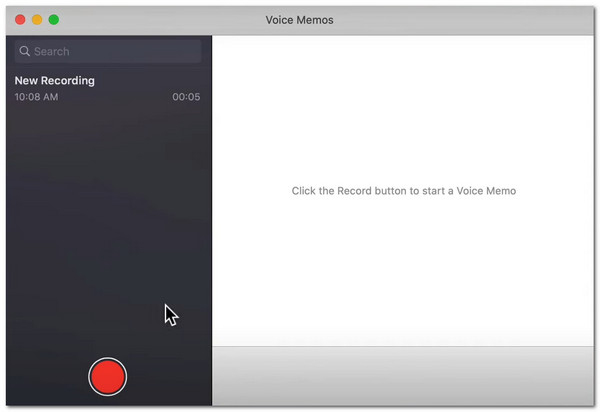
Step 2Choose the Input button at the top. Then, select the microphone you prefer to use during the audio recording. You can adjust its volume using the Volume Slider button at the bottom. Then, return to the program and click the Record button at the bottom left to start the audio recording. Once done, click the Pause button and select the Done button at the bottom right to end the audio recording session.
Part 2. How to Record Audio on Mac with QuickTime Player
Another built-in audio recorder on your Mac is QuickTime Player. This program can teach you how to screen record and audio on a Mac. It has a built-in feature that captures Mac audio and screen better than the previous one. The good thing about this tool is that it records high-quality audio. In addition, this tool has settings for editing your audio recording after the session. You only need to use the Edit tab, which will appear after the audio recording.
Do you want to use QuickTime Player to record audio on a Mac? Follow the detailed steps below.
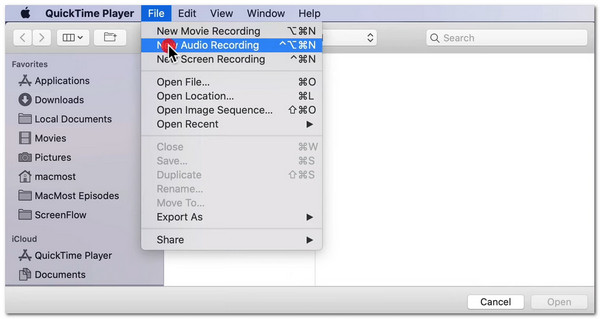
Step 1Launch QuickTime Player using the Launchpad or Spotlight feature of your Mac. Then, click the File tab at the top of the main interface. Drop-down options will be shown on the screen. Click the New Audio Recording option on the drop-down list.
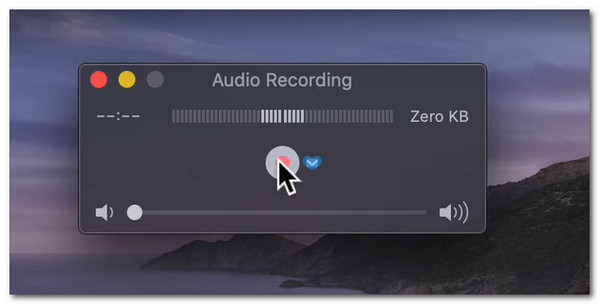
Step 2A small dialog box section will appear at the top left of the screen. Then, adjust its settings by clicking the Arrow-down button. A drop-down list will be shown, and adjust the settings based on your preference. Later, click the Record button on the program to start the audio recording. Click the Box button once you are done with the audio recording.
FoneLab Screen Recorder allows you to capture video, audio, online tutorial, etc on Windows/Mac, and you can easily customize size, edit the video or audio, and more.
- Record video, audio, webcam and take screenshots on Windows/Mac.
- Preview data before saving.
- It is safe and easy to use.
Part 3. How to Record Audio on Mac with GarageBand
GarageBand can also record internal audio on Mac! It is a third-party program that supports various editing and recording features limited to Mac, iPhone, and iPad users. In addition, this tool can manage your recorded audio and edits on its interface. In this case, you will not have difficulty locating the products made by the tool. See how to use this tool by imitating the quick steps below.
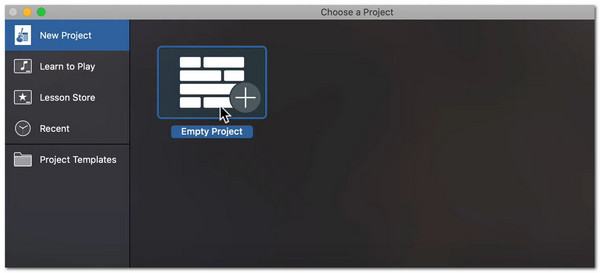
Step 1Open GarageBand on your Mac. You can use the Spotlight feature to make the process quick. Then, select the New Project button at the top left of the screen. The Empty Project section will be shown on the right. Later, click the Plus button and choose the Open button to continue.
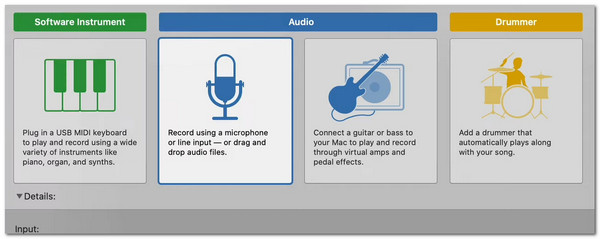
Step 2The tool will require you to choose a track. Please click the Microphone button on the first interface. Please set up the settings you desire for the audio recording tool. Later, select the Create button at the bottom right of the main interface.
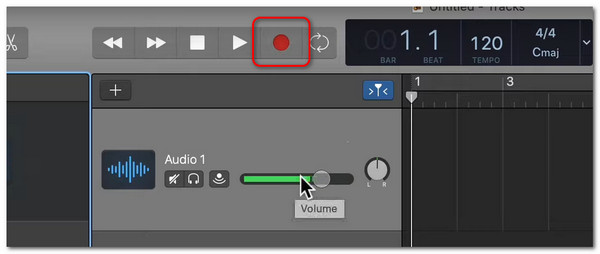
Step 3The multiple features will appear at the top of the screen. Click the Red button at the top of the screen. The audio recording will start quickly later. Then, click the Share button at the top to save the record on your Mac.
As you might know, the Apple way won’t allow you to record internal sound from your computer. What if you want to do this? Move to the next part to get a powerful tool.
Part 4. How to Record Audio on Mac with Mac FoneLab Screen Recorder
Last but not least, learn how to screen and audio record on a Mac with Mac FoneLab Screen Recorder. This tool has other features that can help you during the recording sessions. In addition, the software can also take a snapshot of your Mac screen because it has a Screen Capture feature. See how to use Mac FoneLab Screen Recorder below.
FoneLab Screen Recorder allows you to capture video, audio, online tutorial, etc on Windows/Mac, and you can easily customize size, edit the video or audio, and more.
- Record video, audio, webcam and take screenshots on Windows/Mac.
- Preview data before saving.
- It is safe and easy to use.
Step 1Tick the Free Download button on the website. Set up and launch the tool afterward.

Step 2The tool's first interface will show you its main features. Choose the Audio Recorder button. Then, click the Apple button at the top left. Select the System Preferences option on the screen. Later, choose the Sound button to select your preferred audio channel.

Step 3Return to the software interface and click the Record button on the right. The audio recording will start immediately. Finally, click the Box button on the screen to stop the procedure. Afterward, save the recorded audio on your Mac.

FoneLab Screen Recorder allows you to capture video, audio, online tutorial, etc on Windows/Mac, and you can easily customize size, edit the video or audio, and more.
- Record video, audio, webcam and take screenshots on Windows/Mac.
- Preview data before saving.
- It is safe and easy to use.
Part 5. FAQs about How to Record Audio on Mac
1. Why can't the Mac screen record with audio?
The main reason you cannot execute the procedure is the incompatibility of the tools you use for recording the audio on your Mac. In addition, some third-party tools do not allow audio recording. It is recommended that you check their permissions first.
2. Why is PowerPoint record audio not working on Mac?
There are no concrete reasons why the PowerPoint audio recorder is not working properly. The best way is to check if the microphone is off. In addition, there might be system glitches on the computer or program itself.
In conclusion, this post has 4 methods to learn how to audio record on Mac. It includes a Mac FoneLab Screen Recorder. It is a third-party tool that offers audio and screen recording. Do you have any comments or questions? Leave them in the comment section. Thank you!
FoneLab Screen Recorder allows you to capture video, audio, online tutorial, etc on Windows/Mac, and you can easily customize size, edit the video or audio, and more.
- Record video, audio, webcam and take screenshots on Windows/Mac.
- Preview data before saving.
- It is safe and easy to use.
