Recover the lost/deleted data from computer, hard drive, flash drive, memory card, digital camera and more.
Record Video on Mac to Capture Essential Screen Activities
 Updated by Lisa Ou / Sept 10, 2024 09:20
Watching and playing videos on computers like Macs is convenient because they have larger screens than smartphones. Watching movies and tutorials are some of the screen activities included. Sometimes, we tend to record the videos on our Macs to play them offline without the help of an internet connection. It will benefit your end when you are outdoors and don't have cellular data to play the videos if you need to access them online.

Take this article as your guide to screen record video on Mac. We will introduce to you the most convenient tool for the screen recording procedure on your Mac. Let's discover them as you continue reading this post.

Guide List
Part 1. Record Video on Mac with Screenshot Toolbar
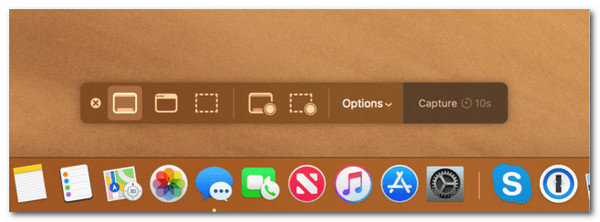
Are you aware of the shortcut key commands that can be performed on your Mac? Good news! Macs have shortcut keys for the screen recording procedure. The built-in tool is called the Screenshot Toolbar. Aside from the screen recording tools, this feature allows you to screenshot your Mac screen. You can have a screenshot of the entire interface or only a portion.
The only drawback of the built-in tool is that it lacks editing features after recording the video. Determine how to video record on Mac using the built-in tool below.
Press the Shift + Command + 5 key combinations on your Mac keyboard. The Screenshot Toolbar section will then be activated, including the controls for taking screenshots and recordings. Go to the screen where you prefer to record. Choose the Record button to start capturing. Once you've done this, press the key combinations again to stop the recording session.

Part 2. Record Video on Mac with QuickTime Player
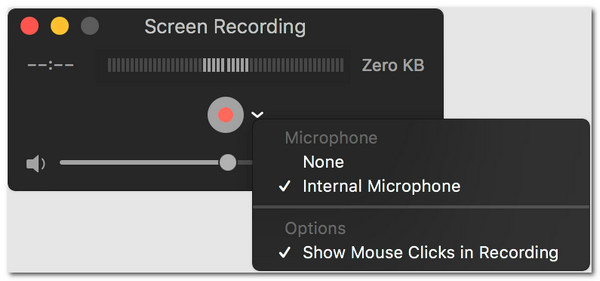
Another built-in way to learn how to record videos on Mac is using QuickTime player. It is the primary built-in media player of Mac that plays videos from the internet or device album. It allows you to view them in high quality. This software also enables you to record videos on your Mac. Like the previous tool, it lets you take a screenshot while recording. In addition, the platform will not reduce the video quality you capture. Perform the steps below to learn how to use the built-in tool for video recording on a Mac.
Step 1Open QuickTime Player, and you can complete it using Launchpad on your Mac. Then, tick the File button on the Menu Bar section at the top left of the main interface. The drop-down options will appear immediately, and select the New Screen Recording button.

Step 2When you are ready for Screen recording, click the Record button to continue. Then, click the screen if you prefer to capture the entire Mac screen. Alternatively, click and drag a portion if you record a specific Mac section. Click the Stop Recording button afterward.

Part 3. Record Video on Mac with Mac FoneLab Screen Recorder
As we have said, built-in screen recording tools that record screen video on Mac lack advanced features, including editing tools. Let Mac FoneLab Screen Recorder fill in the features the mentioned tools lack for the screen recording process. This tool can edit the recorded video on your Mac using its advanced features! It will not ruin the quality of the captured video file because it supports high-quality products.
FoneLab Data Retriever - recover the lost/deleted data from computer, hard drive, flash drive, memory card, digital camera and more.
- Recover photos, videos, contacts, WhatsApp, and more data with ease.
- Preview data before recovery.
In addition, it enables you to take a quick snapshot of your Mac screen. These snapshots will also be high-quality, like the recorded videos. Discover how to screen record video on a Mac with audio using this tool. Follow the steps below to learn how with Mac FoneLab Screen Recorder.
Step 1Download, set up, and launch the screen recorder on your computer. Then, you will be directed to the Video Recorder interface, the most relevant tool for screen recording on Mac.

Step 2Click the Full button on the left to capture the entire Mac screen. Then, choose the Custom button to capture a screen portion. Finally, click the REC button on the right to begin the screen recording.

Step 3Record the screen according to your preferences. Then, click the Red Box button to stop the session. The video preview will appear and can be edited using editing features. Lastly, click the Export Now button to save the recorded file.

FoneLab Data Retriever - recover the lost/deleted data from computer, hard drive, flash drive, memory card, digital camera and more.
- Recover photos, videos, contacts, WhatsApp, and more data with ease.
- Preview data before recovery.
Part 4. Record Video on Mac with Online Tool
However, what if you don't consider downloading a tool? Discover how to record screen video on Mac using an online tool. Countless drawbacks will be experienced during screen recording. It includes limited time for recording progress, editing features, advertisements, and more.
This section will tackle ClipChamp Screen and Camera Screen Recorder. It offers four recording features, including camera, audio, and video recorders, and a text-to-speech feature. See its procedure below.
Step 1Search for the main website of the online tool using your Mac web browser. Then, choose the Screen button on the left side of the main interface. Then, click the Red Circle button at the bottom center.

Step 2Choose the window you will record. The recording will start afterward. Once you've done this, click the Stop Sharing button at the top. Then, click the Save button to keep the video on your Mac.

FoneLab Data Retriever - recover the lost/deleted data from computer, hard drive, flash drive, memory card, digital camera and more.
- Recover photos, videos, contacts, WhatsApp, and more data with ease.
- Preview data before recovery.
Part 5. FAQs about Record Video on Mac
1. How do I record a video on my Mac-protected screen?
Mac focuses on the security and privacy of the owner and its data. Some applications on the mentioned Apple device do not allow video recording for privacy purposes. No third-party tool or built-in features can record the projected screen on your Mac. In this case, you can use another device, like an iPhone, iPad, or Android phone, to capture the projected screen on your Mac to make it possible. You can use their Camera app to do that.
2. Where does screen recording go on a Mac?
If you use the built-in tool to record on your Mac, the recorded video will automatically be saved in the Apple device's Desktop section. It allows you to find the video files quickly. However, the saving procedure for third-party programs will be different. There is software that saves the recorded video on the mentioned destination path, and some create new folders for the files in the Finder folders. You can locate the recorded videos in the two locations.
To summarize, you can record a video on a Mac using its built-in tools, third-party software, and online programs. This post has shown you the 4 top picks tools for Mac video screen recording. They have their differences and common features. Mac FoneLab Screen Recorder is included as a program that can be used for novices and skilled individuals for screen recording a video on computers like Windows and Mac. Comments and suggestions at the end of this article are appreciated. Thank you!
FoneLab Data Retriever - recover the lost/deleted data from computer, hard drive, flash drive, memory card, digital camera and more.
- Recover photos, videos, contacts, WhatsApp, and more data with ease.
- Preview data before recovery.
