- Part 1. How to Transfer Photos from Mac to Mac with iCloud
- Part 2. How to Transfer Photos from Mac to Mac via Migration Assistant
- Part 3. How to Transfer Photos from Mac to Mac with File Sharing
- Part 4. How to Transfer Photos from Mac to Mac via AirDrop
- Part 5. How to Transfer Photos from Mac to Mac via Bluetooth
- Part 6. How to Transfer Photos from Mac to iPhone with FoneTrans for iOS
- Part 7. FAQs About How to Transfer Photos from Mac to Mac
How to Transfer Photos from One Mac to Another
 Posted by Lisa Ou / Jan 25, 2022 09:00
 Transfer photos from Mac to an external hard drive is a task to back up photos onto an external hard drive. Such transferring is smart because creating a backup and keeping your photos in a safe place allows you to keep photos for as long as you wish. But the question is, do you know how to transfer your beloved photos from your Mac onto an external hard drive? It is crucial to find the best solution for your photos to be 100% safe and secured. With that, this post will show you different ways on how to transfer photos from Mac to external hard drive and the latest models.


Guide List
- Part 1. How to Transfer Photos from Mac to Mac with iCloud
- Part 2. How to Transfer Photos from Mac to Mac via Migration Assistant
- Part 3. How to Transfer Photos from Mac to Mac with File Sharing
- Part 4. How to Transfer Photos from Mac to Mac via AirDrop
- Part 5. How to Transfer Photos from Mac to Mac via Bluetooth
- Part 6. How to Transfer Photos from Mac to iPhone with FoneTrans for iOS
- Part 7. FAQs About How to Transfer Photos from Mac to Mac
With FoneTrans for iOS, you will enjoy freedom to transfer your data from iPhone to computer. You can not only transfer iPhone text messages to computer, but also photos, videos and contacts can be moved to PC easily.
- Transfer photos, videos, contacts, WhatsApp, and more data with ease.
- Preview data before transferring.
- iPhone, iPad and iPod touch are available.
Part 1. How to Transfer Photos from Mac to Mac with iCloud
Syncing data photos specifically is among the primary features of iCloud. With iCloud, sharing photos between two macOS and iOS devices has never been more accessible. Additionally, iCloud is an excellent choice because you can keep the original resolution of the photos on its cloud server while saving an optimized version on your other devices.
Steps on How to Transfer Photos from Mac to Mac with iCloud:
Step 1To begin, open System Preferences on the Mac where you want to transfer your photos, then click Sign In.
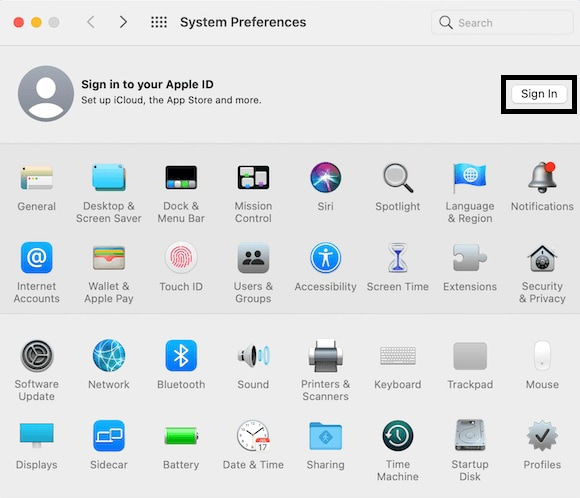
Step 2After that, sign in with the same iCloud account signed in on the Mac where the photos are currently saved. Lastly, tick Photos to sync iCloud photos between the two Macs.
Alternatively, you can use another Apple feature to migrate between Mac computers.
With FoneTrans for iOS, you will enjoy freedom to transfer your data from iPhone to computer. You can not only transfer iPhone text messages to computer, but also photos, videos and contacts can be moved to PC easily.
- Transfer photos, videos, contacts, WhatsApp, and more data with ease.
- Preview data before transferring.
- iPhone, iPad and iPod touch are available.
Part 2. How to Transfer Photos from Mac to Mac via Migration Assistant
Transferring all data, including media files, user accounts, computer settings, and apps, from one Mac to another is the primary purpose of Migration Assistant. Through Migration Assistant, you can transfer from one Mac or drive back up to another Mac.
Steps on How to Transfer Photos from Mac to Mac via Migration Assistant:
Step 1From the Applications folder on the new or destination Mac and open Migration Assistant. Next, enter your Administrator password. When a permission notification appears, then click OK. Log in to your Mac.
Step 2After that, select From a Mac, Time Machine Backup, or Startup disk, then click Continue. Meanwhile, open Migration Assistant on the old or source Mac. From there, select the same transfer option you selected on the new Mac.
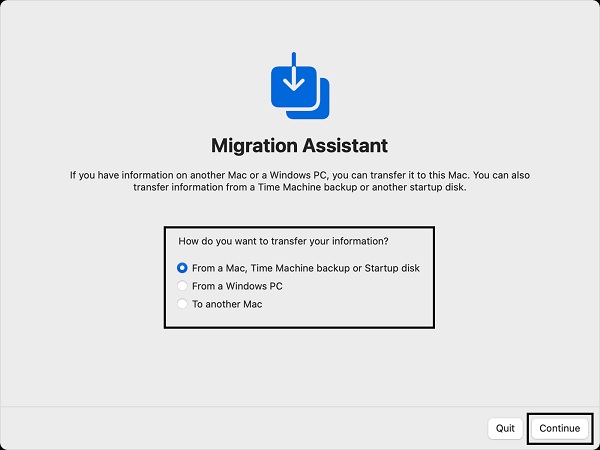
Step 3Now on the new Mac, click Select a Mac, then Continue. Shortly, a security code will appear on both Macs. Click Continue once you verify that they have the same security code.
Step 4Finally, select the type of data you want to transfer on the new Mac, then click Continue. Lastly, close Assistant Migration on both Macs when the transfer is done.
Alternatively, you can also use another mode of sharing for Mac if you don’t intend to share all of your Mac data with others.
With FoneTrans for iOS, you will enjoy freedom to transfer your data from iPhone to computer. You can not only transfer iPhone text messages to computer, but also photos, videos and contacts can be moved to PC easily.
- Transfer photos, videos, contacts, WhatsApp, and more data with ease.
- Preview data before transferring.
- iPhone, iPad and iPod touch are available.
Part 3. How to Transfer Photos from Mac to Mac with File Sharing
File Sharing is part of the operating system of Mac that is built-in and specially designed to share Mac data with other Apple computers. Unlike Migration Assistant, File Sharing allows you to share specific folders rather than the whole Mac. Thus, it is a better and faster method of transferring photos from one Mac to another.
Steps on How to Transfer Photos from Mac to Mac with File Sharing:
Step 1Firstly on sender Mac, click the Apple logo at the left corner of the screen, then open System Preferences.
Step 2Secondly, click Sharing, then select File Sharing. After that, click the Add button and select the folder containing the photos you want to transfer.
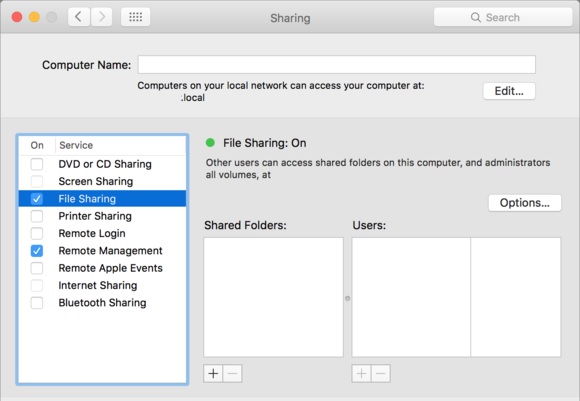
Step 3Thirdly, press the Ctrl key as you click the name of the folder you intend to transfer, then click Advanced Options. From there, alter the settings as you prefer, then click OK.
However, the previous solutions seem to be complicated and a waste of memory space since you will have to transfer photos by folder or along with all data on your Mac. But you don't have to keep up with such solutions. Instead, you might prefer solutions that allow you to transfer selectively.
Part 4. How to Transfer Photos from Mac to Mac via AirDrop
In terms of selectively transferring photos between Apple devices, AirDrop is one of the wireless methods you might consider. AirDrop is a transfer solution introduced by Apple for its devices.
Steps on How to Transfer Photos from Mac to Mac via AirDrop:
Step 1First, connect the two Mac computers to the same WIFI. Then, open the Photos program on the source Mac and select all the images you want to transfer to the other Mac.
Step 2Subsequently, click the Share icon at the screen's upper-right corner and select AirDrop from the drop-down menu. Lastly, click Accept on the receiver Mac to commence the transfer.

Instead of AirDrop, you can use another built-in wireless and quick transfer solution for your Mac photos.
With FoneTrans for iOS, you will enjoy freedom to transfer your data from iPhone to computer. You can not only transfer iPhone text messages to computer, but also photos, videos and contacts can be moved to PC easily.
- Transfer photos, videos, contacts, WhatsApp, and more data with ease.
- Preview data before transferring.
- iPhone, iPad and iPod touch are available.
Part 5. How to Transfer Photos from Mac to Mac via Bluetooth
All Apple devices have a built-in Bluetooth feature that comes in handy when you want to transfer photos and other data. Bluetooth is an underrated transfer method for Apple devices because it is most common for Android devices. However, little did you know that you can use Bluetooth to selectively transfer photos between MacBook Pro, MacBook Air, or iMac. You have to keep the sender and receiver computers with each other.
Steps on How to Transfer Photos from Mac to Mac via Bluetooth:
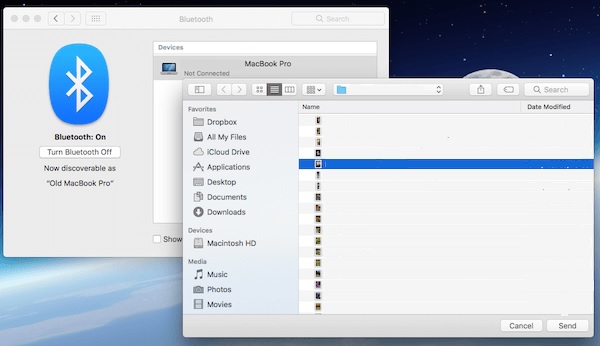
Step 1For both Macs, open System Preferences and head to Sharing. From there, tick the checkbox beside Bluetooth Sharing and turn on Bluetooth.
Step 2On the Mac where the photos are coming from, double click Bluetooth Devices then click the Mac where you want to send photos.
Step 3On the pop-up Finder window, click Photos and select all the photos you want to send. Subsequently, click the Send button. Lastly, click Accept on the receiving Mac.
But what if you intend to transfer your Mac photos onto an iPhone rather than another Mac? Well, don't worry because this post got your back. Continue reading if you want to know how to transfer photos from Mac to an iPhone in the most effective method.
Part 6. How to Transfer Photos from Mac to iPhone with FoneTrans for iOS
FoneTrans for iOS is a data transfer and managing tool for Apple devices that you can undoubtedly use whenever you need. It is readily available on any computer you use, Mac, for instance, and transferred with any iOS device. With FoneTrans for iOS, you never have to worry about losing any data quality. Also, it is highly efficient and effective because of its high technology algorithm.
With FoneTrans for iOS, you will enjoy freedom to transfer your data from iPhone to computer. You can not only transfer iPhone text messages to computer, but also photos, videos and contacts can be moved to PC easily.
- Transfer photos, videos, contacts, WhatsApp, and more data with ease.
- Preview data before transferring.
- iPhone, iPad and iPod touch are available.
Steps on How to Transfer Photos from Mac to iPhone with FoneTrans for iOS:
Step 1First and foremost, install and open FoneTrans for iOS on your Mac. Subsequently, connect your iPhone to your Mac via USB cable.

Step 2After that, select Photos from the left sidebar of the program. Next, click the Add Files icon.
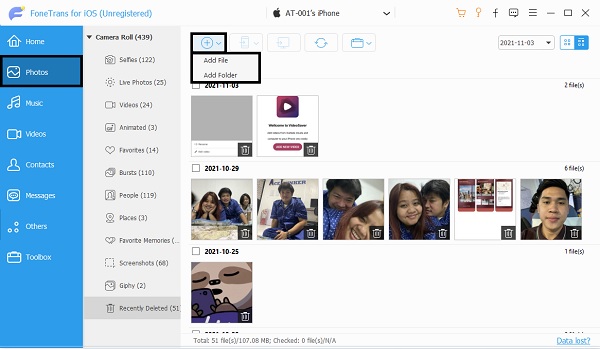
Step 3Now, navigate to your Mac’s local storage, select all the photos you want to transfer to your iPhone, and click Done.
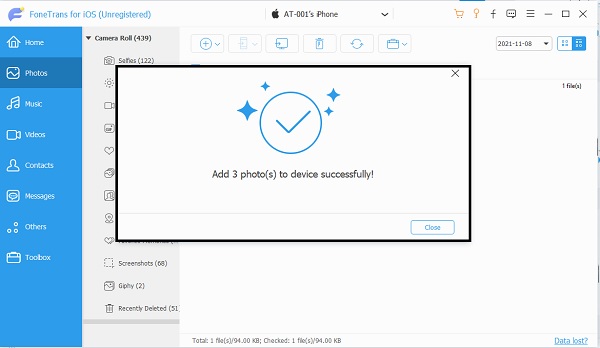
What’s more, you can use it to transfer photos from iPhone to Mac, even from iPhone to another iPhone, as FoneTrans for iOS supports data transfer among iPhone, iPad, iPod Touch, and computer with ease.
Part 7. FAQs About How to Transfer Photos from Mac to Mac
Can two Macs share the same photos library?
Currently, iCloud Photo Sharing is the only native way for two Mac's photos libraries to be synced with each other.
Does Mac Migration Assistant copy everything?
Yes, Migration Assistant for Mac does copy everything. The copied data include photos, documents, apps, user accounts, and settings.
Is my old Mac still usable even after using Migration Assistant?
Technically, nothing happens on the old Mac after using Migration Assistant unless you delete data after the process.
Conclusion
Congratulations! In the most renowned solutions available, you just learned how to transfer photos from one Mac to another. You saw how doable transferring Mac photos have ever been, so you might realize how easy it depends on the solution you have. Transfer your Mac photos now and work on them just as you initially intended.
With FoneTrans for iOS, you will enjoy freedom to transfer your data from iPhone to computer. You can not only transfer iPhone text messages to computer, but also photos, videos and contacts can be moved to PC easily.
- Transfer photos, videos, contacts, WhatsApp, and more data with ease.
- Preview data before transferring.
- iPhone, iPad and iPod touch are available.
