- Part 1. How to Transfer Photos from Old iPad to New iPad via Quick Start
- Part 2. How to Transfer Photos from iPad to iPad via AirDrop
- Part 3. How to Transfer Photos from iPad to iPad via iCloud
- Part 4. How to Transfer Photos from iPad to iPad via iTunes/Finder
- Part 5. How to Transfer Photos from iPad to iPad via FoneTrans for iOS
- Part 6. FAQs About How to Transfer Photos to iPad
5 Best iPad Photo Transfer Apps to Transfer iPhone/iPad Pictures
 Posted by Lisa Ou / Jan 19, 2022 09:00
 Do you have a new iPad and want to save your current iPad photos on your new one? Or are you sharing photos from your iPad with your sibling or friends? Perhaps you have two iPads, and you want to keep your photos on both iPads. If your case is among these instances, or if you have to learn how to transfer photos from iPad to iPad, this post is best for you.
This post will demonstrate how to transfer iPad photos in 5 various methods that suit whichever you prefer and need. Make sure to read carefully to do so efficiently, like a pro, but quickly.


Guide List
- Part 1. How to Transfer Photos from Old iPad to New iPad via Quick Start
- Part 2. How to Transfer Photos from iPad to iPad via AirDrop
- Part 3. How to Transfer Photos from iPad to iPad via iCloud
- Part 4. How to Transfer Photos from iPad to iPad via iTunes/Finder
- Part 5. How to Transfer Photos from iPad to iPad via FoneTrans for iOS
- Part 6. FAQs About How to Transfer Photos to iPad
Part 1. How to Transfer Photos from Old iPad to New iPad via Quick Start
Quick Start for iPad is a solution that is meant to ease and fasten data migration between an existing and currently used device onto a new one. Luckily, the iPad features Quick Start, which means you can utilize this feature in transferring your iPad photos to a new iPad with ease and convenience. But before you proceed, note that this method takes up time, so make sure you will not need to use your current device because you wouldn't want to interrupt the process.
Steps on How to Transfer Photos from Old iPad to New iPad via Quick Start:
Step 1Firstly, please turn on your new iPad and keep it beside or close to your current iPad. After that, a notification will appear on your current iPad asking if you want to use your Apple ID to set up a new iPad. With that notification, tap Continue.
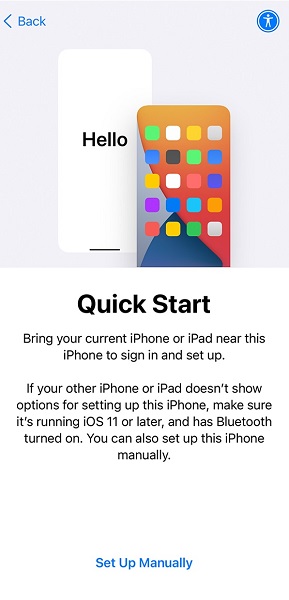
Step 2Secondly, place the new iPad under your current iPad making sure it is within the viewfinder of the other iPad. Do this until a notification that says Finish on New iPad appears. Alternatively, you can also select Authenticate Manually if your current iPad’s camera is unavailable.

Step 3Thirdly, enter your current iPad passcode on your new iPad. Subsequently, follow the on-screen instructions in setting up your new iPad. Tap Continue when Transfer Data from iPad appears. This step will commence syncing all data between these two iPads.
Additionally, note that Bluetooth must be enabled on your current iPad for this method to work. Further, this method will only work on a new iPad. Otherwise, you will have to factory reset iPad as a new one before transferring. However, you can also use a different picture transfer solution.
With FoneTrans for iOS, you will enjoy freedom to transfer your data from iPhone to computer. You can not only transfer iPhone text messages to computer, but also photos, videos and contacts can be moved to PC easily.
- Transfer photos, videos, contacts, WhatsApp, and more data with ease.
- Preview data before transferring.
- iPhone, iPad and iPod touch are available.
Part 2. How to Transfer Photos from iPad to iPad via AirDrop
Wirelessly transferring photos between Apple devices is made easier through AirDrop. You can surely go for this method, especially if you want to transfer quickly or on the go.
Steps on How to Transfer Photos from iPad to iPad via AirDrop:
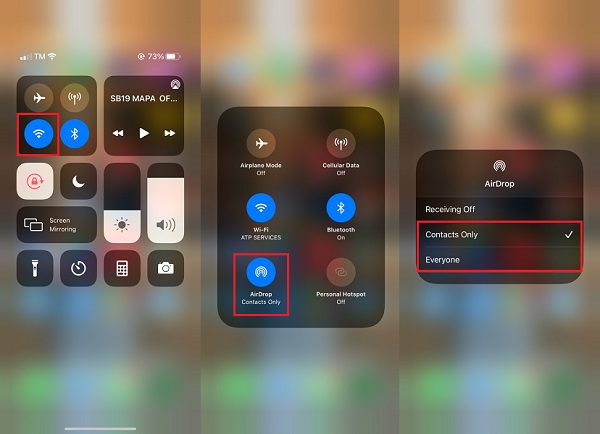
Step 1First, turn on Bluetooth, Wi-Fi, and AirDrop on the Control Center for both iPads. Also, note that the iPads must be close to each other for the transfer duration.
Step 2Second, head to the Photos app on the iPad, where the photos to be transferred are saved. Then, select all the photos you wish to transfer and tap the Share icon at the left-bottom corner of your screen.
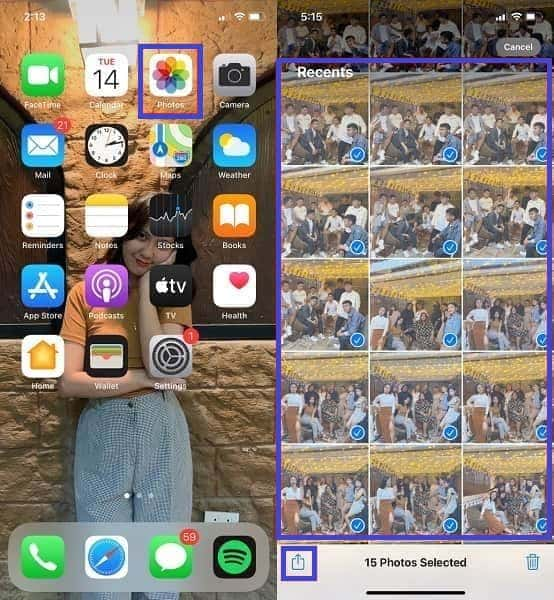
Step 3After that, select AirDrop as the transfer method. Finally, tap the recipient iPad's name. Lastly, tap Accept on the recipient's iPad to transfer the photos.

However, this method might be a little complicated because there are connectivity factors to set up. Moreover, this might take a bit longer if you transfer many pictures. But the worst of all is experiencing interruptions or connections lost between your iPads. These are enough reasons to consider using a different method.
With FoneTrans for iOS, you will enjoy freedom to transfer your data from iPhone to computer. You can not only transfer iPhone text messages to computer, but also photos, videos and contacts can be moved to PC easily.
- Transfer photos, videos, contacts, WhatsApp, and more data with ease.
- Preview data before transferring.
- iPhone, iPad and iPod touch are available.
Part 3. How to Transfer Photos from iPad to iPad via iCloud
If you intend to use the same iCloud account for the two iPads, syncing data between them is an excellent option. Rather than transferring, you can opt to sync your photos automatically instead. If so, iCloud is the candidate.
Steps on How to Transfer Photos from iPad to iPad via iCloud:
Step 1Firstly, go to your Apple ID on the sender iPad’s Settings app. From there, tap iCloud.
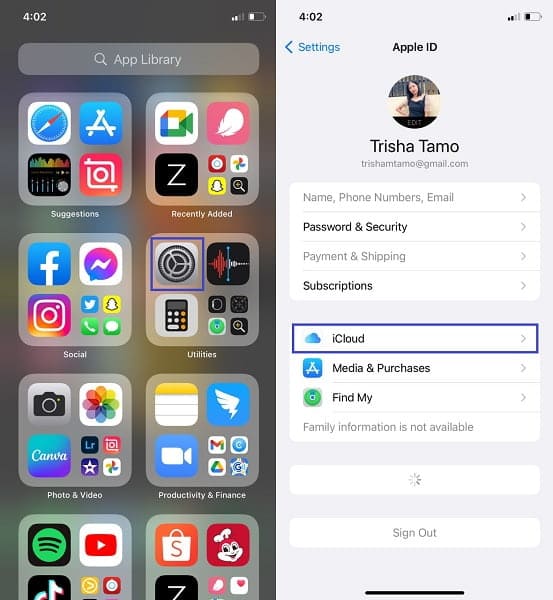
Step 2Secondly, select Photos. After that, enable iCloud Photos.
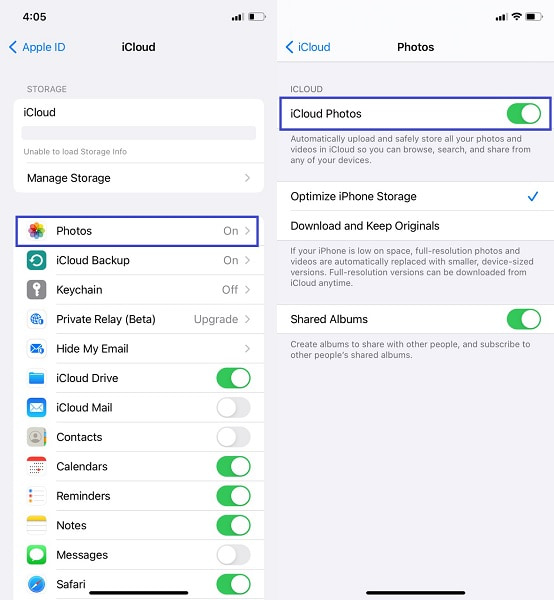
Step 3Thirdly, do the same thing on the destination iPad. Go to Settings, head to iCloud, and enable iCloud Photos.
However, you might not have enough space on your iCloud, preventing your photos from being continually backed up and synced. Don't worry because there is another syncing method for you. Through a computer this time.
Part 4. How to Transfer Photos from iPad to iPad via iTunes/Finder
Finder and iTunes are the most reliable in managing and syncing data between iPads and other Apple devices. Finder and iTunes are Apple's data managers for its devices. Hence, you can certainly use either when you want to sync photos from your current iPad onto your new one.
Steps on How to Transfer Photos from iPad to iPad via iTunes/Finder:
Step 1First, connect the iPad to the photos and run iTunes or Finder. Meanwhile, tap Trust on your iPad to permit access to your computer.
Step 2Now, click your iPad’s name and head to the Photos section. From there, select which photos folder you want to sync, then click Apply. After that, eject that iPad and connect the other one.
Step 3Like what you did with the first iPad, head to the Photos section on iTunes or Finder under your iPad's name. Then select the similar option you set to sync from the first iPad, then click Apply.
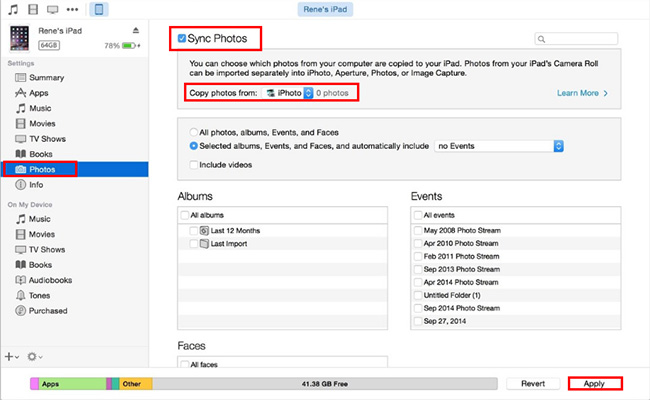
However, some issues include using iTunes or Finder to sync photos between devices. Such issues include duplicate photos and time-consuming, as it is not direct syncing. Thus you sync the photos twice.
Moreover, although it is indeed a great option to sync photos between the two iPads, it’s not always the best option. What if you don't want to sync all photos between the iPads and only need to transfer a few photos? Isn't it a waste of storage to store all the other irrelevant photos, then? Then a direct transfer solution is the best option for you.
Part 5. How to Transfer Photos from iPad to iPad via FoneTrans for iOS
Directly transferring photos is the most efficient way of doing so. Thus, it is best to use a transfer tool to transfer directly from the source device onto the destination device. In addition to that, fast-loading, versatile functionality, and effective technology must also be present. FoneTrans for iOS performs just as mentioned. FoneTrans for iOS is a transfer tool for all iOS and iPadOS devices that is easy-to-use, efficient, effective, and convenient. It supports all image formats and transfers without quality loss.
With FoneTrans for iOS, you will enjoy freedom to transfer your data from iPhone to computer. You can not only transfer iPhone text messages to computer, but also photos, videos and contacts can be moved to PC easily.
- Transfer photos, videos, contacts, WhatsApp, and more data with ease.
- Preview data before transferring.
- iPhone, iPad and iPod touch are available.
Steps on How to Transfer Photos from iPad to iPad via FoneTrans for iOS:
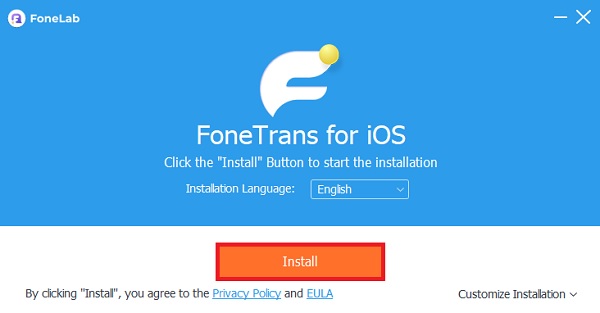
Step 1The first thing to do is download, install and run FoneTrans for iOS on your computer. Note that this program is available for both Mac and Windows, so it will surely meet your needs, whichever computer you use.
Step 2Second, connect the two iPads to your computer altogether using a USB cable. Then click Photos from the left sidebar panel.
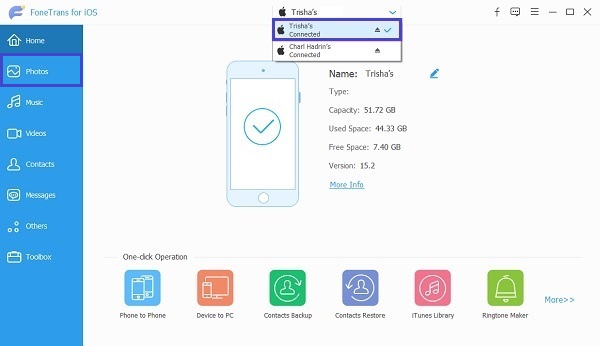
Step 3After that, you can now start selecting and highlighting all the photos that you want to transfer to another iPad. You can selectively transfer your iPad photos or transfer all photos at once using FoneTrans for iOS.

Step 4Lastly, click the Device Export icon, then select the destination iPad.

Part 6. FAQs About How to Transfer Photos to iPad
How long does it take to transfer iPad to iPad via Quick Start?
According to user reviews, the overall process of setting up a new iPad via Quick Start takes approximately 30 to 45 minutes. This process includes over-the-air activation, setting up, and data syncing.
How do you back up your iPad to iCloud?
To back up your iPad to iCloud, you must first head to the Settings app, tap your iPad's name at the top, and select iCloud. After that, tap iCloud Backup, then enable iCloud Backup. This command will allow iCloud to back up your iPad daily every time it is plugged, locked, and has Wi-Fi, or as you set it to do so.
Alternatively, you can also manually back up your iPad to iCloud if you want. To do that, navigate to iCloud settings similar to the first method, but this time, tap Back up Now.
Why are my photos not on iCloud?
TIf your iPad photos are not backing up on iCloud, the first thing you have to check is your iCloud settings. To check if iCloud Photos is enabled on your iPad, head to Settings, go to your Apple ID, tap iCloud, and see if iCloud Photos is indeed on. Along with this, make sure to enable Upload to My Photo Stream.
That concludes this post. You just learned How to transfer photos from the old iPad to the new iPad in 5 different ways. Congratulations, because you have already discovered the best ways to transfer iPad photos depending on your circumstances, needs, and preferences. The solutions above include setting up a new iPad, transferring wirelessly, syncing photos between the iPads, and a direct transfer solution using a transfer tool. Above all, the most recommended solution is using FoneTrans for iOS. FoneTrans for iOS is a reliable transfer tool that ensures a safe and secured procedure on top of being an effective and quick solution.
Again, congratulations on being equipped with the right solutions. You may now transfer your iPad photos and never be stressed about it again.
With FoneTrans for iOS, you will enjoy freedom to transfer your data from iPhone to computer. You can not only transfer iPhone text messages to computer, but also photos, videos and contacts can be moved to PC easily.
- Transfer photos, videos, contacts, WhatsApp, and more data with ease.
- Preview data before transferring.
- iPhone, iPad and iPod touch are available.
