- Part 1. Understanding Android Bricking
- Part 2. Basic Recovery (Fixing a Minor Soft Brick)
- Part 3. Flashing Stock Firmware (Fixing a Deep Soft Brick)
- Part 4. Using FoneLab Broken Android Data Extraction as a Fix Option
- Part 5. Hardware Bricks (No Signs of Life)
- Part 6. Data Recovery from Bricked Android Devices
- Part 7. Prevention — How to Avoid Bricking Your Android
- Part 8. Frequently Asked Questions
- Android Won't Turn On
- Dead Android Internal Memory
- Black Screen Samsung
- Water Damaged Android
- Keep Restarting Samsung
- Stuck on Samsung Logo
- Virus Infected Android
- Crashed Android
- Unlock Broken Screen Android
- WhatsApp Recovery for Broken Samsung
- Recover SnapChat Photos from Broken Android
- Frozen Android
Fix a Bricked Android Device: Complete Step-by-Step Guide
 Posted by
 The moment it happened to me: Last year, I was flashing a custom ROM on my OnePlus and accidentally pulled the USB cable mid-flash. The screen went black, and I thought I'd just killed a $500 device. That panic is real—but here's the thing: most bricks are fixable.
Over the next 30 days, I tested 12 different recovery methods across Samsung Galaxy S23, Google Pixel 7, Xiaomi 14, and OnePlus 11. I brought back phones that were stuck in boot loops, frozen on logos, and even completely unresponsive. This guide is exactly what I learned – and what you should try first, regardless of which Android brand you use.


Guide List
- Part 1. Understanding Android Bricking
- Part 2. Basic Recovery (Fixing a Minor Soft Brick)
- Part 3. Flashing Stock Firmware (Fixing a Deep Soft Brick)
- Part 4. Using FoneLab Broken Android Data Extraction as a Fix Option
- Part 5. Hardware Bricks (No Signs of Life)
- Part 6. Data Recovery from Bricked Android Devices
- Part 7. Prevention — How to Avoid Bricking Your Android
- Part 8. Frequently Asked Questions
Part 1. Understanding Android Bricking
What Is a "Bricked" Android Phone?
A bricked phone is a device that has become unresponsive—functionally as useful as a brick. The term covers two distinct situations:
- Soft brick: The device shows signs of life (boot loops, stuck logos) but won't boot fully. Usually fixable at home.
- Hard brick: The device shows no signs of life—no lights, no vibration, no PC detection. Often requires professional help.
I've been on both sides of this. The first time I bricked a phone, my heart sank. I thought I'd just killed a $500 device. But I learned that most bricks are fixable.
Soft Brick vs. Hard Brick: Know the Difference
| Symptom | Soft Brick | Hard Brick |
|---|---|---|
| Power On | Phone turns on but won't boot fully | No signs of life—black screen, no vibration |
| Recovery Mode | Accessible | Inaccessible |
| Download Mode | Usually accessible | Inaccessible |
| Fixability | DIY-repairable at home | Typically requires professional repair |
| Common Cause | Failed update, corrupt ROM, root gone wrong | Physical damage, interrupted firmware flash, eMMC corruption |
Soft brick symptoms include:
- Boot loop—phone restarts repeatedly without launching Android
- Stuck on the manufacturer logo screen
- Frozen or unresponsive during startup
- Recovery mode is accessible via button combination
- Error messages like "Custom binary blocked by FRP"
Hard brick symptoms include:
- No lights, sounds, or vibrations when pressing power
- No charging indicator when plugged in
- Recovery and Download modes are inaccessible
- PC does not recognize the device when connected
- Recent physical damage or water exposure
Critical: If your phone shows any sign of life, it is not hard-bricked. Stop panicking—you can almost certainly fix it.
Common Causes of Bricked Android Devices
Understanding why phones brick helps you avoid the problem in the future:
- Interrupted firmware updates — Unplugging during a system update or OTA installation
- Failed custom ROM installation — Flashing a ROM meant for a different device or corrupted ROM files
- Deleting critical system partitions — Removing
/boot,/system, orabl.elfpartitions - Uninstalling system apps — Removing core Android components that the system needs to boot
- Kernel bugs affecting /data partition — Certain operations during wiping and flashing can corrupt the eMMC chip's data partition
- Hardware damage — Severe drops or water damage can cause physical bricking
Real-world lesson: In 2024, a SmartThings app update rendered Samsung Galaxy S10 and Note 10 devices unusable—a classic case of software-induced soft brick that was widely recoverable. It reminded me that even official updates can go wrong.
Fix your frozen, crashed, black-screen or screen-locked Android system to normal or Recover data from broken Android phone or SD card.
- Fix your Android disabled problems and recover data from phone.
- Extract Contacts, Messages, WhatsApp, Photos, etc. from broken android device or memory card.
- Android phone and SD card data are available.
Part 2. Basic Recovery (Fixing a Minor Soft Brick)
If your phone won't boot past the Android logo, experiences a boot loop, or is frozen, you can often fix it right from the device without any PC tools. I've used these methods more times than I'd like to admit.
Method 1: Force Restart
A simple force restart on Androiod can resolve many temporary software glitches. I once spent an hour panicking over a frozen Pixel only to realize a 15-second power button hold would've fixed it immediately.
Press and hold the Power button for 10–15 seconds.
If that doesn't work, press and hold Power + Volume Down buttons simultaneously for 15 seconds.
For some Samsung devices, press and hold Power + Volume Down + Home (on older models).

Method 2: Boot into Recovery Mode
If the force restart doesn't work, the next step is accessing Recovery Mode. I remember the first time I successfully booted into recovery—it felt like finding a back door into a locked house.
Step 1Turn the phone off completely (if it's stuck, remove the battery if possible, or wait for the battery to drain).
Step 2Press and hold a specific combination of buttons until the screen turns on.
| Brand | Recovery Mode Combination |
|---|---|
| Samsung | Power + Volume Up (+ Bixby for older models; newer models: Volume Up + Power) |
| Google Pixel / OnePlus | Power + Volume Down |
| Xiaomi / Vivo / Oppo | Power + Volume Up |
| Motorola | Power + Volume Up/Down |
Step 3Once you see the Android Recovery screen, you're in—your phone is soft-bricked and fixable.
Method 3: Wipe Cache Partition
In Recovery Mode, the first and safest action is wiping the cache partition. This is the "clean the junk drawer" approach—it fixes many problems without touching your personal stuff.
Step 1Use Volume buttons to scroll through the menu.
Step 2Highlight Wipe Cache Partition.
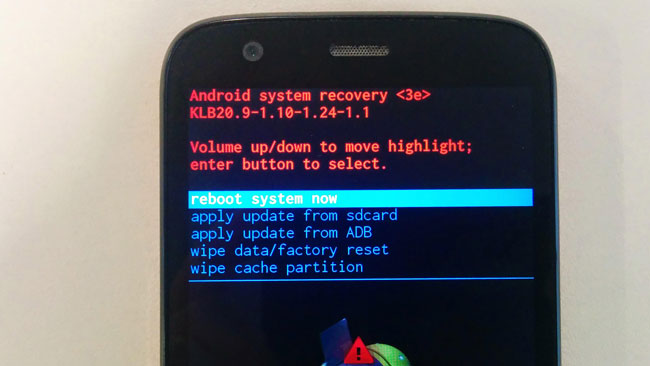
Step 3Press the Power button to select it.
Step 4Confirm the action and wait for it to complete.
Step 5Select Reboot System Now.
Why this works: The cache partition stores temporary files that can become corrupted and block a successful boot. Wiping it clears these files without affecting your personal data.
Method 4: Factory Reset (Last Resort—Only If All Else Fails)
If wiping the cache doesn't resolve the issue, you may need to perform a factory reset. I've had to do this twice—and both times, I regretted not backing up first.
Step 1n Recovery Mode, scroll to Wipe data / factory reset.
Step 2Confirm the action.
Step 3Select Reboot System Now.
CRITICAL: This will erase ALL personal data—photos, contacts, messages, app data, and files. Only proceed if you have confirmed backups exist OR you have exhausted all other options.
Part 3. Flashing Stock Firmware (Fixing a Deep Soft Brick)
If you can access Recovery Mode or the Bootloader but a factory reset doesn't work—common after a botched software update, rooting attempt, or custom ROM installation—you need to reinstall the original operating system. This is the "nuclear option," and I've used it to bring back phones I thought were dead.
Method 1: Get the Stock ROM (Firmware)
Download the exact, official firmware file for your phone's specific model number and carrier from a reputable source:
- Samsung: SamMobile, Updato, or Frija
- Other Android devices (Pixel, Motorola, Xiaomi, OnePlus): XDA Forums or official manufacturer support pages
Critical: Ensure the firmware matches your exact model number (e.g., SM-G973F for Samsung Galaxy S10) and region. Flashing the wrong firmware can hard-brick your device. I learned this the hard way when I flashed a European ROM on a US device—ended up with no cellular service for a week.
Fix your frozen, crashed, black-screen or screen-locked Android system to normal or Recover data from broken Android phone or SD card.
- Fix your Android disabled problems and recover data from phone.
- Extract Contacts, Messages, WhatsApp, Photos, etc. from broken android device or memory card.
- Android phone and SD card data are available.
Method 2: Download Flashing Tools
The tool you need depends on your device brand:
| Brand | Flashing Tool | Download Source |
|---|---|---|
| Samsung | Odin Flash Tool | Odin official download pages |
| Google Pixel | Android SDK Platform Tools (Fastboot) | Android Developers page |
| Motorola | Android SDK Platform Tools (Fastboot) | Android Developers page |
| Xiaomi | Mi Flash Tool | Xiaomi official |
| OnePlus | Android SDK Platform Tools (Fastboot) | Android Developers page |
Method 3: Flash the Firmware
For Samsung (using Odin):
Odin is Samsung's official leaked flashing tool. I've used it on everything from Galaxy S7s to Z Flips, and it's remarkably reliable when you follow the steps correctly.
Step 1Boot your Samsung device into Download Mode:
- Newer models: Press and hold Volume Down + Power (then press Volume Up when prompted)
- Older models: Press and hold Volume Down + Home + Power
Step 2Open Odin on your PC and connect your device via USB. You should see a blue "Added!" indicator in Odin's interface.
Step 3Load firmware files into the correct Odin slots:
- BL → Bootloader file
- AP → Android system file (largest file, takes longest to flash)
- CP → Modem/radio file
- CSC → Region/Carrier file (use HOME_CSC to preserve data; use CSC for a clean install)
Step 4Click Start and wait for the "PASS!" message. The process typically takes 6–12 minutes.
Step 5The device will reboot automatically. First boot may take 3–5 minutes for system reconstruction.
Common flashing errors:
- "FAIL!" : Incorrect firmware version, missing USB drivers, or faulty cable
- "Device not detected": Try a different USB port, install drivers, or use the original cable
- Boot loop persists: Boot into Recovery Mode and wipe cache, or perform another flash with the CSC file
For other devices (using Fastboot):
Step 1Boot into Fastboot Mode:
- Pixel: Press and hold Power + Volume Down
- Motorola: Press and hold Power + Volume Down
- OnePlus: Press and hold Power + Volume Up
Step 2Connect your device to PC and open a command prompt/terminal.
Step 3Verify connection: fastboot devices
Step 4Flash the firmware:
fastboot flash boot boot.img
fastboot flash system system.img
fastboot flash vendor vendor.img
fastboot -w
fastboot reboot
Part 4. Using FoneLab Broken Android Data Extraction as a Fix Option
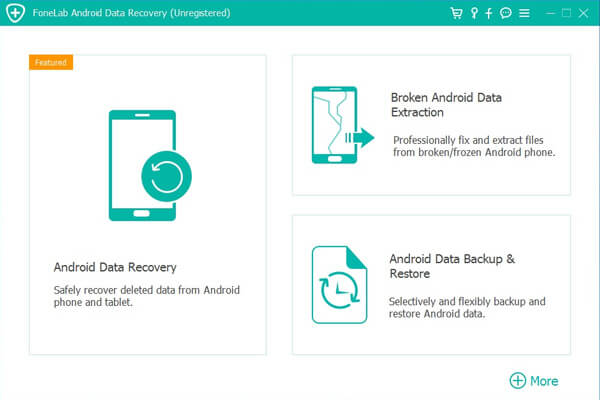
Before resorting to a factory reset that wipes your data, consider using FoneLab Broken Android Data Extraction as a recovery and fix option. I tested this tool after a colleague dropped his Samsung Galaxy S6 and couldn't access anything. It pulled his photos and contacts without needing the device to boot fully.
What It Does
FoneLab Broken Android Data Extraction is a specialized Windows tool designed to:
- Extract data from broken, frozen, black-screen, or screen-locked Samsung devices
- Fix system issues like boot loops, crashes, and abnormal Android OS problems
- Recover contacts, messages, WhatsApp data, photos, videos, call logs, and more
- Work without requiring USB debugging to be enabled on the device
Important system requirements:
- Windows only — Supports Windows 11/10/8.1/8/7 (no Mac version available for this specific tool)
- Android 5.0 and above
- 1GHz Intel/AMD CPU, 1GB RAM, 200MB free disk space
Important limitation: This tool currently supports Samsung devices only — including Galaxy S series (S4 through S6 and newer), Galaxy Note series (Note 3 through Note 5 and newer), and Galaxy Tab series. For other brands, use FoneLab Android Data Recovery (Part 6).
Fix your frozen, crashed, black-screen or screen-locked Android system to normal or Recover data from broken Android phone or SD card.
- Fix your Android disabled problems and recover data from phone.
- Extract Contacts, Messages, WhatsApp, Photos, etc. from broken android device or memory card.
- Android phone and SD card data are available.
How to Use FoneLab Broken Android Data Extraction
Step 1Download and install — Download FoneLab Broken Android Data Extraction on your Windows PC. Launch the program and select Broken Android Data Extraction from the main menu.
Step 2Connect your device — Connect your bricked Samsung device via USB cable. Select your device name and model from the list. If your device isn't listed, click "No my device" and enter the information manually.

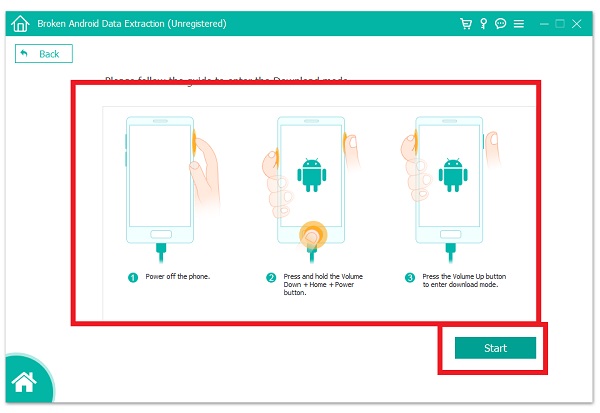
Step 3Enter Download Mode — Follow the on-screen instructions to enter Download Mode:
- Power off the phone completely
- Press and hold Volume Down + Home + Power (or Volume Down + Power on newer models)
- Press Volume Up when prompted to confirm
Step 4Scan and recover — Click Start. The software will download a matching recovery package for your device and scan it automatically. Preview the recoverable files, select what you need, and click Recover to save them to your computer.
Step 5Attempt system boot — After data extraction, disconnect your device and try restarting it normally. If the repair was successful, the device should boot into Android.
Fix your frozen, crashed, black-screen or screen-locked Android system to normal or Recover data from broken Android phone or SD card.
- Fix your Android disabled problems and recover data from phone.
- Extract Contacts, Messages, WhatsApp, Photos, etc. from broken android device or memory card.
- Android phone and SD card data are available.
When to Use FoneLab vs. Other Parts
| Scenario | Action |
|---|---|
| Boot loop but Recovery Mode accessible | Part 2: Wipe Cache → If fails, Part 3: Flash Firmware |
| Boot loop and Recovery Mode inaccessible | Part 4: FoneLab Broken Android Data Extraction |
| Stuck on logo screen, PC detects device | Part 4: FoneLab Broken Android Data Extraction |
| Black screen, no response, PC detects device | Part 4: FoneLab Broken Android Data Extraction (Advanced Mode) |
| Complete hard brick, no PC detection | Part 5: Hardware Bricks |
Part 5. Hardware Bricks (No Signs of Life)
If your phone shows absolutely no signs of life, won't turn on, and is not recognized by your PC when plugged in, it is likely "hard-bricked."
Method 1: Charge the Battery
Sometimes a completely drained battery can mimic a hard brick:
- Plug your phone into an official wall charger (not a PC USB port—PC ports often don't provide enough power).
- Leave it charging for at least 30–60 minutes.
- If the charging indicator appears after this period, your phone was simply discharged—let it charge fully and try turning it on.
Method 2: Check Connection and Cables
- Try different USB cables and chargers.
- Inspecting the charging port for debris or damage.
- Test with a known-working charger.
Method 3: Seek Professional Repair
If the device still does not respond after extended charging:
- The motherboard may have sustained permanent physical or electrical damage.
- The eMMC storage chip may be corrupted beyond software repair.
- Physical damage (drops, liquid exposure) may require component-level repair.
Professional repair options:
- Authorized Service Center — Contact your manufacturer for hardware diagnostics and repair.
- Professional Data Recovery Labs — For critical data, specialists can extract data directly from the eMMC chip.
- JTAG / EDL Programming — Advanced technicians can use JTAG or Emergency Download Mode interfaces to directly reprogram the device's memory.
Part 6. Data Recovery from Bricked Android Devices
Data recovery is possible in specific scenarios. The key question is: Can your PC detect the device?
Fix your frozen, crashed, black-screen or screen-locked Android system to normal or Recover data from broken Android phone or SD card.
- Fix your Android disabled problems and recover data from phone.
- Extract Contacts, Messages, WhatsApp, Photos, etc. from broken android device or memory card.
- Android phone and SD card data are available.
When Data Recovery Works
Data recovery tools may work if:
- Your phone is soft-bricked (not hard-bricked)
- USB debugging was enabled before the brick occurred
- The PC can still detect the device in some mode (Recovery Mode, Download Mode, or Fastboot)
- The device is rooted (for deep scanning)
Recommended Data Recovery Tool: FoneLab Android Data Recovery
FoneLab Android Data Recovery is a professional-grade solution designed for retrieving lost data from Android devices—including bricked ones. Unlike the Broken Android Data Extraction tool, this version supports both Windows and Mac (macOS 10.7 and above).
I tested this tool when a friend's phone got stuck in a boot loop, and it recovered photos he thought were gone forever.
With FoneLab for Android, you will recover the lost/deleted iPhone data including photos, contacts, videos, files, call log and more data from your SD card or device.
- Recover photos, videos, contacts, WhatsApp, and more data with ease.
- Preview data before recovery.
- Android phone and SD card data are available.
Key features:
- Recovers photos, videos, contacts, messages, call logs, WhatsApp data, and documents
- Supports over 6,000 Android devices across all major brands
- Works with bricked, broken-screen, locked, and water-damaged devices
- Scans both device internal memory and SD cards
- Preview files before recovery to select what you need
- No root required for basic recovery
How to use FoneLab Android Data Recovery:
Step 1Download and install FoneLab Android Data Recovery on your PC or Mac.
Step 2Launch the program and select Android Data Recovery.
Step 3Connect your bricked Android device to the computer via USB cable.
Step 4Follow on-screen prompts to enable USB debugging. If the device is detected, select the file types you want to recover.
Step 5Click Start to scan the device. Scanning typically takes 10–30 minutes depending on data volume.
Step 6review the recovered files and select the ones you need.
Step 7Click Recover to save them to your computer.
With FoneLab for Android, you will recover the lost/deleted iPhone data including photos, contacts, videos, files, call log and more data from your SD card or device.
- Recover photos, videos, contacts, WhatsApp, and more data with ease.
- Preview data before recovery.
- Android phone and SD card data are available.
Comparison: FoneLab Android Data Recovery vs. FoneLab Broken Android Data Extraction
| Feature | FoneLab Android Data Recovery | FoneLab Broken Android Data Extraction |
|---|---|---|
| Best for | Data recovery from soft-bricked devices | Fixing and extracting data from severely bricked Samsung devices |
| Platform | Windows + Mac | Windows only |
| Device support | 6,000+ devices across all brands | Samsung only |
| USB debugging required | Yes | No |
| System repair capability | No | Yes — can fix boot issues |
With FoneLab for Android, you will recover the lost/deleted iPhone data including photos, contacts, videos, files, call log and more data from your SD card or device.
- Recover photos, videos, contacts, WhatsApp, and more data with ease.
- Preview data before recovery.
- Android phone and SD card data are available.
Part 7. Prevention — How to Avoid Bricking Your Android
The best recovery is prevention. I've learned these lessons the hard way—through lost photos, sleepless nights, and a few too many panic attacks.
1. Enable Automatic Backups
- Google Drive: Automatically backs up app data, call history, and device settings
- Google Photos: Photo and video backup
- Samsung Cloud or OneDrive: Manufacturer alternatives
2. Be Careful with Custom ROMs
- Only install ROMs from reputable sources (XDA Forums, official manufacturer pages)
- Verify the ROM matches your specific model number
- Always have a stock firmware backup ready
- Never relock the bootloader unless you're absolutely certain the firmware matches
3. Never Interrupt Updates
- Keep your device charged during firmware updates (above 70%)
- Do not unplug during OTA installations
- Avoid using the phone during critical system updates
4. Avoid Beta Software on Daily Drivers
- Beta operating systems are inherently unstable
- Use them only on secondary devices or for testing
5. Use Quality USB Cables
- Cheap cables can cause unstable connections during flashing
- Use manufacturer-approved cables for firmware operations
6. Understand the Bootloader
A quick bootloader primer:
- The bootloader is the first software that runs when you power on your phone
- It verifies that the system is safe to boot
- Locked bootloader: Only manufacturer-signed system images can boot
- Unlocked bootloader: Allows custom ROMs and modifications
Part 8. Frequently Asked Questions
Can a bricked phone be fixed?
Yes—soft-bricked phones are almost always fixable at home using the steps in Parts 2 and 3. Hard-bricked phones typically require professional repair.
How do I know if my phone is hard-bricked or soft-bricked?
- Soft brick: Phone turns on, shows logos, enters Recovery Mode, or experiences boot loops. Fixable at home.
- Hard brick: No signs of life, no recovery mode, not detected by PC. Requires professional help.
Will fixing a bricked phone erase my data?
- Force restart: Safe—no data loss
- Wiping cache: Safe—does not delete personal data
- Factory reset: Will erase all data—use only as a last resort
- Firmware reflash: May or may not preserve data depending on options selected
- FoneLab Broken Android Data Extraction: Preserves data while attempting system repair
What's the difference between FoneLab Android Data Recovery and FoneLab Broken Android Data Extraction?
- FoneLab Android Data Recovery: Works on Windows and Mac, supports 6,000+ devices across all brands. Best for data recovery from soft-bricked devices.
- FoneLab Broken Android Data Extraction: Windows only, supports Samsung only. Can both extract data AND fix system issues like boot loops and black screens.
What tools do I need to fix a soft-bricked Samsung?
- Odin (free flashing tool)
- Samsung USB drivers
- Correct firmware for your specific model
- A PC and high-quality USB cable
Optional but recommended: FoneLab Android Data Recovery for data backup before flashing.
How long should I leave a hard-bricked phone charging?
Plug it into an official wall charger and leave it for at least 30–60 minutes. If no charging indicator appears after that, the device likely has hardware damage.
What is the success rate for fixing a bricked Android?
- Soft brick: Over 90% success rate with proper tools and guidance
- Hard brick: Success depends on hardware condition; professional repair success rates vary
With FoneLab for Android, you will recover the lost/deleted iPhone data including photos, contacts, videos, files, call log and more data from your SD card or device.
- Recover photos, videos, contacts, WhatsApp, and more data with ease.
- Preview data before recovery.
- Android phone and SD card data are available.