Top 4 Methods to Back up an iPhone Effectively and Quickly
 Posted by Boey Wong / Oct 29, 2021 09:00
 Are you an iPhone user? Are you fond of taking pictures and videos? Perhaps you like downloading a variety of apps or games? Do you have important files on your iPhone that you cannot risk losing? Whatever you might have saved on your iPhone, it is important to backup all your data. Backing up an iPhone is an important process all users must do to protect data from unintentional loss or unexpected data corruption. Data backup is the process of creating and storing a copy of all data from an iPhone or any device somewhere safe. Learn how to backup an iPhone with and without USB efficiently.

Guide List
FoneLab enables you to backup and restore iPhone/iPad/iPod without data loss.
- Backup and restore iOS data to your PC/Mac easily.
- Preview data in detail before you restore data from backups.
- Backup and restore iPhone, iPad and iPod touch data Selectively.
1. How to Back up iPhone to iCloud
As an iPhone user, you certainly have access to iCloud. Fortunately, Apple offers iCloud. Wherein you can access all your photos, videos, documents, notes, contacts, accounts, settings, and more iPhone data through iCloud. Note that iCloud backs up iPhone data automatically daily depending on your settings and as long as it has enough memory space.
Steps to back up iPhone to iCloud:
Step 1Firstly, open Settings on your iPhone and go to your Apple ID. Note that you must connect to Wi-Fi.
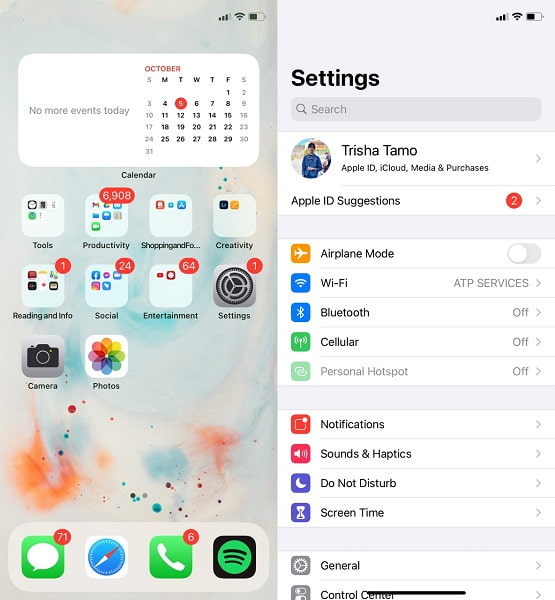
Step 2Secondly, go to iCloud then browse the list and select iCloud Backup.
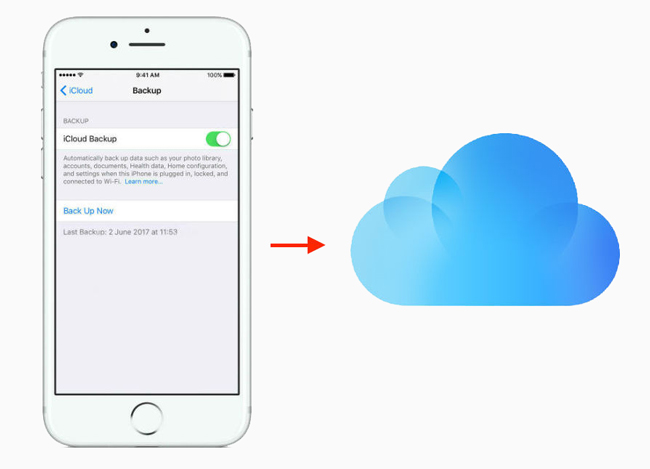
Step 3Lastly, enable iCloud Backup and tap Back Up Now.
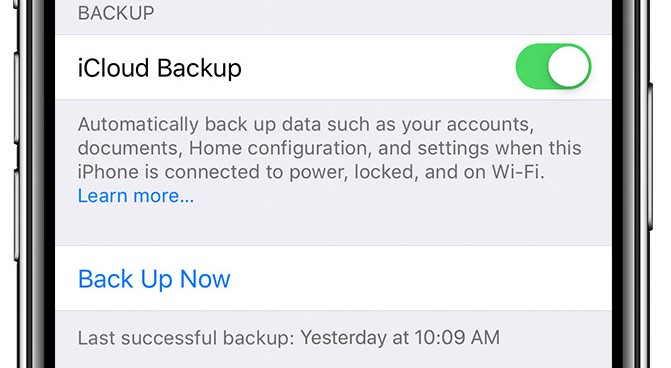
If you have data larger than the free storage 5GB, you should upgrade your iCloud space or figure out other solutions instead.
FoneLab enables you to backup and restore iPhone/iPad/iPod without data loss.
- Backup and restore iOS data to your PC/Mac easily.
- Preview data in detail before you restore data from backups.
- Backup and restore iPhone, iPad and iPod touch data Selectively.
2. How to Back up iPhone on Windows with iTunes
When connected to the computer, iTunes backs up data from your iPhone automatically. What's great is that iTunes can back up settings, contacts, call logs, photos, messages, and other data saved on your iPhone and you can restore any backed up data anytime. As you might know, iTunes is available on both Windows and Mac. However, you need to access Finder instead as iTunes is unavailable on macOS Catalina and later versions.
Steps to back up iPhone to iTunes:
Step 1Firstly, open iTunes/Finder on your computer and connect your iPhone to your computer using a USB cable.

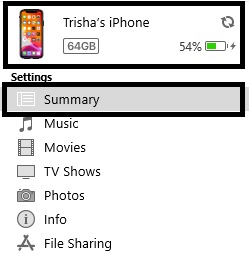
Step 2Secondly, on your computer’s iTunes or Finder interface, click the iPhone icon near the top of the iTunes window. Subsequently, click Summary.
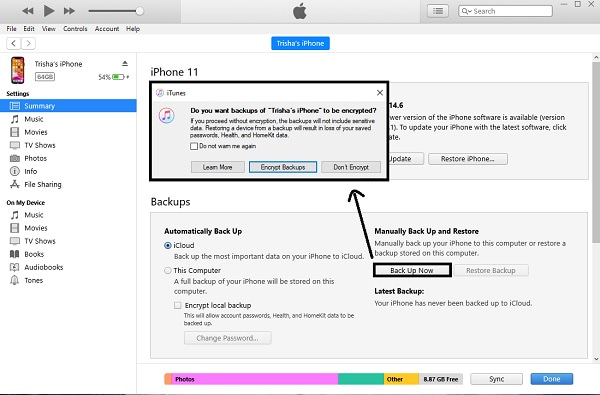
Step 3Lastly, click Back Up Now. You can also click Encrypt Backup to protect your backups with a password.
3. How to Back up iPhone on Mac with Finder
Steps to back up iPhone to Mac Finder:
Step 1To begin, connect your iPhone to your Mac. Select iPhone from the Finder sidebar after that. It's significant to mention that MacOS 10.15 or later is required for this to work.
Step 2Second, go to the top of the Finder window and select General. Select Back up all the data on your iPhone to this Mac from the drop-down menu. By selecting Encrypt local backup, you can encrypt your backup data.
Step 3Finally, select Backup Now.
FoneLab enables you to backup and restore iPhone/iPad/iPod without data loss.
- Backup and restore iOS data to your PC/Mac easily.
- Preview data in detail before you restore data from backups.
- Backup and restore iPhone, iPad and iPod touch data Selectively.
4. How to Back up iPhone to Google Drive
Google Drive is among the most popular and widely-used cloud services to store and backup data. You certainly can backup iPhone to Google Drive as it supports iOS and is readily available and downloadable. Through Google Drive, you may now store and share any data from one device to another conveniently and safely.
Steps to back up iPhone to Google Drive:
Step 1First of all, install and run Google Drive on your iPhone. Make sure you are connected to Wi-Fi or have mobile internet data throughout the process.
Step 2Secondly, tap the Menu at the upper-right corner. Subsequently, go to Settings.
Step 3Lastly, select Backup then tap Start backup.
5. How to Selectively Back up iPhone with FoneLab for iOS
FoneLab for iOS - Data Backup & Restore is a great tool that features backup iPhone photos, contacts, videos, and more, which by itself is helpful and advantageous for all users. What's great about this tool is that you have the courtesy to backup and restore data selectively or all data at once.
FoneLab enables you to backup and restore iPhone/iPad/iPod without data loss.
- Backup and restore iOS data to your PC/Mac easily.
- Preview data in detail before you restore data from backups.
- Backup and restore iPhone, iPad and iPod touch data Selectively.
Steps to back up iPhone with FoneLab for iOS - Data Backup & Restore:
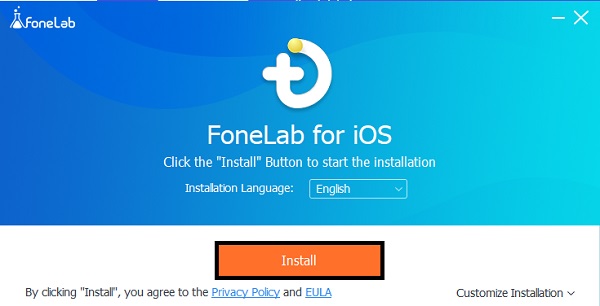
Step 1Firstly, install and open FoneLab for iOS on your computer. At the same time, connect your iPhone to the computer with a USB cable, tap Trust on the pop-up notification that will appear on your iPhone. The program will automatically recognize your iPhone once connected successfully.
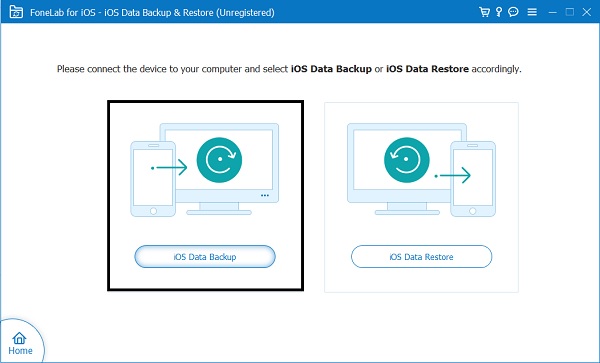
Step 2Secondly, choose iOS Data Backup & Restore from the interface of the program. Subsequently, choose iOS Data Backup among the two options available.
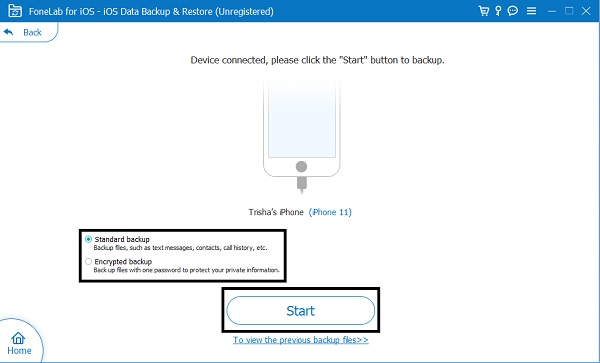
Step 3Thirdly, choose Encrypted backup to protect your backed-up files with a password. You may also just choose Standard backup. After that click Start.
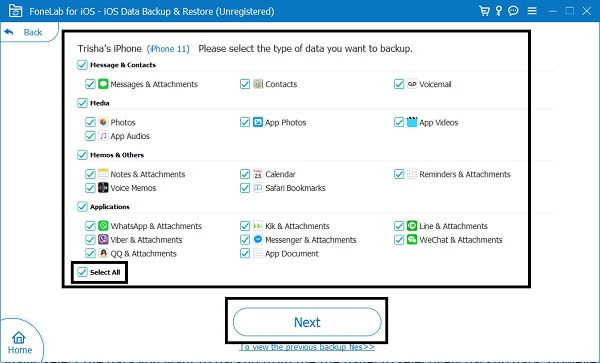
Step 4Finally, select the data you want to backup from the panel to selectively backup data. However, if you want to backup all data on your iPhone just tick the Select All option on the bottom-left.
Step 5Lastly, set the backup location then click Backup to start the backup process.

6. FAQs about How to Back up iPhone
Does iPhone backup encrypted with passwords?
By default, backed-up files are not protected by a password. However some tools like FoneLab for iOS - Data Backup & Restore and iTunes give you the option to encrypt backup files and protect them with a password. On the other hand, iCloud automatically encrypts your backup data.
How Long Does it Take to Back up an iPhone?
Duration of Backing up an iPhone varies with different methods depending on the sizes and numbers of iPhone data you plan to backup. Normally backing up an iPhone takes up approximately 30 minutes to 2 hours. There are also other factors to consider by the time you backup your iPhone. Here are the determining factors for the duration of Back up:
- Size and number of data to be backed up.
- Internet speed by the time you backup your iPhone.
- Condition of your iPhone.
- Current Operating System you use.
Why do iPhones take so long to transfer?
If it takes so long to complete, you are probably backing up large-sized data or too much data at once. The duration of the backup process depends on various factors, but the major determiner is the size and number of the data you back up.
Can you stop an iPhone backup in progress?
You certainly can stop or cancel a backup process. Note that you can do this accordingly and depend on your circumstances. Rest assured your iPhone data is safe, as you are just creating a copy.
The whole backup process is not complicated at all. Rest assured it is easy and convenient, as long as you have the right tools and solutions. Learn how to backup iPhone to Google Drive, iCloud, iTunes, and last but definitely last the least with FoneLab for iOS. Moreover, FoneLab for iOS - Data Backup & Restore is the most recommended tool to use because of its versatility and user-friendly features.
FoneLab enables you to backup and restore iPhone/iPad/iPod without data loss.
- Backup and restore iOS data to your PC/Mac easily.
- Preview data in detail before you restore data from backups.
- Backup and restore iPhone, iPad and iPod touch data Selectively.
