Proper Techniques on How to Stop Screen Record on Mac
 Posted by Lisa Ou / Nov 03, 2023 16:00
Greetings! I plan to record a tutorial on my Mac screen later, and the good thing is I already know how to start. However, I didn't start the recording yet since I don't know how to stop it. I'm worried it will take too much of my storage if I begin, but I can't end. Thus, I hope anyone will give me the details first on how to stop recording on Mac. Please help. Thanks a lot!
Most devices now have a built-in recording feature, whether on a mobile device or a computer like a Mac. Hence, it has become one of the painless processes since it's already a default function. However, you may not be knowledgeable enough if you don't often take screen recordings or if it's your first time doing so. No matter how often you use the Mac, you won't be familiar with its features if you don't explore them.
That said, it's understandable if you're unaware of how to stop the recording on your Mac. Luckily for you, this post will tackle the proper navigation for ending your screen record on different recording features of a Mac. As a bonus, a specialized program will also be ahead.


Guide List
Part 1. How to Stop Screen Recording on Mac
As we explored and learned about screen recorders for macOS, we stumbled upon its 2 default recording features: Screenshot Bar and QuickTime. Thus, we took time testing them, and as a result, the necessary details and procedures for each recorder are now below. Learn them with us and ensure you’ll be attentive to achieve an enjoyable recording process.
Option 1. Screenshot Bar
The screenshot bar is a floating toolbar on your Mac screen containing features for taking a screenshot and screen recording. It is one of the official functions to screen record on Mac, and it is built-in, so it doesn’t require a download or installation before you can utilize it. For the toolbar to materialize on your desktop, you only have to press the appointed keyboard shortcut, and you’ll be free to record your Mac screen.
Meanwhile, we have prepared the completed guidelines for using the screenshot bar, including the process to start and stop the recording. This way, you will understand the procedure better and not get lost searching for the stop button to end the recording.
Heed to the painless instructions underneath to grasp how to stop a screen recording on Mac with the screenshot bar:
Step 1Since you already know the process to start a recording, you must have hit Command + Shift + 5 on your Mac keyboard to display the screenshot toolbar on the screen. Afterward, there is the 5th or 6th icon on the bar to start the recording.
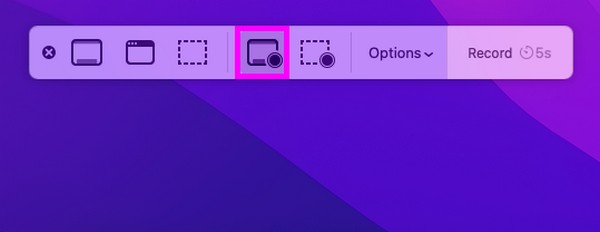
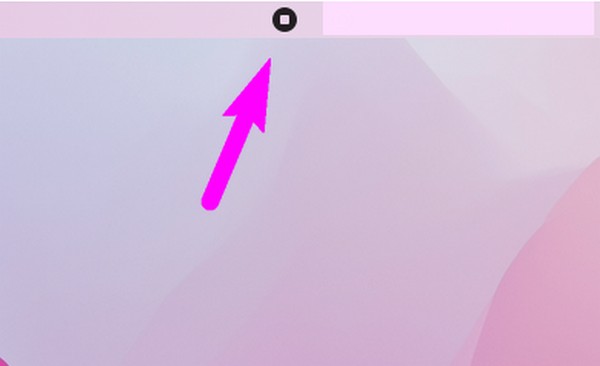
Step 2Once the recording has started, wait for the activities you are capturing to finish. Then, hit the stop icon at the top center of your Mac desktop to stop the screen recording. Your video will then automatically be saved on your files.
FoneLab Screen Recorder allows you to capture video, audio, online tutorial, etc on Windows/Mac, and you can easily customize size, edit the video or audio, and more.
- Record video, audio, webcam and take screenshots on Windows/Mac.
- Preview data before saving.
- It is safe and easy to use.
Option 2. QuickTime
Like the preceding option, QuickTime is an official recording method on Mac. It is an app primarily for playing various digital media formats. But thanks to its flexibility, it also allows other functions, including screen recording. Hence, you can take advantage of this app’s features to record the activity you’d like to capture on your Mac screen.
However, you may find QuickTime more complex than the previous recording method. If it’s not yet ready for use, you must install codecs and set it up first so that you can utilize it. Besides, it’s now a discontinued app, so it’s no longer as advanced as the other recorders.
Mind the manageable directions below to determine how to stop QuickTime screen recording on Mac:
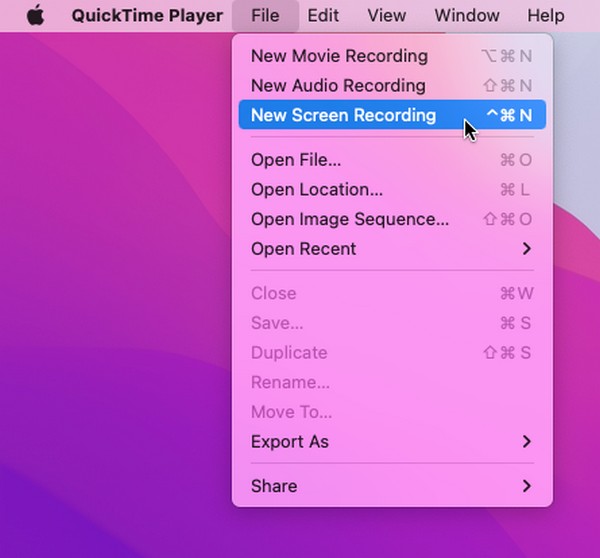
Step 1Locate the QuickTime player manually on the Launchpad page or use your Mac spotlight search. Once found, click the app to open, then click the File button beside the Quicktime Player tab to see the shortcut menu. Next, select New Screen Recording.
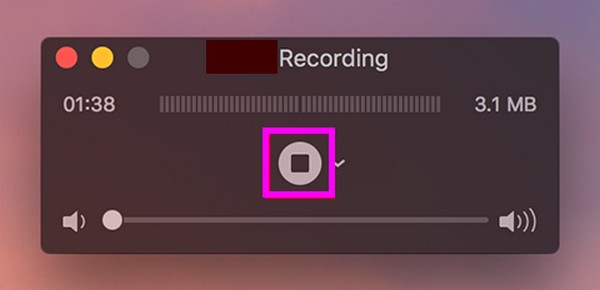
Step 2When the screen recording window emerges, hit the record icon in the middle to begin capturing your screen. Once you’re satisfied with your recorded activities, choose the stop symbol in the menu bar to end the recording and save the video on your Mac.
Part 2. How to Record Screen with Mac FoneLab Screen Recorder
On the other hand, we gladly introduce the Fonelab Screen Recorder if you’d like to try a professional recording method. It is a third-party tool that can be easily downloaded online and offers numerous functions. With this recorder, you can record your Mac screen in high quality and sat in many available formats. It also allows you to customize the recording size to record only the portion of the screen you wish to capture without the unwanted parts.
Moreover, Mac FoneLab Screen Recorder provides advantageous editing functions, allowing you to improve your screen recording. When you finish handling the video you have recorded, explore its other capabilities, like the window recorder, audio recorder, and more. It offers multiple recording features that are helpful in different situations.
FoneLab Screen Recorder allows you to capture video, audio, online tutorial, etc on Windows/Mac, and you can easily customize size, edit the video or audio, and more.
- Record video, audio, webcam and take screenshots on Windows/Mac.
- Preview data before saving.
- It is safe and easy to use.
Take the effortless procedure underneath as a pattern for screen recording on Mac using Fonelab Screen Recorder:
Step 1Use the Free Download tab on the Mac FoneLab Screen Recorder site to obtain its installer on your Mac. When saved, proceed to your Downloads to open the file and transfer its icon to the Applications folder. After that, launch the recording program and manage the permissions with the administrator requirements when prompted to run it.
Step 2You will be welcomed with the tool’s recording features once you reach its primary interface. You can freely try them all, but for now, choose the Video Recorder box on the leftmost side to view the screen recording features. Modify the options according to your screen recording preferences, and when done, hit the REC button on the right interface.

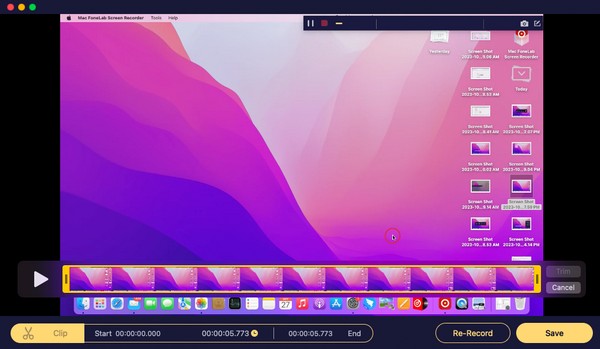
Step 3The tool will begin capturing your Mac screen, so perform the activities you’d like to record until it’s completed. Finally, select the stop icon on the bar to end the recording process. An interface previewing your video will then appear with a few editing options. Manage them accordingly and click the Save icon afterward to save the screen record.
FoneLab Screen Recorder allows you to capture video, audio, online tutorial, etc on Windows/Mac, and you can easily customize size, edit the video or audio, and more.
- Record video, audio, webcam and take screenshots on Windows/Mac.
- Preview data before saving.
- It is safe and easy to use.
Part 3. FAQs about How to Stop Screen Recording on Mac
1. Why won't the screen recording stop on my Mac?
Your Mac may have been frozen while recording your screen, preventing you from seeing the stop button. When this happens, use the keyboard shortcut Cmd + Ctrl + Esc to force the process to quit. Then, try running the screen recording again to see if it functions well.
2. Is there a time limit for screen recording on Mac?
It depends on the recording method you use. But don't worry; most screen recorders on Mac, especially the ones we suggested above, don't set a time limit. They will let you keep recording the screen if you have storage available. But once you run out, the recording will automatically stop because of insufficient space.
The information and guidelines in this article are all you need to stop the screen recording on your Mac. Hence, check and trust them to attain your desired outcome.
FoneLab Screen Recorder allows you to capture video, audio, online tutorial, etc on Windows/Mac, and you can easily customize size, edit the video or audio, and more.
- Record video, audio, webcam and take screenshots on Windows/Mac.
- Preview data before saving.
- It is safe and easy to use.
