- Part 1. Transfer Music from iPad to Computer with Airdrop
- Part 2. Copy Music from iPad to Computer with iTunes
- Part 3. Transferring Music from iPad to Mac with Apple Music
- Part 4. Transfer Music from iPad to PC via USB Cable
- Part 5. Best Way to Transfer Songs from iPad to Computer with FoneTrans for iOS
- Part 6. FAQs About Transfer Music from iPad to PC
Transferring Music from iPad to Computer: 5 Best Practical Techniques
 Posted by Lisa Ou / March 21, 2022 09:00
 Listening to songs on mobile devices anywhere has been a part of everybody's daily life. People feel good when hearing music. That is why they store songs on their devices, like the iPad. But they also want to transfer them to the computer because the iPad's storage is running out of storage, or they just want a backup of their favorite songs, and others simply want to play their music on computers, etc. If you have the same situation like this, good thing that you are here. With practical and reliable methods, learn how to transfer songs from iPad to computer.


Guide List
- Part 1. Transfer Music from iPad to Computer with Airdrop
- Part 2. Copy Music from iPad to Computer with iTunes
- Part 3. Transferring Music from iPad to Mac with Apple Music
- Part 4. Transfer Music from iPad to PC via USB Cable
- Part 5. Best Way to Transfer Songs from iPad to Computer with FoneTrans for iOS
- Part 6. FAQs About Transfer Music from iPad to PC
Part 1. Transfer Music from iPad to Computer with Airdrop
Airdrop is a feature that allows users to share files between Apple devices. And so, if you are a Mac computer user, you can transfer music from your iPad using Airdrop. It is the simplest and easiest way of sending your files to a computer to backup or save them. Here’s how you can use Airdrop to send your songs.
Steps on How to Transfer Music from iPad to Computer with Airdrop:
Step 1First off, open the Airdrop feature on your Mac computer. To do it, click Go on the menu tab, then select System Preferences from the drop-down list.
Step 2Next, choose a song from your iPad device. Then, tap the Share icon and the Airdrop option.
Step 3Afterward, you’ll see all the list of where you can send or the opened Airdrop. Simply select Mac’s name as the recipient.
Step 4Finally, click the Receive option once a message prompt is on your Mac. And that’s it!
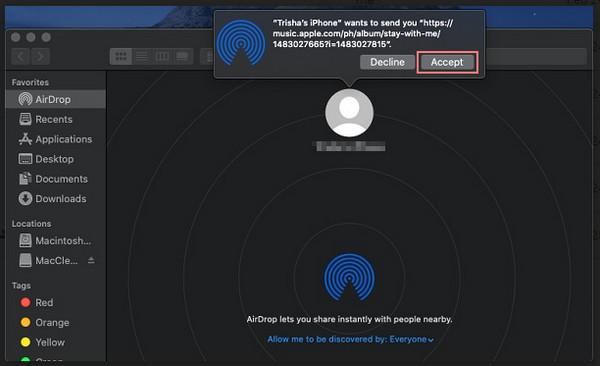
One of the simplest and easiest ways indeed to share files from your iPad to Mac or between Apple devices as you won’t be required to download or install other tools. Yet, if you prefer using iTunes, you can move to the next part.
Part 2. Copy Music from iPad to Computer with iTunes
iTunes is popularly known that it can act as a media player. With it, you can purchase songs and manage them at the same time. Not just that, you can copy your purchased music or transfer songs from iPad to Mac or Windows PC. Also, you can restore and backup your iOS devices through it and sync data from your iPad to your computer. Now, let’s learn how to transfer music from iPad to PC.
Steps on How to Copy Music from iPad to Computer with iTunes:
Step 1Firstly, download and install iTunes on your computer if you haven't installed it. And run the latest version of it.
Step 2Next, connect your iPad device to the computer using a USB cable. The app will automatically detect your device.
Step 3After that, click the Device icon on the toolbar. Next, click the Summary.
Step 4On the Summary tab, click the Back Up Now button-finally, all the data from your iPad, including the songs.
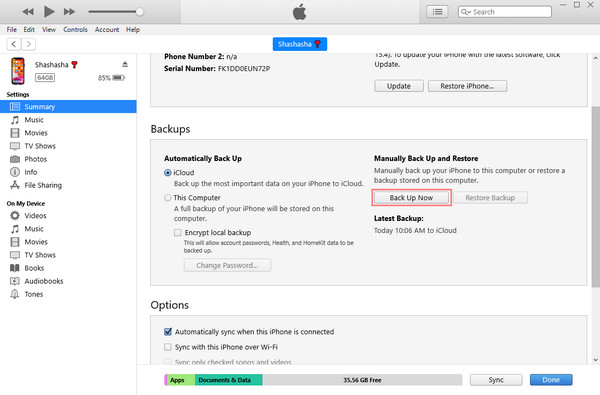
You can use iTunes for your Windows PC, but you should use Apple Music if you are a Mac user with later macOS versions as iTunes has been replaced already.
With FoneTrans for iOS, you will enjoy freedom to transfer your data from iPhone to computer. You can not only transfer iPhone text messages to computer, but also photos, videos and contacts can be moved to PC easily.
- Transfer photos, videos, contacts, WhatsApp, and more data with ease.
- Preview data before transferring.
- iPhone, iPad and iPod touch are available.
Part 3. Transferring Music from iPad to Mac with Apple Music
Have you subscribed to the Apple Music plan? If so, you don’t need to transfer your music manually. Using the same Apple ID account, your iPad songs will be synced on your Mac computer after you enabled the auto sync feature. If you have not did it before, you can follow steps below.
Steps on How to Transfer Music from iPad to Mac with Apple Music:
Step 1First, you need to turn on the iCloud Music Library or the Sync Library feature. To do it, go to Settings > Music > Sync Library on iPad. Now, transfer or sync your music from iPad to Mac.
Step 2Then, open the Apple Music on your Mac. And sign in to the same Apple ID account you used to purchase or subscribe to Apple Music on your iPad.
Step 3After which, turn on the iCloud Music Library by going to Preferences and toggle on the iCloud Music Library.
Step 4Lastly, click the Ok button. And all your songs were synced on the Apple Music app on your Mac.
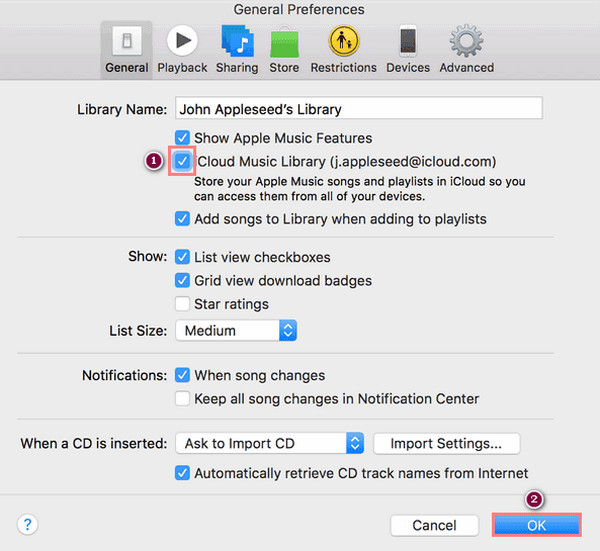
With Apple Music, you can definitely sync whatever you saved from your iPad to your computer using the same Apple ID. But, note that it is only limited to what has been saved to Apple Music. Outside it, you cannot sync them.
Part 4. Transfer Music from iPad to PC via USB Cable
If you are looking for an online tool that you can use to transfer your files from iPad to PC, you can use Dropbox, which is an online cloud storage that enables users to sync and backup files throughout different devices. Whatever you store in it, you can access them on any devices you are using with the right account. If you want to view your music from your iPad to your computer, try using Dropbox. Here’s how you can use it.
Steps on How to Transfer Music from iPad to PC via Online Tool:
Step 1First of all, on your iPad search browser, type and go to Dropbox official site.
Step 2Then, you can Sign up for free to utilize this online tool.
Step 3After signing up, you can now tap the Upload button and choose the music you want to import.
Step 4Finally, search for Dropbox on your computer’s browser and sign in for the same account. And you will be able to see the uploaded music file. You can save it on your computer if you want.
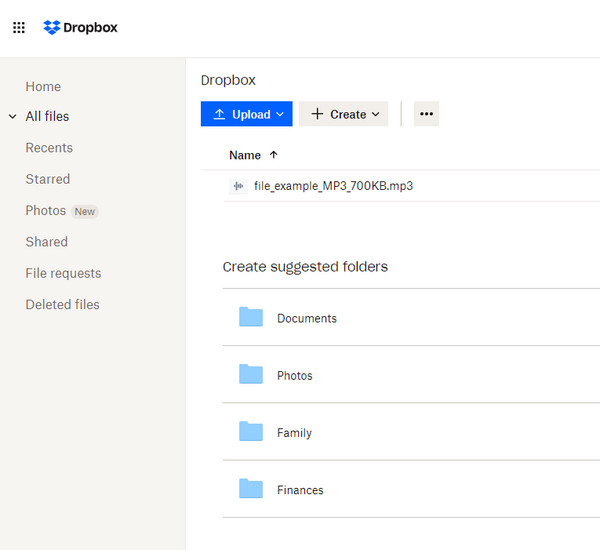
The only disadvantage of using Dropbox is what it offers in the storage limitation. For you to save or store more song files on it, you have to upgrade to their plan because they can only offer you 2GB free of storage. Yet, you can use the best way to transfer any songs from your iPad to your computer – the FoneTrans for iOS.
Part 5. Best Way to Transfer Songs from iPad to Computer with FoneTrans for iOS
One of the best iOS file transfers that you can use these days is FoneTrans for iOS. It is the most versatile and professional software when it comes to your transferring needs. With a few clicks, you can transport your music from iPad to computer, whether on Windows or Mac, using this tool. The most interesting part of using this program is that it is simple to use and easy to understand. Here is the complete tutorial on how to transfer songs from iPad to computer.
With FoneTrans for iOS, you will enjoy freedom to transfer your data from iPhone to computer. You can not only transfer iPhone text messages to computer, but also photos, videos and contacts can be moved to PC easily.
- Transfer photos, videos, contacts, WhatsApp, and more data with ease.
- Preview data before transferring.
- iPhone, iPad and iPod touch are available.
Steps on How to Transfer Songs from iPad using FoneTrans for iOS:
Step 1To begin with, download the FoneTrans for iOS by ricking the Download button below. Then, run the installer. After that, it will automatically launch the tool.
Step 2Then, connect your iPad device to the computer using a USB cable. And it will show you the details of your device.
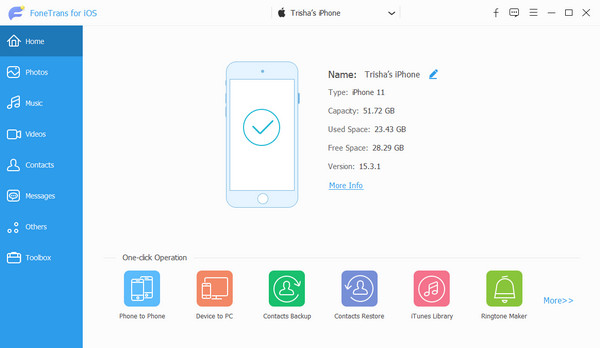
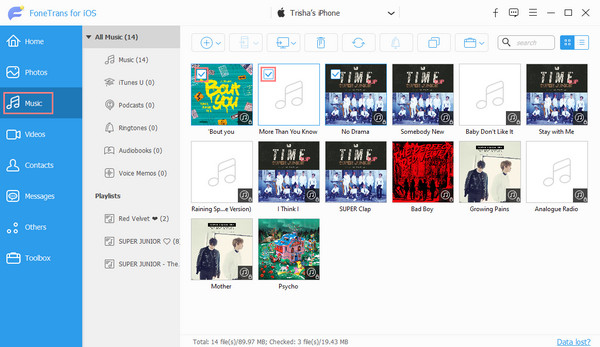
Step 3Subsequently, click the Music on the categories on the left sidebar of the main interface. And start choosing the message you want to transfer on your computer.
Step 4At this final point, click the Export to icon and select the Export to PC on the drop-down menu.
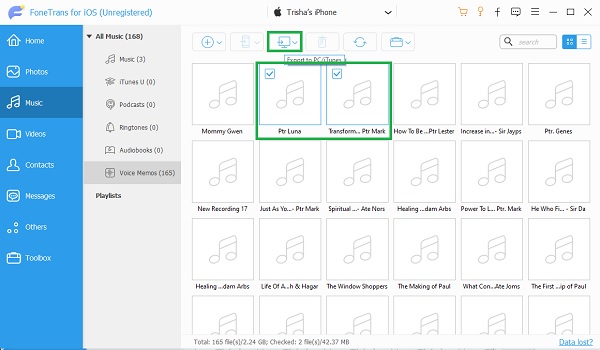
There you have it! You can always rely on this tool for your transferring needs. It will also guarantee you that you can transfer songs without any loss. And whatever or how many files you have, you can transfer them easily and quickly with FoneTrans for iOS.
Part 6. FAQs About Transfer Music from iPad to PC
1. Can I transfer music from iPad to PC without iTunes?
Definitely, yes! Even without iTunes, you can still transfer your songs from your iPad to your personal computer. You can use the methods mentioned above. But, you can try the best transferring tool – the FoneTrans for iOS. The easiest and quick way to transfer your files.
2. Can I send music files from iPad to computer through Bluetooth?
No. Unfortunately, you can't share or transfer music files from your iPad device to the computer with the use of Bluetooth. Unlike Android, Apple does not enable other devices to send files. Even though both computers and iPad have the same Bluetooth feature, you will still not be able to send songs.
To conclude, transferring music or any files must not be that complicated. With these easy, practical, and reliable ways, you can freely share your songs from iPad to computer. Still, we strongly recommend FoneTrans for iOS for your transferring demands and iOS or Apple devices. It can surely provide whatever your needs are because of its performance. At last, you can leave a message below for your queries.
With FoneTrans for iOS, you will enjoy freedom to transfer your data from iPhone to computer. You can not only transfer iPhone text messages to computer, but also photos, videos and contacts can be moved to PC easily.
- Transfer photos, videos, contacts, WhatsApp, and more data with ease.
- Preview data before transferring.
- iPhone, iPad and iPod touch are available.
