Simple Guide: How to Backup iPhone to iCloud to Secure Data
 Posted by Boey Wong / July 30, 2024 16:30
Greetings! I need some help. I keep hearing about backing up my iPhone to iCloud, but I'm unsure how to accomplish it. I want to learn the process because I unintentionally lost some important files. Could you please take me through the process? Any recommendations will greatly help. Thank you in advance!
Without a backup, your iPhone data is at risk of being lost due to unexpected occurrences. Fortunately, Apple offers an easy and trustworthy option to protect your data with iCloud. Millions of Apple users use cloud-based storage! Learn how to backup iPhone to iCloud as you scroll down in this post.


Guide List
Part 1. Why Backup iPhone to iCloud
Backing up your iPhone to iCloud is essential for protecting your data. Cloud storage can automatically backup your images, contacts, apps, and settings, so if you lose or damage your iPhone, you will not lose any important data.
On the other hand, you can use the Back Up Now feature to back up your iPhone data manually. You may create a backup anytime you want. However, iCloud will overwrite them and store the most recent ones.
Using an iCloud backup, you can also effortlessly restore your data to a new or old device. In short, an iCloud backup gives you peace of mind, knowing that your Apple device's data is safe and can be instantly restored.
Part 2. How to Backup iPhone to iCloud
Others prefer to use iCloud over physical backups on a computer. The cloud-based storage iCloud backups are saved online, freeing up local storage space on your devices. You only need your iPhone for the restore process, and you do not need any physical devices. However, learning how to backup iPhone to iCloud requires a strong internet connection for a faster process.
The backup data includes device settings, app data, photos, videos, health data, and messages. As stated in the previous method, you can automatically and manually back up your iPhone data. The detailed steps below will help you learn how to back up your iPhone to iCloud.
Step 1Ensure that your iPhone has access to a Wi-Fi network. As mentioned, iCloud backups need Wi-Fi to transmit data to the cloud. Launch the Settings app on your iPhone. Then, tap the Wi-Fi icon to maximize it. Choose your Wi-Fi network icon and enter the password to connect the iPhone if required.

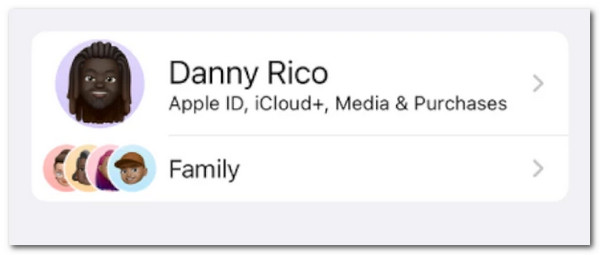
Step 2To update your backup preferences, navigate to the iCloud settings. Open the Settings application to see the list of options for the Apple device mentioned. Tap your name at the top to see your Apple ID preferences. Select the iCloud button on the next interface to see the options for the feature.
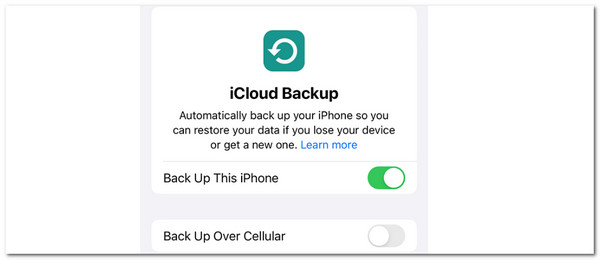
Step 3Go to the iCloud Backup section and select the first option. Toggle the Back Up This iPhone slider to automatically back up your iPhone data. This will happen when your Wi-Fi is turned on and connected to a network. You can also back up your data through cellular data by toggling the Back Up Over Cellular button.
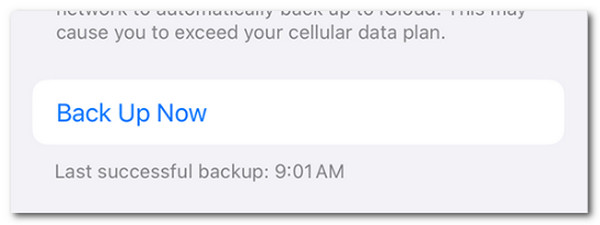
Step 4On the other hand, you can create an iPhone backup by tapping the Back Up Now section at the bottom of the main interface. Follow the onscreen instructions for the setup process. Please complete the necessary information to complete the procedure.
Alternatively, you can visit the iCloud official website and log in with your Apple ID. Import or upload your iPhone files to the website by dragging and dropping them to back them up.
FoneLab enables you to backup and restore iPhone/iPad/iPod without data loss.
- Backup and restore iOS data to your PC/Mac easily.
- Preview data in detail before you restore data from backups.
- Backup and restore iPhone, iPad and iPod touch data Selectively.
Part 3. iPhone Backup Tools Alternatives
While iCloud is popular for backing up your iPhone, several other options provide reliable backup solutions. These alternatives meet many needs, from huge cloud storage to advanced local backup solutions, ensuring your data is safe and quickly recoverable in many scenarios. Below are the leading alternatives for the iCloud backup feature. See them as you scroll down.
Option 1. Use Finder/iTunes
Backing up your iPhone with Finder or iTunes is a simple and reliable technique, especially if you have a local backup on your computer. This technique creates a backup of your app's data, settings, and, most importantly, images and messages. The advantage is that it does not rely on internet speed, which makes huge backups faster.
You might wonder why iTunes and Finder procedures are combined. Finder and iTunes have almost the same method for backing up iPhone data but differ in some of their buttons. In addition, Finder is only available on the latest macOS versions. On the other hand, iTunes is available in earlier macOS versions and Windows versions. See the detailed steps below on how to use the mentioned program to back up iPhone data.
Step 1Plug your iPhone to the Mac with a USB cord. Unlock your iPhone and, if required, tap the Trust This Computer option on the mentioned Apple device. Enter your passcode. On your Mac, launch Finder and choose the iPhone icon from the Locations list.

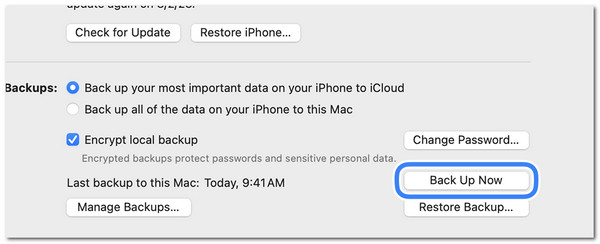
Step 2In the main Finder window, go to the General tab. Navigate to the Backups section and select the Back Up All Data on Your iPhone to This Mac option. To start the backup process, tick the Back Up Now button. Wait for the backup to finish. Ensure that your iPhone is still linked to your Mac throughout this process.
Option 2. Use FoneLab iOS Data Backup & Restore
FoneLab iOS Data Backup & Restore provides an easy solution for backing up and recovering iOS data to your PC or Mac. The Preview feature allows you to see data in detail before restoring it, and you can selectively backup and restore data for iPhone, iPad, and iPod touch. The tool supports iOS 18 and earlier versions and simplifies the process with one-click backups and recovery.
FoneLab enables you to backup and restore iPhone/iPad/iPod without data loss.
- Backup and restore iOS data to your PC/Mac easily.
- Preview data in detail before you restore data from backups.
- Backup and restore iPhone, iPad and iPod touch data Selectively.
The program allows you to keep numerous versions of backup files without overwriting them, ensuring you always have the correct backup available. You can also encrypt backup files to increase security. Finally, managing your iOS data is simple, efficient, and secure. See how to use FoneLab iOS Data Backup & Restore below.
Step 1Download the tool on your computer by ticking the Free Download button. Then, set it up and launch it. Later, 2 options will be shown on the screen. Connect the iPhone using a USB cable. Follow their instructions below.

Step 2To back up the data, click the iOS Data Backup button. Then, select the data you prefer to back up from your iPhone. Then, click the Next button at the bottom center of the main interface. The software will back up the data afterward.
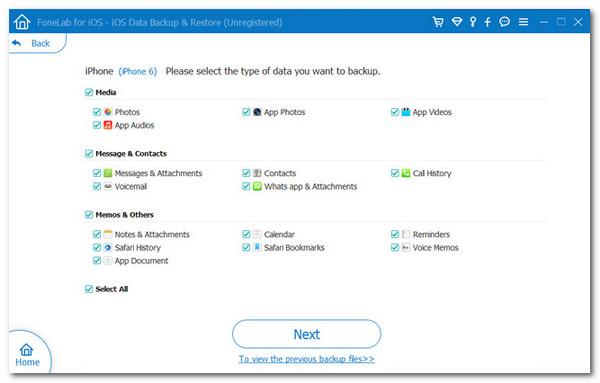
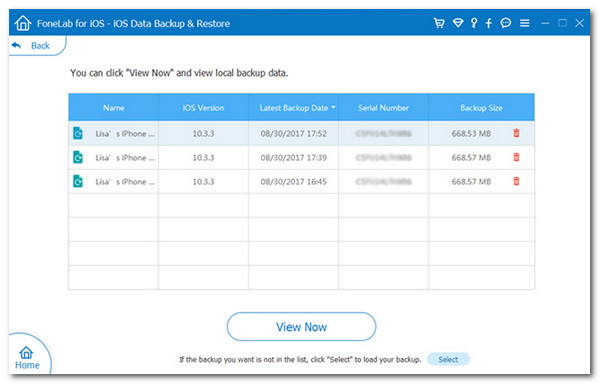
Step 3Once you need the backup, you can restore it using the iOS Data Restore feature. First, choose the backup file you prefer to restore. The software will start the restoration process, and you only need to wait.
FoneLab enables you to backup and restore iPhone/iPad/iPod without data loss.
- Backup and restore iOS data to your PC/Mac easily.
- Preview data in detail before you restore data from backups.
- Backup and restore iPhone, iPad and iPod touch data Selectively.
Part 4. How to Restore iPhone from iCloud Backup
If you lose or replace your iPhone, you may easily restore your data to a new device via iCloud, streamlining the setup process. You will only need to use the backups created from the mentioned cloud-based storage. Without the backups, you cannot regain the permanently deleted data on your iPhone.
However, restoring from iCloud can be time-consuming, especially if you have a lot of data. Some data, such as those from applications that do not support iCloud backup or larger files, may not be restored, resulting in incomplete data recovery. In addition, you need to perform a factory reset before restoring backups from iCloud to your iPhone.
How to restore iPhone from iCloud backup? See the detailed steps below on how to perform it.
Step 1Turn on the iPhone. If you have a new or recently wiped iPhone, it should display the Hello screen. If you are already using the device, navigate to the Settings app. But if you are using the iPhone, perform a factory reset. Open the mentioned app and tap the General button. Then, navigate to the Erase All Content and Settings icon. Tap the Continue button to complete.

Step 2Start setting up the device. Imitate the instructions on the screen until you reach the Apps & Data screen. Choose the Restore from iCloud Backup option to see more sections for the restoring iCloud backup process. Sign in using the linked Apple ID and password that you used to back up the iPhone.

Step 3After signing in, you'll see a list of available iCloud backups. Tap on the most recent or your preferred backup. The restoration process will begin immediately. The time required to recover your data depends on the size of the backup and the strength of your internet connection. After the restoration is complete, finish setting up your iPhone.

FoneLab enables you to backup and restore iPhone/iPad/iPod without data loss.
- Backup and restore iOS data to your PC/Mac easily.
- Preview data in detail before you restore data from backups.
- Backup and restore iPhone, iPad and iPod touch data Selectively.
Part 5. FAQs about How to Backup iPhone to iCloud
1. How much iCloud storage is needed for the backup?
The size of your data decides storage limits. The good news is that Apple offers 5GB for free. If you need more because the cloud storage is insufficient, you may upgrade to higher storage options beginning at 50GB. The maximum GB you can avail is up to 12TB of storage. In addition, the price of the additional cloud-based storage depends on your country. You may visit the official website of the iCloud about it.
2. Can I use my iPhone while it's backing up to iCloud?
Yes, you can use your iPhone while backing up, but if you actively use it, the process will pause and resume when it is inactive. However, restoring the backups means you cannot use your phone during the process. You cannot use the iPhone because it will only show you the restore screen when you use iCloud. Restarting iPhone will be the solution to using the iPhone. However, the restoration process will be interrupted, which might cause data loss.
FoneLab enables you to backup and restore iPhone/iPad/iPod without data loss.
- Backup and restore iOS data to your PC/Mac easily.
- Preview data in detail before you restore data from backups.
- Backup and restore iPhone, iPad and iPod touch data Selectively.
In conclusion, iCloud Backup makes protecting your iPhone data easier than expected. This useful tool allows you to manually and automatically save your pictures, contacts, messages, and app data to the cloud, preventing accidental data loss. This post is a step-by-step guide on how to backup iPhone to iCloud. In addition, the leading software that can backup and restore iOS devices is recommended: FoneLab iOS Data Backup & Restore. Do you have more concerns about your iPhone or other devices? Let us know by commenting below. Thank you!
