How to Delete Photos on Facebook [2 Effective Techniques]
 Posted by Lisa Ou / July 15, 2024 09:00
 Hello! Please help me discover how to delete Facebook photos. I have been dying to delete them because there are plenty of them. In addition, I also posted some unintentional images when I was drunk yesterday. Can you help me? Thank you so much in advance!
When you post pictures on Facebook, the public or some of your friends will see them in seconds. If so, you must be careful when posting them. But what if you already have many pictures on your Facebook account and want to lessen them? Learn how to delete uploaded photos on Facebook with this article by scrolling below.
![How to Delete Photos on Facebook [2 Effective Techniques]](/images/ios-data-recovery/how-to-delete-photos-on-facebook/how-to-delete-photos-on-facebook.jpg)
With FoneLab for iOS, you will recover the lost/deleted iPhone data including photos, contacts, videos, files, WhatsApp, Kik, Snapchat, WeChat and more data from your iCloud or iTunes backup or device.
- Recover photos, videos, contacts, WhatsApp, and more data with ease.
- Preview data before recovery.
- iPhone, iPad and iPod touch are available.

Guide List
Part 1. How to Delete Photos on Facebook Individually
When you delete photos from Facebook, they will be permanently deleted from your account. We have to tell you that information before you perform the procedures. This section focuses on deleting posted images from your Facebook account individually. You might want to delete them from albums or somewhere else on the mentioned social media platform.
However, deleting various photos will surely take a long time and consume much of your time. We will answer your question: How do I delete photos from Facebook individually? below. You only need to follow the detailed steps.
Step 1Open the Facebook app and enter the account credentials where the photos are uploaded to sign in. Then, select the Profile icon at the top right of the main interface. The Account Name and its settings will be shown on the screen. Tap the account, and you will see your Facebook timeline.

Step 2Tap the Photos section at the top of the screen under the account name. The posted images will be shown on the Facebook interface. Please tap the photo you prefer to delete from the account. You will be directed to a new interface afterward.

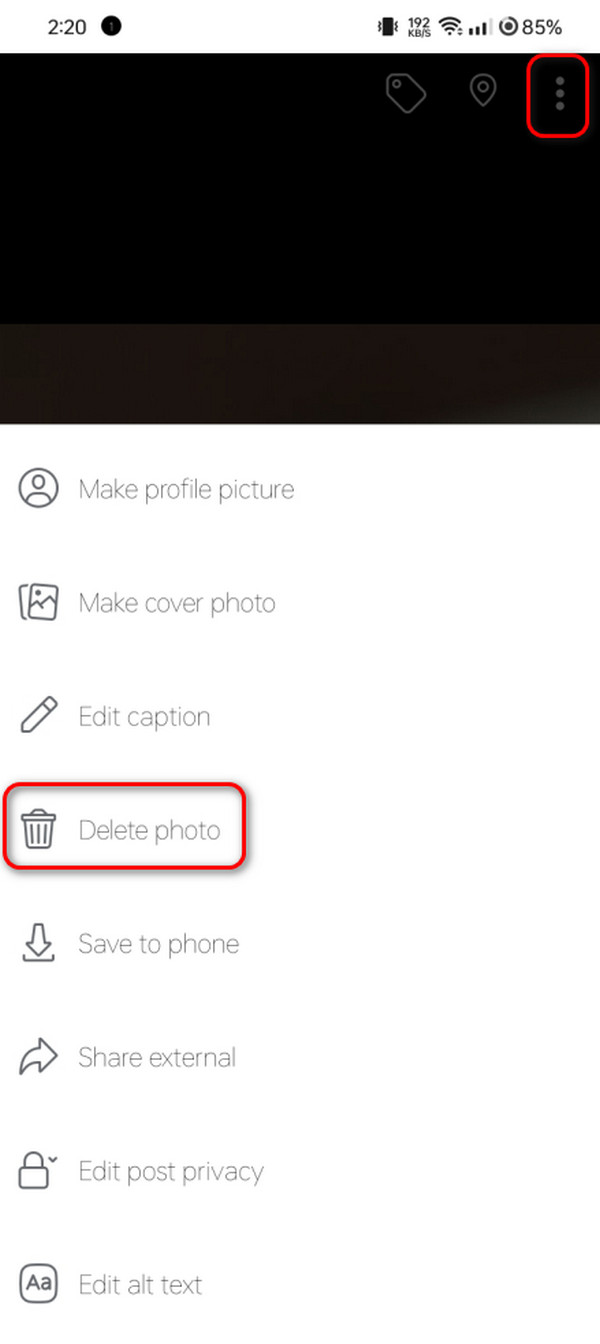
Step 3Three options are available at the top right of the screen. Please select the Three Dots icon by tapping it. Then, the drop-down options will appear on the screen. Among all of them, tap the Delete Photo button. The confirmation dialog will be seen; you only need to tap the Delete icon to confirm.
With FoneLab for iOS, you will recover the lost/deleted iPhone data including photos, contacts, videos, files, WhatsApp, Kik, Snapchat, WeChat and more data from your iCloud or iTunes backup or device.
- Recover photos, videos, contacts, WhatsApp, and more data with ease.
- Preview data before recovery.
- iPhone, iPad and iPod touch are available.
Part 2. How to Delete Photos on Facebook Album
You might also want to learn how to delete multiple photos on Facebook. This process is way faster for deleting posted images because hundreds or even thousands can be eliminated from the Facebook account.
However, this process is not executed with the Cntrl key to select multiple photos. The posted photos must be in one album to perform the process. If not, it is possible to delete multiple images in one process. Follow the detailed instructions below to discover how to delete multiple pictures on a Facebook album.
Step 1Open the Facebook application and select the Profile section at the top right of the screen. The Facebook account timeline will be shown. Then, choose the Photos button at the top of the main interface. Go to the Your Photos and Videos section at the top. Choose the Albums section afterward to proceed.

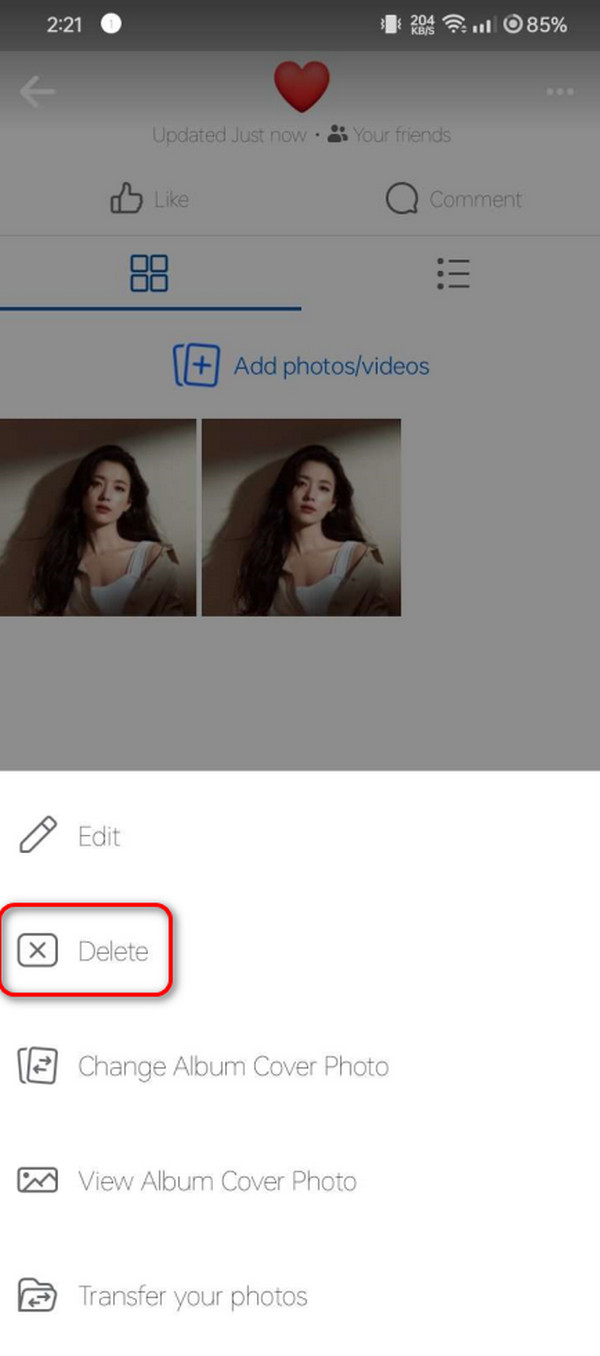
Step 2The next interface will show all the uploaded photos from the album, including their names. Please tap the Three Dots section at the top right corner to see the drop-down options at the bottom of the screen. Five options will be listed, and tap the Delete button to continue. Confirm the action by tapping the button again once it is shown in the dialog box.
Part 3. How to Retrieve Deleted Photos on Facebook from iPhone
As we have said, delete Facebook photos from the account that cannot be retrieved. But what if you have downloaded the images and accidentally deleted them from your iPhone? The mentioned data types can be retrieved in that state! You only need to use FoneLab iPhone Data Recovery. Photos are not the only data it supports. It can also recover reminders, contacts, audio, videos, etc. Now, see the software for recovering deleted Facebook photos from your iPhone. Follow the detailed steps below.
With FoneLab for iOS, you will recover the lost/deleted iPhone data including photos, contacts, videos, files, WhatsApp, Kik, Snapchat, WeChat and more data from your iCloud or iTunes backup or device.
- Recover photos, videos, contacts, WhatsApp, and more data with ease.
- Preview data before recovery.
- iPhone, iPad and iPod touch are available.
Step 1On the FoneLab iPhone Data Recovery website, click the Free Download button. Then, click the file and set it up according to the requirements. Your computer will launch the tool automatically.

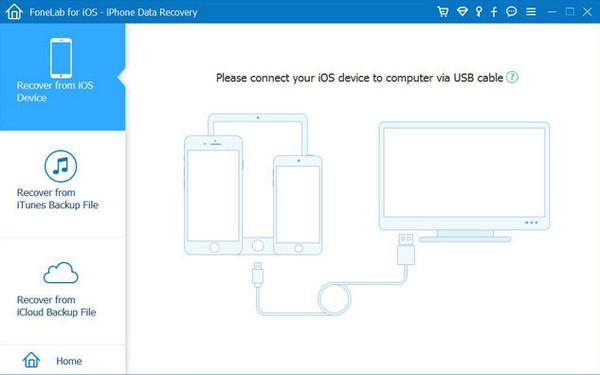
Step 2Grab a working USB cable and plug the iPhone into a compatible computer. Wait a few seconds to complete the procedure. The iPhone name will appear afterward. Click the Recover from iOS Device button to proceed.
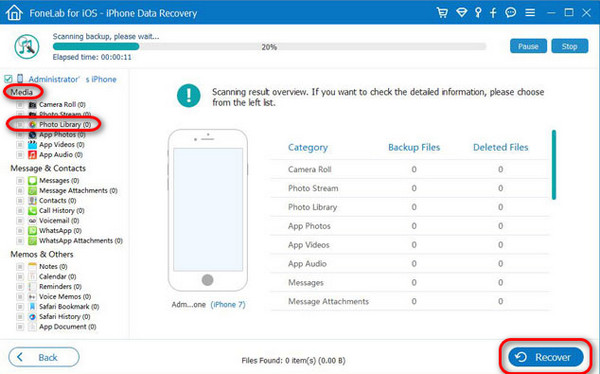
Step 3Click the Start Scan button at the center of the main interface. The software will locate the lost Facebook photos from your iPhone. On the next interface, choose the Media section. It is recommended that you choose the Photo Library section. Lastly, select the deleted Facebook photos on the right. Tick the Recover button at the bottom right of the screen. Clicking it will start to retrieve the Facebook photos from your iPhone.
With FoneLab for iOS, you will recover the lost/deleted iPhone data including photos, contacts, videos, files, WhatsApp, Kik, Snapchat, WeChat and more data from your iCloud or iTunes backup or device.
- Recover photos, videos, contacts, WhatsApp, and more data with ease.
- Preview data before recovery.
- iPhone, iPad and iPod touch are available.
Part 4. FAQs about How to Delete Photos on Facebook
1. Why did Facebook delete my photos?
Facebook does not delete your photos randomly and without any valid reason. The pictures you have uploaded might be corrupted or damaged by viruses and malware. In addition, the social platform mentioned has restrictions for sensitive content. Ensure you follow the Facebook guidelines and do not turn down the images. Lastly, you must also check if you accidentally deleted them.
2. How do you delete pictures on Facebook that won't delete?
Some photos cannot be deleted from your Facebook album, for sure. These posts are the tagged ones from your friends on the social media platform. If that's the case, you need to untag yourself first or ask the owner of the post to do that for you. Once completed, you can no longer see the images posted on your Facebook account. However, it will still be visible in the owner's timeline.
3. How to delete a cover photo on Facebook?
Open the Facebook application and log in to the account. Then, tap the Profile icon at the top right of the screen. Next, select the Account Name section to proceed to the next screen. Tap the cover photo at the top. Later, drop-down options will be shown. Choose the View Profile Cover button to view the cover photo. Tap the Three Dots icon at the top right of the main interface. Then, select the Delete Photo button.
With FoneLab for iOS, you will recover the lost/deleted iPhone data including photos, contacts, videos, files, WhatsApp, Kik, Snapchat, WeChat and more data from your iCloud or iTunes backup or device.
- Recover photos, videos, contacts, WhatsApp, and more data with ease.
- Preview data before recovery.
- iPhone, iPad and iPod touch are available.
That's how to delete Facebook pictures. It might seem difficult, but executing it is easy! This post includes the 2 different approaches, with bonus tips on recovering Facebook photos if they are accidentally deleted. We hope you try using FoneLab iPhone Data Recovery using the mentioned process. If you have more questions, leave them in the comment section below. Thank you!
