100% Recovery WhatsApp Messages and Attachments
Recently many people are asking for help: how to restore WhatsApp deleted messages from iPhone. For example:
How can I recover deleted WhatsApp chat history from my iPhone 8? I deleted it and soon realized that I hadn't saved the new contact from the conversation between one of my friends. Please any suggestion is welcome, thanks a lot!
Guess what?
No matter you agree or not, WhatsApp has become the most popular app to communicate among people. If you don't know WhatsApp yet, you should really keep up your pace. Don't worry, I will help you to get into it:

WhatsApp is a cross-platform mobile messaging app which allows you to exchange messages without having to pay for SMS. It is totally free to send text messages, unlimited images, videos and audio messages. As far as I know, this messaging app is compatible with just about all mobile operating systems on the market like iOS, Android, Symbian and Windows.
This basically means you are able to use WhatsApp app to communicate with anyone who has installed this app, regardless of what model of mobile they use.
More interesting that:
- - WhatsApp lets you easily create and manage groups. Any user can enter any group, as long as they've been invited by the group's creator, and they can leave it whenever they want.
- - WhatsApp uses your phone's Internet connection, so you don't have to pay for every message or WhatsApp video call, even if your friends or family are in another country.
- - Share your location, exchange contacts, set custom wallpapers and notification sounds, email chat history, broadcast messages to multiple contacts at once, and more.
Now, let's go back to the topic that the post focuses on. It's common that iPhone users every now and then mistakenly delete their important data and want to get it back. WhatsApp will not save your daily data on its servers, so you can't retrieve WhatsApp messages from server.
Good news is:
You are allowed to back up your WhatsApp chat history to iCloud. So if you have manually backed up your WhatsApp messages in iCloud or turned on auto backup sometime. You have 100 percentages to restore the deleted iPhone WhatsApp messages back.
Or else, if you have the habit of backing up your iPhone to iTunes regularly, you can also recover deleted WhatsApp messages from iTunes backups with several simple steps.
The worst situation is:
You are a lazy person who has never created any backup, neither iCloud nor iTunes. Are you sentenced to death?
Of course not!
I will show you an amazing tool to help you recover WhatsApp messages online in this post as well.
So here are 4 Methods:

Guide List
1. Recover Deleted Messages from WhatsApp Backup on iPhone
Step 1First you should check whether you have backed up WhatsApp messages to iCloud or not. Simply go to WhatsApp – Settings – Chats – Chat Backup.
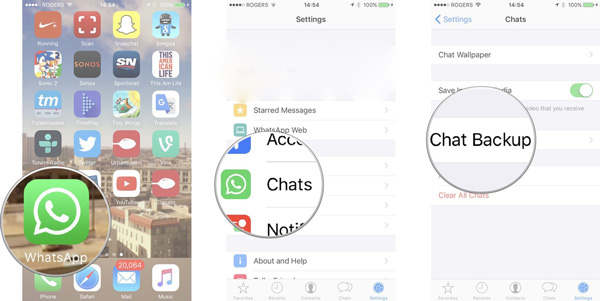
Step 2Uninstall your WhatsApp app on iPhone, and verify your phone number after reinstalling it from the App Store. Then a welcome notice pops up prompting you to recover chat history. Tap on Restore Chat History to restore Whatsapp backup, then the deleted messages from WhatsApp should be backup to your phone once the restore process is complete.
2. Restore WhatsApp Messages Without Backup
I highly recommend that:
You shall use a free comprehensive iPhone data recovery tool – FoneLab iPhone Data Recovery. With the help of this software, you are able to recover data like WhatsApp messages and attachments, photos, contacts, videos, call logs, SMS, documents and many more.
With FoneLab for iOS, you will recover the lost/deleted iPhone data including photos, contacts, videos, files, WhatsApp, Kik, Snapchat, WeChat and more data from your iCloud or iTunes backup or device.
- Recover photos, videos, contacts, WhatsApp, and more data with ease.
- Preview data before recovery.
- iPhone, iPad and iPod touch are available.
More features:
- Retrieve your lost files while keeping current ones intact.
- Recover deleted files from 19 different types of data created on these devices – iPhone 4/3GS, iPad 1 or iPod touch 4.
- Restore and export eight types of lost data from any other iOS device, including the iPhone X, iPhone 8 and iPhone 8 Plus.
- Allow you to view deleted WhatsApp messages.
- Restore data from iCloud backup or iTunes backup.
- Fully supports iOS 11 and iTunes 12.7.
Download the free trial version and follow below step by step guide, you will have three recovery modes to choose:
Recover from iOS Device:
Step 1Download and install the software on your computer with the above link according to your operating system. The software will launch automatically once it completes.
Step 2You have three sections, select the iPhone Data Recovery section.
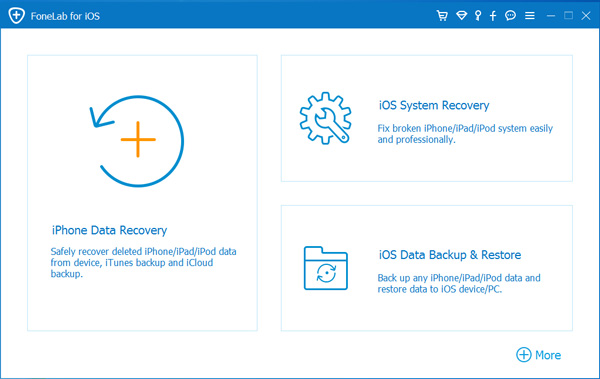
Step 3Choose Recover from iOS Device on the FoneLab interface and plug your iPhone into the computer. After the program detects your phone, click Start Scan.

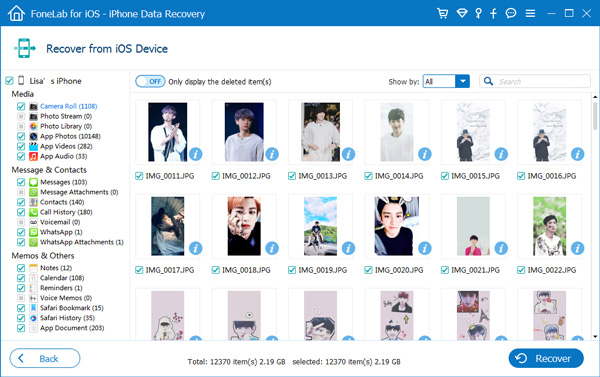
Step 4The scanning result will list in categories on the left. Check WhatsApp and WhatsApp Attachments to preview detail. Then mark those items you want, and click Recover to save them onto your computer.
Recover from iTunes Backup File:
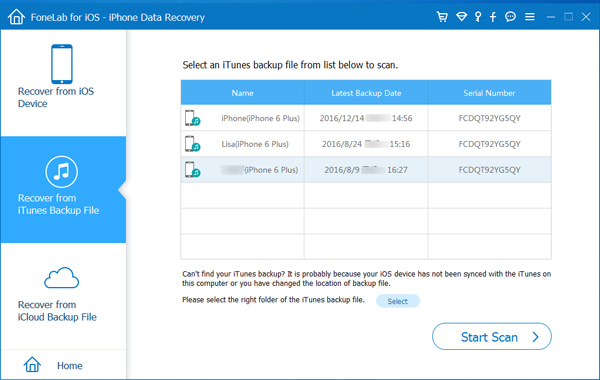
Step 1Select Recover from iTunes Backup File instead. Then you will get multiple backup files if you have created before. Select the one that you think may include your deleted WhatsApp history and click Start Scan.
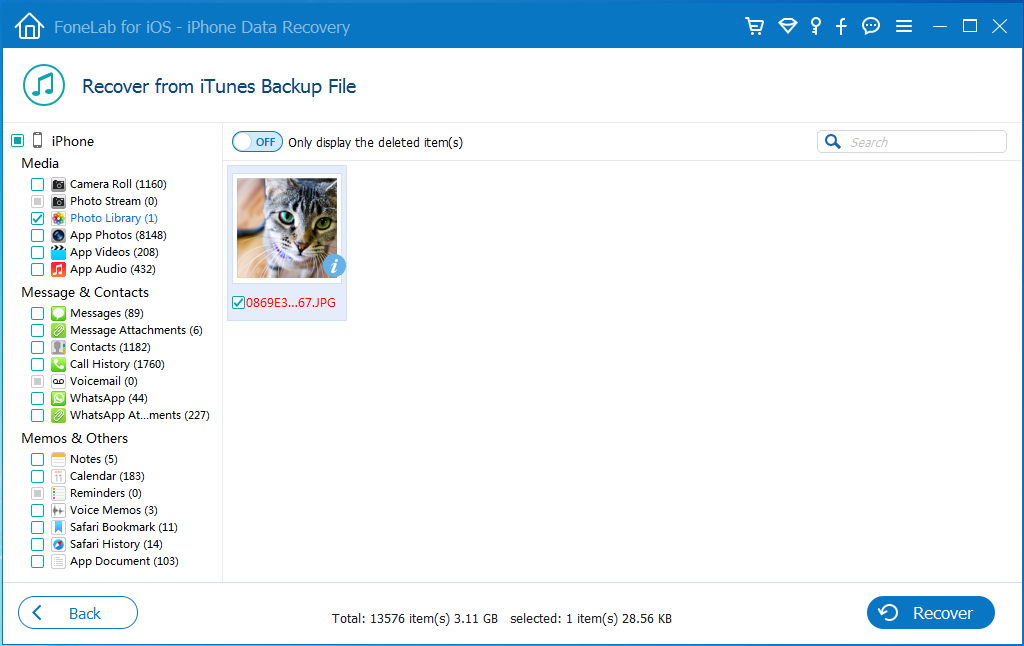
Step 2Preview contents in details. Then mark the items that you want and click the Recover button. The retrieved WhatsApp chat will be saved onto your computer afterwards.
Recover from iCloud Backup File:
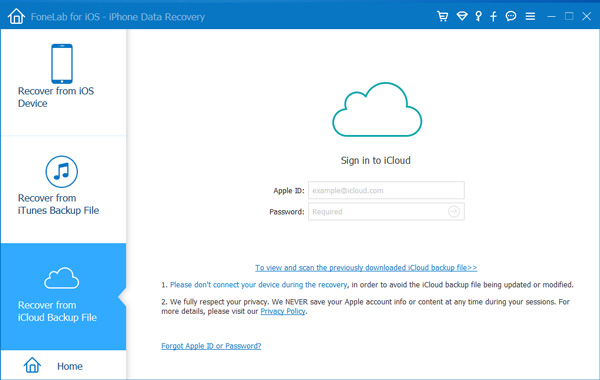
Step 1Choose Recover from iCloud Backup File in the beginning. Sign in to iCloud account with your Apple ID and password. All backup files are listed in a table, Download the related one and click on the Start Scan button to begin.
Step 2Preview contents in details before recovery.
3. Get WhatsApp History Back from iCloud Backup
If you have backed up iPhone to iCloud, you can restore WhatsApp from iCloud.
Step 1Factory reset iPhone, go to Settings – General – Reset – Erase All Content and Settings.
Step 2Your iPhone will restart, then follow the on-screen instruction until you get to Apps & Data. Select Restore from iCloud backup.
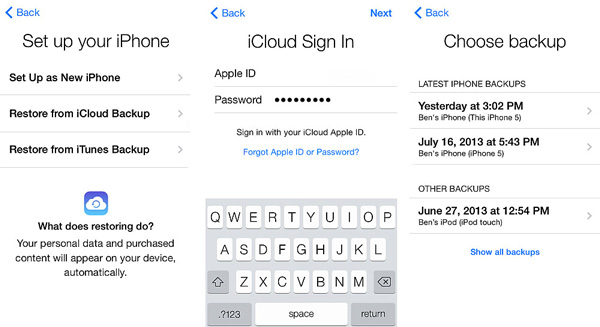
Step 3Then you should choose the relevant iCloud backup file to restore. Please make sure the device is connected to a Wi-Fi network all the time.
4. Recover Deleted WhatsApp Chat from iTunes Backup
Step 1Launch iTunes on your computer and make sure it is the latest version.
Step 2Connect your iPhone to the computer via USB cable. When iTunes recognizes the phone, you can see its icon on the top. Click over it.
Step 3Navigate to Summary tab and select Restore Backup… on the right.
Step 4Choose an iTunes backup file to restore.
Note:
The last two methods will lead to the loss of new data generated after the date your backup was made.
5. Backup iPhone WhatsApp in 3 Ways
Kindly remind you should back up your iPhone from time to time. Apple offers users two easy and free ways to create a copy of your information, so there is no reason for not backing up iPhone if your own one. If you have no idea of how to backup iPhone.
Please keep reading:
Option 1. Back up iPhone to iCloud
- a. Stores backups in the cloud.
- b. Apple offers 5GB free of storage, if you need more, you have to pay for it.
- c. Always encrypts your backups.
- d. Lets you make and use backups from anywhere with Wi-Fi.
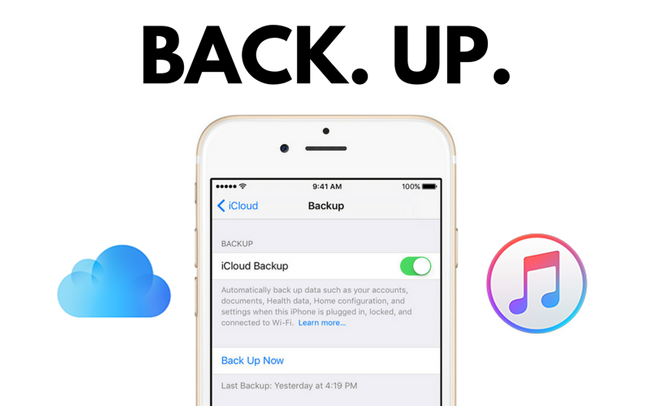
Step 1Connect your iPhone to a good Wi-Fi network.
If your device is running iOS 10 or later, tap Settings – iCloud – Backup.
Step 2If your device is running iOS 7 or earlier, tap Settings – iCloud – Storage & Backup.
Step 3Toggle iCloud Backup on.
Step 4Tap Back Up Now to start backup immediately if you want to back up your iPhone right away.
Please note that media files synced from your computer will not be backed up by iCloud and the purchased apps, books, music, movies and TV shows won't be backed up too. What actually backed up are the links to those items in iTunes Store, App Store and iBookstore. However, they will be automatically re-downloaded from their respective stores when you restore your iPhone from an iCloud backup. This helps you save some iCloud storage.
Option 2. Back up iPhone with iTunes
- a. Stores backups on your PC or Mac.
- b. Storage depends on your PC or Mac's available space.
- c. Not encrypted backups automatically.
- d. Lets you make and use your backups on your PC or Mac.
Step 1Plug your iPhone into your computer using the USB cable and the iTunes will automatically open, if not, open it.
Step 2Click over your iPhone icon on the iTunes interface. Go to Summary section, click This computer and Back Up Now. If you want to make an encrypted iTunes backup, just check Encrypt local backup.
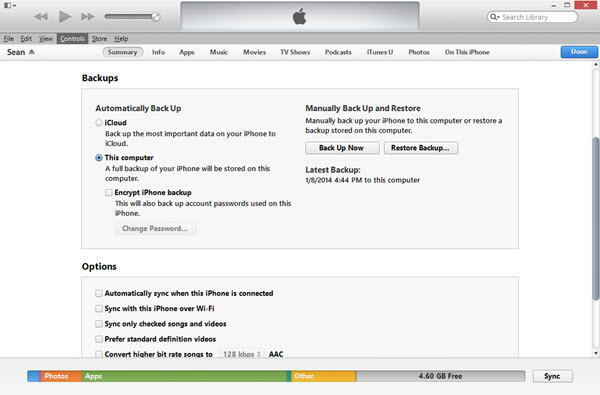
You can also make an iCloud backup of your iPhone data through a computer, just click the iCloud option instead of This computer.
Also note that: iTunes will backup settings, contacts, call logs, photos, messages and etc. But won't back up any synced music, videos, podcasts or apps from your iTunes library that are not locally residing on your iPhone.
Option 3. Back up iPhone with FoneLab iOS Data Backup & Restore
Feature of iOS Data Backup & Restore:
- a. Efficient and fast.
- b. Easy to use.
- c. Selectively and flexibly back up iPhone data.
- d. No storage limitation.
FoneLab enables you to backup and restore iPhone/iPad/iPod without data loss.
- Backup and restore iOS data to your PC/Mac easily.
- Preview data in detail before you restore data from backups.
- Backup and restore iPhone, iPad and iPod touch data Selectively.
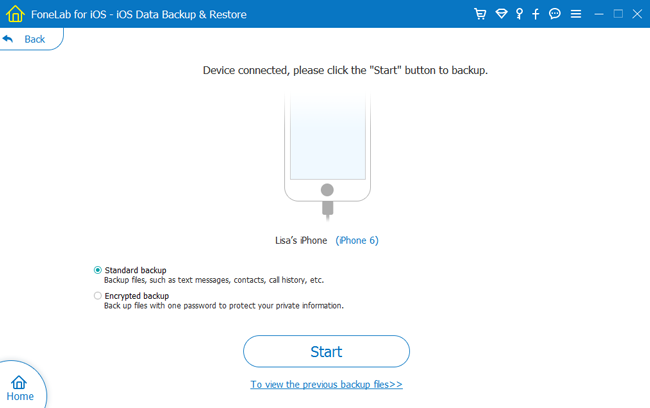
Step 1Download and install FoneLab for iOS and select iOS Backup & Restore from the interface.
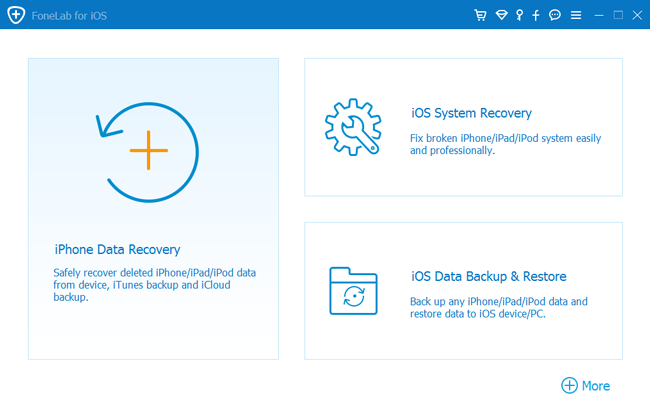
Step 2Click iOS Data Backup.
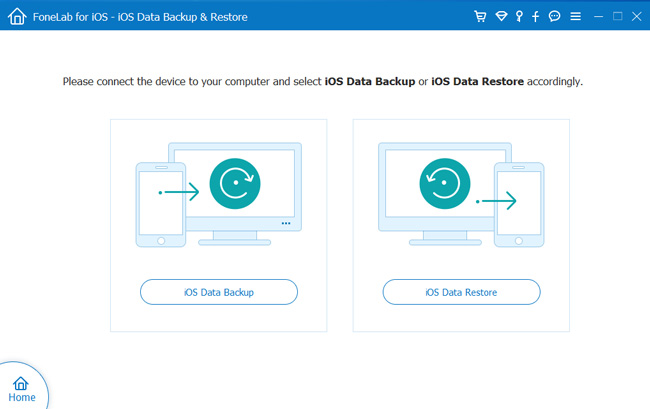
Step 3You can choose to make standard backup or encrypted backup as you want.
Overall, if you restore your device using iCloud, you are able to access them anytime and anywhere using Wi-Fi. If you restore your device using iTunes or the backup & restore tool, you have to use the computer where the backup file stored.
However, restoring lost data from a backup file using iTunes or iCloud means all, this will cause new data loss as a result. Therefore, I suggest you to use FoneLab iPhone Data Recovery, which can help you do selective iOS data recovery.
Below is a video tutorial for reference.
