3 Reliable Methods to Record Overwatch Highlights on PC and PS4 Quickly
 Posted by Lisa Ou / Jan 16, 2023 16:00
Playing Overwatch is very exciting because it is a multiplayer game. You can play with your friends or family. Aside from that, some players record their game highlights and upload them on social media platforms like Facebook, YouTube, and more. If you are one of them, it is not hard to capture your gameplay highlights. You only need to locate the locations where overwatch highlights are saved.

Moreover, this article will introduce to you the leading screen recorders of all time! FoneLab Screen Recorder is that software. Aside from this tool, you can use other techniques and tools to record your Overwatch highlights.

Guide List
Part 1. How to Record Overwatch Highlights on PC
When recording Overwatch, you must need a tool to capture your screen without losing its quality. If you upload it on social media platforms, your viewers will not like the video if it is blurred. To avoid the video losing high quality, you will need FoneLab Screen Recorder. It supports high-quality videos or images. On the other hand, you can also use the built-in tool of your PC. It would help if you only located first where Overwatch screenshots go. To know the steps of these two screen recorders, proceed below.
Method 1. FoneLab Screen Recorder
FoneLab Screen Recorder is the leading software to record your Overwatch gameplay or highlights. You will not regret using and downloading it because it will give you the best outcome for your video. It will not ruin your video's quality once it starts recording your game highlights. Another good thing about this tool is that you can use it without internet access. Before using this tool, you must locate where overwatch highlights are stored to have a smooth recording process. If you are done doing that, move on to the easy steps of this software.
FoneLab Screen Recorder allows you to capture video, audio, online tutorial, etc on Windows/Mac, and you can easily customize size, edit the video or audio, and more.
- Record video, audio, webcam and take screenshots on Windows/Mac.
- Preview data before saving.
- It is safe and easy to use.
Step 1To get the best Overwatch screen recorder, click the Free Download button on the left. You must select the version of Windows because you are currently using a PC. After that, the software will acquire you to set it up on your device, then install, launch, and run it later.
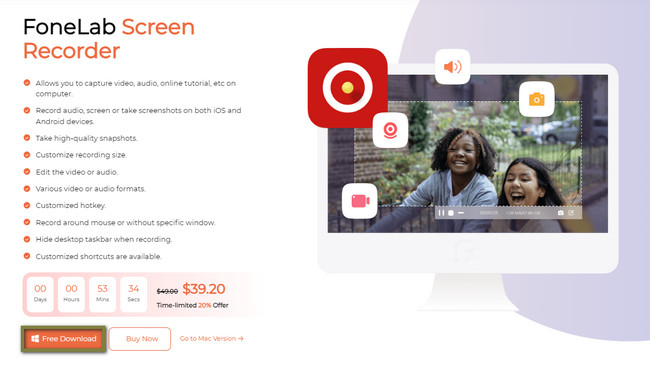
Step 2On the tool's interface, you will see the recording mode you can use. To record Overwatch highlights, you must select the Game Recorder button for a better experience.

Step 3Launch and locate the Overwatch highlights you want to record on your device. After that, click the Select the Game button, then select Window > Overwatch Game. In this case, the software will choose the game, and you can use the other features of this screen recorder. You can add your voice to the video while recording, the system sound, and the webcam.
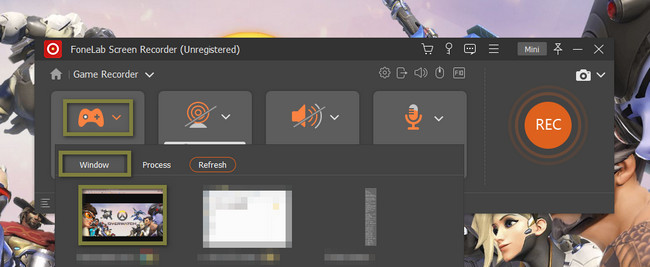
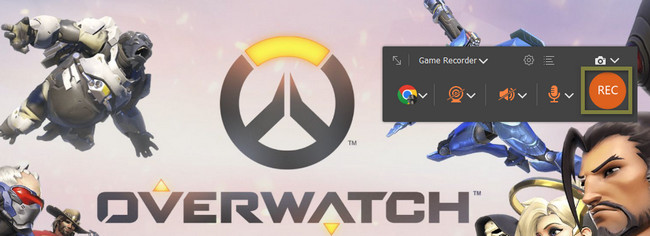
Step 4To start recording the Overwatch highlights, click the REC button on the right side of the tool. After that, the software will count down for a few seconds to give you time to prepare the device screen. Later, once you are done recording the Overwatch highlights, click the Red Box button to end the recording session.
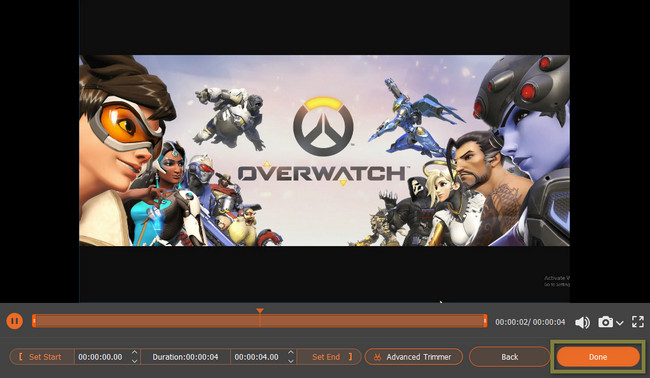
Step 5The video of your Overwatch highlights will pop up with the software. To save your recorded video on your PC, click the Done button. You will only need to select the device folder you want.
This software above is also the best to record your game if the Overwatch settings are not saving the video. Aside from this software, you can use other techniques or recording tools. However, they are complicated to use. If you still want to know them, proceed to know them.
FoneLab Screen Recorder allows you to capture video, audio, online tutorial, etc on Windows/Mac, and you can easily customize size, edit the video or audio, and more.
- Record video, audio, webcam and take screenshots on Windows/Mac.
- Preview data before saving.
- It is safe and easy to use.
Method 2. Game Bar
Game bar is one of the leading built-in tools on your PC to record anything on your screen. It is not hard to use, but it is a bit risky. You can launch this tool by using the keyboard shortcut keys. In this case, there are tendencies that you will perform the wrong keys. For this reason, if you are not careful enough, it can lead to losing your files or destroying other data on your PC. You can avoid that by following the steps below after you record your gameplay and locate where the overwatch highlights are saved.
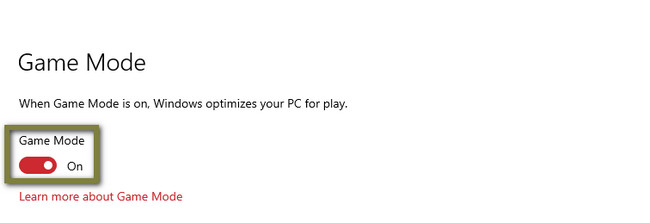
Step 1Go to the Windows Search Bar of your computer. After that, please search for the Game Bar, then launch it. However, you need to activate the tool on your PC if you do not see it. To do that, go to the Game Mode settings, then turn On the button. You can also press the Windows+G button to launch the tool faster if you activate it.
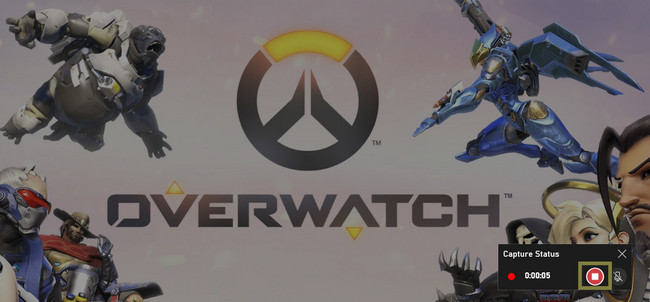
Step 2The tool will pop up its features, including the computer's performance. In this case, you will see if you will have a smooth game. To start recording your Overwatch, launch the game, then click the Dot button at the top of the tool. Later, if you want to end the recording, you only need to click the Red Box button. The computer will automatically save the video in one of its folders.
The methods above are the quickest ways to record Overwatch highlights on PC. However, if you are using PS4, this article also prepares the steps to capture your highlights using it. Move on.
FoneLab Screen Recorder allows you to capture video, audio, online tutorial, etc on Windows/Mac, and you can easily customize size, edit the video or audio, and more.
- Record video, audio, webcam and take screenshots on Windows/Mac.
- Preview data before saving.
- It is safe and easy to use.
Part 2. How to Record Overwatch Highlights by Share Button on PS4
PS4 is a gaming console that you can use to play Overwatch. It will not only help you to play this game. It can also help you learn how to save a highlight in Overwatch. If you are familiar with this gaming console, the steps will be easy for you to perform. However, if you are a newbie playing Overwatch, you may be unfamiliar with its interface. Do not worry about that. This part of the article is for you! It will show you how to record Overwatch highlights by providing the steps. To achieve the best video result, view the methods for PS4 below.
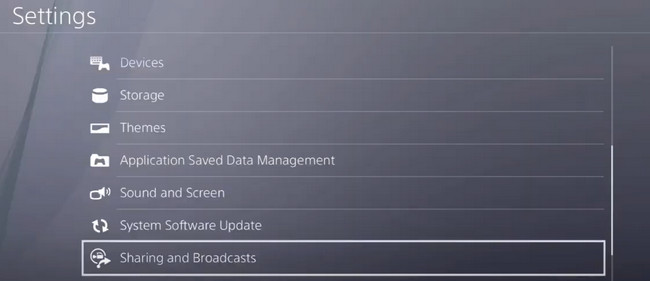
Step 1To activate the recording on the Share button, go to the Settings of your Overwatch. After that, locate the Sharing and Broadcast button.
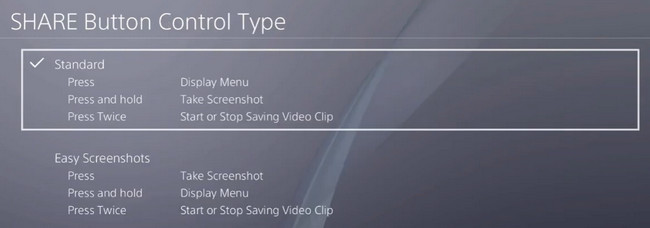
Step 2On the available sections, choose the Share Button Control Type section. You will see the shortcuts for your Share button after that. To start the recording, go to the highlights of Overwatch. After that, double-press the Share button. On the other hand, to stop the recording, double-press also the Share button. Later, the device will automatically save the video.
FoneLab Screen Recorder allows you to capture video, audio, online tutorial, etc on Windows/Mac, and you can easily customize size, edit the video or audio, and more.
- Record video, audio, webcam and take screenshots on Windows/Mac.
- Preview data before saving.
- It is safe and easy to use.
Part 3. FAQs about Overwatch Highlights
How to get and record Overwatch highlights on Nvidia ShadowPlay?
Launch the ShadowPlay on your PC, then locate Settings. Look for the NVIDIA ShadowPlay Highlights > Highlights Auto Capture > Yes button. After that, the recording will automatically start, then once you end the session, the device will save the recording on one of its folders.
How to save Overwatch gameplay on Xbox One?
Press the Xbox button, then go to the Guide menu. Afterward, Press the X button to save the highlight as a short video clip. You can see the clip by pressing the Xbox button and selecting the Broadcast and Capture > Recent Captures buttons.
There are many ways to record Overwatch highlights. You can use PS4 and other built-in tools on your PC. Last but not least, you can use FoneLab Screen Recorder. It is the best and leading screen recording software. Download it now!
FoneLab Screen Recorder allows you to capture video, audio, online tutorial, etc on Windows/Mac, and you can easily customize size, edit the video or audio, and more.
- Record video, audio, webcam and take screenshots on Windows/Mac.
- Preview data before saving.
- It is safe and easy to use.
