- Part 1. How to Fix An iPad Unable to Check for Update by Redownloading Update
- Part 2. How to Fix An iPad Unable to Check for Update with FoneLab iOS System Recovery
- Part 3. How to Fix An iPad Unable to Check for Update by Freeing Up Space
- Part 4. FAQs about How to Fix An iPad Unable to Check for Update
4 Leading Fixes for Unable to Check for Update on iPad
 Posted by Lisa Ou / Jan 29, 2024 09:00
 Why does my iPad say unable to check for updates? I discovered there are new cool features on the later iOS versions. Thus, I tried to update my iPad software but got an error message on the screen. Does anyone know what causes this software update issue? Also, I hope someone can provide reliable fixes so my device can get through this successfully.
IOS device users do a software update occasionally to upgrade their iPad, iPhone, or iPod Touch's capabilities. Apple provides the latest features, bug fixes, and security updates in every iOS version, so it is understandable why people always grab the chance whenever a new update is available. But unfortunately, it doesn't always go smoothly.

Sometimes, you may encounter a situation where your iPad screen says the device cannot check for updates. In this case, you must take action to let your device update successfully again. Hence, we prepared some trustworthy strategies for fixing the issue with your iPad that can't check for updates. Feel free to browse them below and solve the problem quickly.
Before we dive into it, you should try rebooting your iPad, as it might be the easiest method to fix unknown issues.
Steps: Push and release the Upper Volume button quickly, then do the same for the Lower Volume button. Right after, hold the Power or Top button until the screen displays the Apple logo.
Then, ensure the updated iPadOS version is compatible with your device and your network works well on your iPad. If not, you can switch to another Wi-Fi or cellular data and try again. Moreover, you can even try to reset your iPad network settings if there are network issues.
Steps: Head to your device's Settings app, then tap General on its initial screen. Next, select the Transfer or Reset iPad tab, then the Reset selection on the following interface. When the reset options pop up, hit the Reset Network Settings to finish.
If the ways mentioned above are not working, go to the following parts to learn how to fix your iPad.

Guide List
- Part 1. How to Fix An iPad Unable to Check for Update by Redownloading Update
- Part 2. How to Fix An iPad Unable to Check for Update with FoneLab iOS System Recovery
- Part 3. How to Fix An iPad Unable to Check for Update by Freeing Up Space
- Part 4. FAQs about How to Fix An iPad Unable to Check for Update
FoneLab enables you to fix iPhone/iPad/iPod from DFU mode, recovery mode, Apple logo, headphone mode, etc. to normal state without data loss.
- Fix disabled iOS system problems.
- Extract data from disabled iOS devices without data loss.
- It is safe and easy to use.
Part 1. How to Fix An iPad Unable to Check for Update by Redownloading Update
While installing your last iOS update, an issue may have occurred, affecting the operation of software updates. Perhaps you suddenly lost your internet connection while the installation was ongoing. Thus, the disruption may have caused the update to be corrupt, preventing you from updating your iPad to the latest iOS version. Removing and redownloading your new software update would be best if your situation is similar. But this time, be sure there will be no interruptions, and staying on the screen would be best to finish the update smoothly.
Adhere to the secure procedure underneath to fix the iPad error unable to check for updates by redownloading:
Step 1Pick the Settings icon on the iPad Home screen, then tap General on its interface. Next, open the iPad Storage section to find and select the iOS version you will delete from the list. Then, tap Delete Update on the following screen.
Step 2Once deleted, return to Settings, then to the General screen. Once you see the Software Update tab, tap it, and the available iOS updates will be shown. Hit the Download and Install selection on the lower left if it is available to update your software successfully.
As mentioned, a poor connection can disrupt and fail your download in a snap. Thus, you must ensure your cellular data or WiFi you’re connected to has a strong and stable internet. This way, you won’t experience the same problem all over again.
Part 2. How to Fix An iPad Unable to Check for Update with FoneLab iOS System Recovery
Regarding repair programs for such issues on your iPad, the FoneLab iOS System Recovery tool is the solution you can depend on. It primarily works for system issues, including an iOS device that can’t update, is disabled, has no service, can’t charge, failed to restart, is waiting for activation, and more. Hence, if one of these problems was the reason your iPad is unable to check for updates, don’t hesitate to install this program now on your computer.
FoneLab enables you to fix iPhone/iPad/iPod from DFU mode, recovery mode, Apple logo, headphone mode, etc. to normal state without data loss.
- Fix disabled iOS system problems.
- Extract data from disabled iOS devices without data loss.
- It is safe and easy to use.
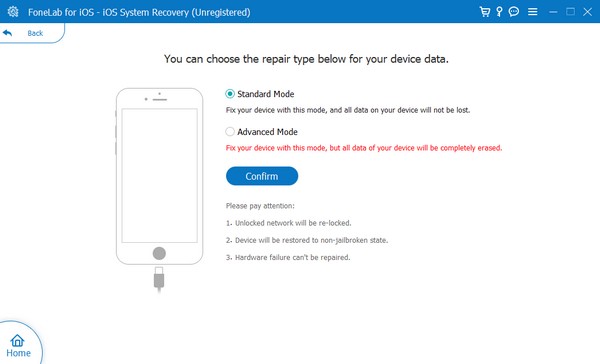
Aside from its flexibility to fix several problems, FoneLab iOS System Recovery also offers advantageous features. For instance, its Advanced repair type can wipe everything on your device, cleaning all its content and settings. But the Standard mode is also available if you prefer to keep your data safe. Meanwhile, with this system recovery tool, you can expect a user-friendly procedure because of its easy-to-navigate features and interface.
Determine the untroubled steps below as an example for repairing the unable to check for update on iPad issue with FoneLab iOS System Recovery:
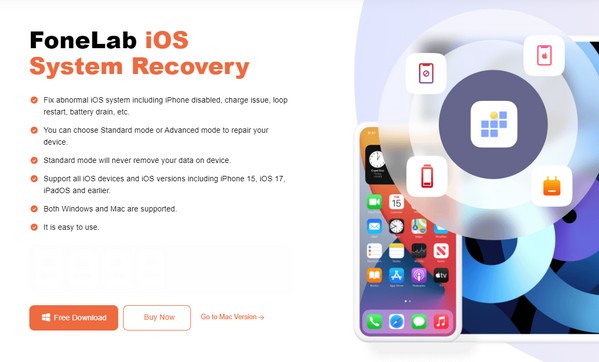
Step 1Install the program by acquiring first the FoneLab iOS System Recovery installer. Press the Free Download tab on its main page to save it in your Downloads folder. Afterward, the installation will start once you open the downloaded file, and only a few seconds will pass before you can launch it on your computer desktop.

Step 2Select iOS System Recovery on the initial interface’s upper right section. The Start tab will be presented, so you can click it and view the repair modes. As mentioned earlier, the Advanced and Standard modes have different functions. Click the type you prefer, then attach the ends of a USB cable to the iPad and computer to connect. Next, click Confirm.

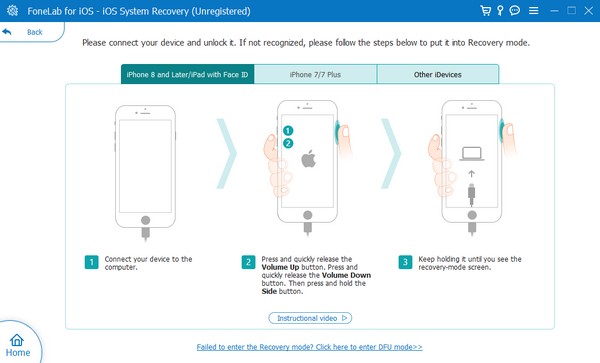
Step 3The next interface will welcome you with its on-screen instructions for various iOS models. Click your iPad model at the top area, and the designated directions for your device will be displayed. Enter the Recovery mode through them to save the appropriate firmware package and fix your iPad update problem.

FoneLab enables you to fix iPhone/iPad/iPod from DFU mode, recovery mode, Apple logo, headphone mode, etc. to normal state without data loss.
- Fix disabled iOS system problems.
- Extract data from disabled iOS devices without data loss.
- It is safe and easy to use.
Part 3. How to Fix An iPad Unable to Check for Update by Freeing Up Space
Other possible causes also include lack of storage. Updating an iOS system consumes a considerable amount of space on an iPad. Thus, your storage must be enough to handle the new update. If not, an issue causing your device not to check for updates can occur. If your iPad has experienced this, we highly suggest freeing up space. It may be through deleting the apps you no longer use, unnecessary images, videos, music files, etc. After all, erasing data on an iPad is effortless and can be done within minutes.
Mimic the safe guidelines underneath to fix an iPad unable to check for updates by freeing up space on iPad:
Delete Media Files: The media files stored on an iPad are usually saved in the Photos app. Hence, open it to view your videos and photos on the screen. Afterward, tap Select on the top right, then choose the files you no longer need. Once chosen, hit the Trash symbol at the bottom right, then select Delete Photos for confirmation.
Delete Apps: Open Settings and tap General once it’s shown on the app interface. Following that, tapping the iPhone Storage tab will let you view the applications installed on your iPad; thus, find the unneeded apps once they’re presented. Once found, tap the first one you wish to delete, then tick Delete App on the next screen to free up storage.
Part 4. FAQs about How to Fix An iPad Unable to Check for Update
How do I fix my iPad Air unable to check for updates?
Use the strategies and procedures recommended in this article. Regardless of your iPad model, the parts below are flexible enough to repair your device effortlessly. Thus, we guarantee they will successfully and efficiently fix your update issues.
Why is my iPad stuck in the verifying the update screen?
An unstable internet connection is the common cause of this. It may also be because of an abnormal system or other issues, but don't worry. The FoneLab iOS System Recovery repair program can easily fix this, so check the details above.
No matter what iPad model or iOS device you use, there is always a solution when you encounter problems. Meanwhile, visit the FoneLab iOS System Recovery website for more.
FoneLab enables you to fix iPhone/iPad/iPod from DFU mode, recovery mode, Apple logo, headphone mode, etc. to normal state without data loss.
- Fix disabled iOS system problems.
- Extract data from disabled iOS devices without data loss.
- It is safe and easy to use.
