Delete iTunes Backup and Learn Effective Backup Methods
 Posted by Lisa Ou / May 05, 2023 09:00
 Do you often back up your iPhone using iTunes? If so, your computer storage must be filling up quickly. When you back up your iPhone data with iTunes, the backups are usually saved on your computer's C Drive. Hence, you can have insufficient space immediately when you keep on backing up your iPhone. To solve this problem, it will be helpful if you know how to delete backup from iTunes, especially as it can give you several advantages.
With that in mind, we have tracked down the correct technique for deleting your iPhone backup on iTunes. But before that, understand first the meaning of deleting iTunes backup and what it can do for your computer. After that, this article will lay out the most effective and safest methods to back up your iPhone. Read ahead to continue.


Guide List
Part 1. What Does iTunes Delete Backup Mean
iTunes delete backup simply means deleting the iPhone backups you have made on iTunes. Doing this can give you several advantages, particularly regarding storage. If your computer runs out of space, you can delete the backups you are not using anymore. The more often you back up your iPhone, the faster your computer storage will fill up, so it is recommended to erase the other backups. Especially when they’re almost all the same and there are only a few changes in each backup.
Part 2. How iTunes Delete Backup with Built-in Feature
Now that you know the benefits of deleting backups, it’s time to start the deleting process with the built-in feature. There are 2 different ways to do this. First, using Mac, you can operate the process on Finder. Second, you can process the deletion on File Explorer if you use a Windows computer.
Be guided by the effortless directions below to delete backup from iTunes with the built-in feature on Mac:
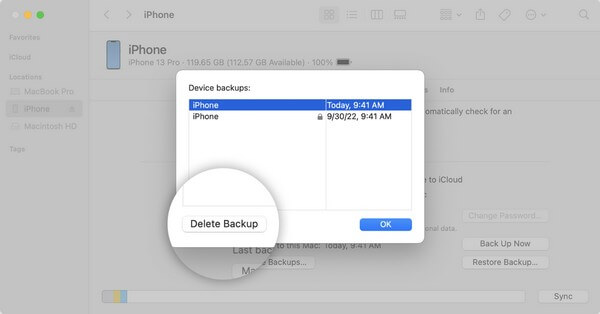
Step 1Find the Two-Face icon on your Mac’s Dock and click it to open Finder. Link your iPhone with a lightning cable to your Mac for your device to appear on Finder. Select it on the left column of the screen.
Step 2Once the options for your device show up, hit the Manage Backups tab under the General section. You will then see the list of backups you have made. Find the backup you no longer use, then right-click it.
Step 3From the options that appear, choose Delete, then hit the Delete Backup tab on the popup dialog box to confirm the deletion.
Note the trouble-free instructions underneath to erase your iPhone backup from iTunes with the built-in feature on Windows:
FoneLab enables you to backup and restore iPhone/iPad/iPod without data loss.
- Backup and restore iOS data to your PC/Mac easily.
- Preview data in detail before you restore data from backups.
- Backup and restore iPhone, iPad and iPod touch data Selectively.
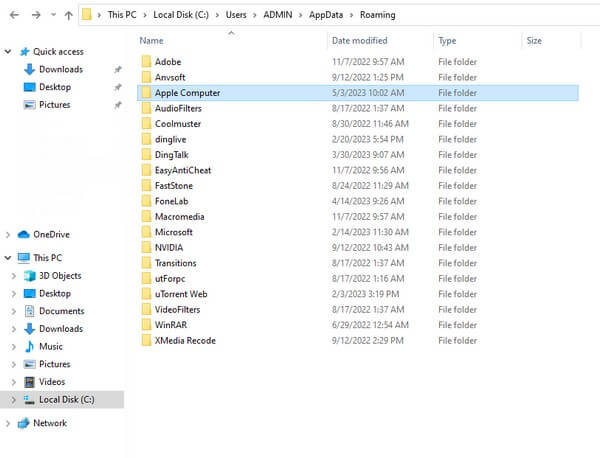
Step 1Launch the File Explorer on your Windows computer. On the upper-right area of the screen, click the search bar and enter %appdata%.
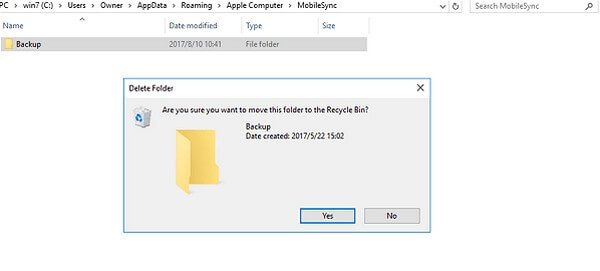
Step 2Next, open the Apple or Apple Computer folder. Inside, you will encounter another list of folders. Choose the MobileSync folder, then proceed to Backup.
Step 3Right-click the backup folder you intend to delete. Lastly, choose Delete from the options to erase your unwanted iTunes backup.
Part 3. How to Backup iPhone
the safe backup methods below. This will protect your device data even if you don’t use iTunes.
Method 1. Try FoneLab iOS Data Backup & Restore
If there is an easy and accessible way to back up your iPhone, FoneLab iOS Data Backup & Restore is among the top picks. This backup tool lets you back up or store your iPhone data in a safe place. Also, unlike other backup methods, this enables you to preview your data in detail once you restore them. And you can back up or restore selectively, according to your liking. It also offers a one-click backup, so it’s not a problem if you plan to back up everything at once.
FoneLab enables you to backup and restore iPhone/iPad/iPod without data loss.
- Backup and restore iOS data to your PC/Mac easily.
- Preview data in detail before you restore data from backups.
- Backup and restore iPhone, iPad and iPod touch data Selectively.
Go along with the undemanding steps below to safely back up your iPhone after you delete iPhone backup from iTunes with FoneLab iOS Data Backup & Restore:
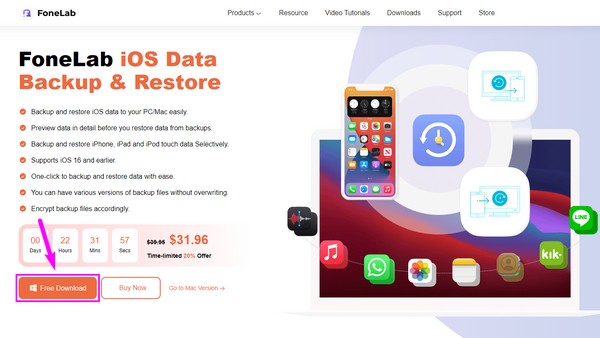
Step 1Get the Windows version of FoneLab iOS Data Backup & Restore by hitting Free Download on its official site. Meanwhile, click the Go to Mac Version selection to see the Apple version of the download tab. Afterward, set up the installation process and run the backup program on your computer later.
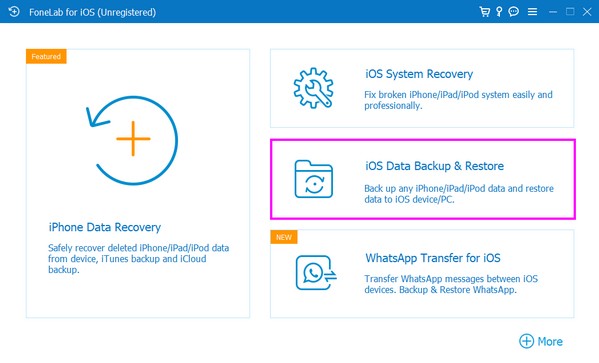
Step 2The tool's primary interface will show the iOS Data Backup & Restore, iPhone Data Recovery, WhatsApp Transfer for iOS, and iOS System Recovery features. You may use them accordingly if you need their functions later. But for now, click the box that contains the iOS Data Backup & Restore feature.
Step 3On the program’s following interface, choose iOS Data Backup, then attach your iPhone using a lightning cord to the computer. Following that, select your preferred backup mode from Standard or Encrypted backup. Then, hit the Start tab below and check the data types you wish back up on the next interface.
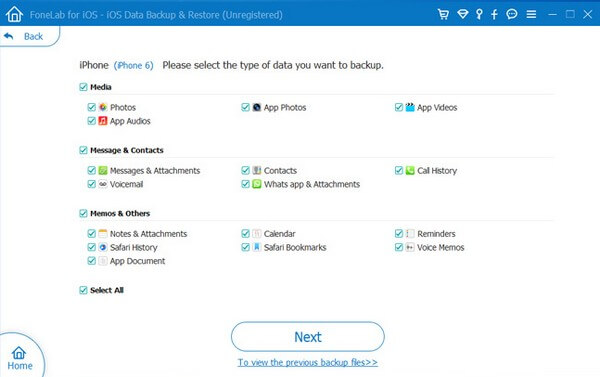
Step 4When you’re done selecting the file types, click the Next tab at the bottom of the tool’s screen. Afterward, the folder destination you want your backup to be stored. The backup will then process depending on the size and quantity of your data. Stand by until it finishes and your iPhone backs up successfully.
Method 2. Use iCloud
iCloud is one of the primary methods for backing up your iPhone. It offers 5 GB of free storage; thus, you can back up the essential files and other data on your device with this service as long as you have a fast Wi-Fi connection.
Take to heart the manageable guidelines to back up your iPhone after you delete iPhone backup from iTunes with iCloud:
Step 1Enter the Settings app on your iPhone and tap your profile at the top of the screen. Next, tap the iCloud tab from the list of options.
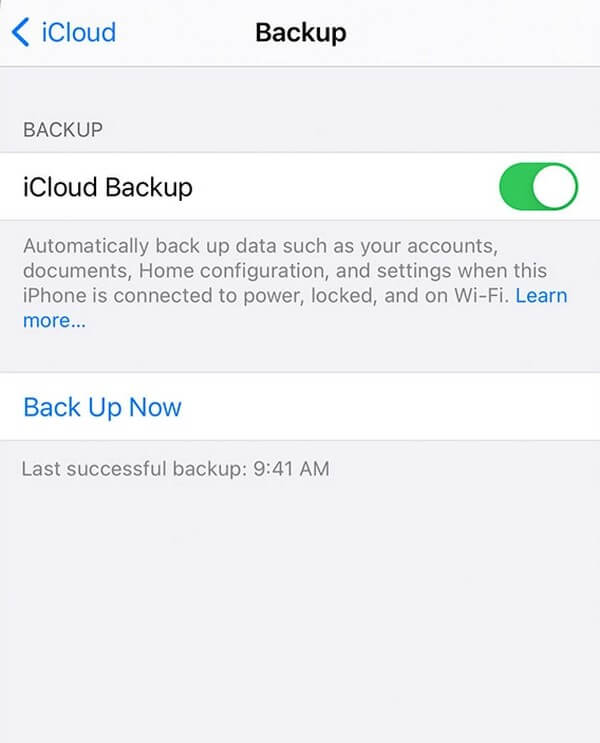
Step 2Tap iCloud Backup on the following screen, then toggle on the slider next to it. Under that option, hit the Back Up Now tab for your iPhone to start backing up to iCloud.
As mentioned above, this method requires the internet, so you must be connected to a stable network. If not, the backup process will take a while or, worse, get interrupted.
FoneLab enables you to backup and restore iPhone/iPad/iPod without data loss.
- Backup and restore iOS data to your PC/Mac easily.
- Preview data in detail before you restore data from backups.
- Backup and restore iPhone, iPad and iPod touch data Selectively.
Part 4. FAQs about iTunes Delete Backup
1. Is it ok to delete old iPhone backups on iTunes?
Yes, it is. Nothing is wrong if you wish to delete your iPhone backups, especially the old ones. In fact, this will bring advantages to your storage and can lead to better computer performance. You can create a backup afterward to keep your current data safe using reliable tools like FoneLab iOS Data Backup & Restore.
2. Does an iTunes backup save everything on my iPhone?
Not everything, but it saves most of your iPhone's local data. This includes your photos, messages, videos, call logs, contacts, etc. That's why creating a backup with iTunes can quickly fill up your storage. Different from other programs like FoneLab iOS Data Backup & Restore, which lets you back up selectively.
Deleting a backup is an easy task if you process the proper instructions. Same with backing up your iPhone to secure your data. Thus, you can trust the simple methods above to make your backup process more manageable.
FoneLab enables you to backup and restore iPhone/iPad/iPod without data loss.
- Backup and restore iOS data to your PC/Mac easily.
- Preview data in detail before you restore data from backups.
- Backup and restore iPhone, iPad and iPod touch data Selectively.
