Use QuickTime to Record Screen with Audio and Its Alternatives
 Posted by Valyn Hua / Feb 01, 2023 16:00
QuickTime is a pre-installed program across Mac and Apple mobile devices. It is mainly known as a multimedia player where you can watch videos, view photos, and play audio files. This tool can also manage these media files on your Mac. But aside from these, many people also use QuickTime to record Mac screens and edit videos simply. It is indeed a multifaceted media player. However, not everything about this program is admirable. For instance, it is restricted to Apple or Mac users only, as it is incompatible with other operating systems. Another is it doesn't support playback for several popular file formats like AVI, FLV, WMV, and more.
But there are lots of restrictions or drawbacks for the QuickTime recorder. You can also find the best alternative to record in iMovie, capture music files, quicktime screen recording and take snapshots from the article.

Later, you will come to know more information about QuickTime. In addition, the reasons why people have difficulty using the media player. But even with that, this article will guide you to use QuickTime to record screens. The steps will be provided to assist you through the entire process. You may still find it difficult since this recorder is not the easiest tool to deal with but worry no more. As we also included other recorders. Whether you prefer another built-in feature or a third-party tool, there is something in this article for you. Kindly read ahead to begin recording your screen with audio successfully.

Guide List
Part 1. QuickTime Screen Recording with Audio
The good thing about QuickTime is that it works well with high-quality videos. If you want to watch or edit full-HD videos, it easily delivers. So when it comes to the recording aspect, it won’t disappoint you with its HD recordings. Unfortunately, it seems to have more limitations than it looks. When you do a screen recording, expect it will take large file size of your device storage. For example, a 10-minute recording with 1080 resolution already occupies around half a GB. Moreover, QuickTime doesn’t have the capability to system audio, so the sound won’t be as clean as the other recorders’ outputs.
If you still wish to use the media player, go along with the following instructions below for QuickTime player screen recording with audio:
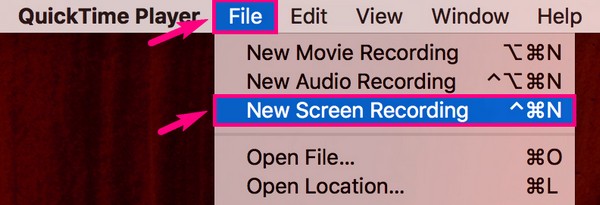
Step 1Open the Applications folder and launch QuickTime. Once it’s running, click the File tab and choose New Screen Recording from the drop-down list.

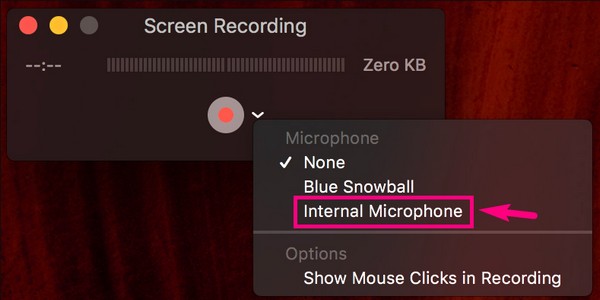
Step 2When the recording window appears, set up the options by clicking the down arrow next to the record button. On the microphone section, choose Internal Microphone to capture the screen with audio. You may also check out the other options if you want.

Step 3Afterward, hit the record button and choose your preferred recording type. The program will provide you with instructions to proceed with the recording process. When you’re finished, click the Stop icon at the top. Then finally, save the video recording to your Mac.

FoneLab Screen Recorder allows you to capture video, audio, online tutorial, etc on Windows/Mac, and you can easily customize size, edit the video or audio, and more.
- Record video, audio, webcam and take screenshots on Windows/Mac.
- Preview data before saving.
- It is safe and easy to use.
Part 2. QuickTime Alternative to Record Screen with Audio
Sometimes, there are more processes for QuickTime beyond the simple setup options. And they may involve a few technicalities that confuse the users, especially beginners. When you encounter this kind of situation, you can always look for other solutions instead of letting the frustration mess up your brain.
Option 1. FoneLab Screen Recorder
FoneLab Screen Recorder is a perfect example of an alternative that is more powerful than the original. Same with QuickTime, it can screen record videos, tutorials, vlogs, and more in high quality. But this tool is beyond superior, as it can do much more than your ordinary screen recorder. It records your screen and converts them into several available formats. Hence, video compatibility will be one of the least of your concerns. And the best part is FoneLab Screen Recorder has both Mac and Windows versions. Therefore, you can install it on almost any computer you have.
Go along with the straightforward steps below to have knowledge on how to screen record with sound using the trusted QuickTime alternative, FoneLab Screen Recorder:
FoneLab Screen Recorder allows you to capture video, audio, online tutorial, etc on Windows/Mac, and you can easily customize size, edit the video or audio, and more.
- Record video, audio, webcam and take screenshots on Windows/Mac.
- Preview data before saving.
- It is safe and easy to use.
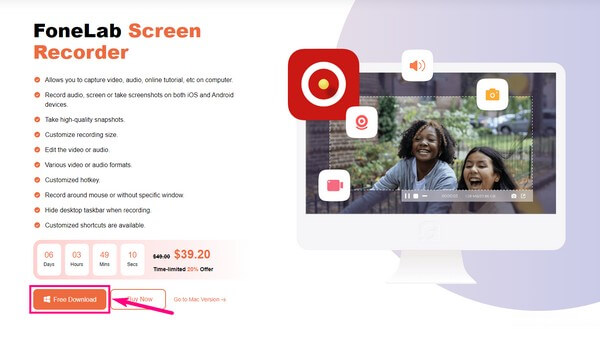
Step 1Launch a web and visit the FoneLab Screen Recorder’s website. To save the software file on your computer, click the Free Download tab on the lower-left part. The download and installation process combined will only take a minute or two. Make sure you will permit the program to make changes on your device so you can launch it on your computer.

Step 2Choose the Video Recorder feature on FoneLab Screen Recorder’s main interface. The other functions are accessible to use anytime once you need them. There are also options at the bottom you can set up to make the process easier.

Step 3Customize the functions on the following interface. You have the choice to record the whole computer screen or change it to your preferred size. Turn on the webcam if you want to include yourself in the video. Same with the volume sliders. You can also adjust them according to your video needs.

Step 4Once satisfied with the options proceed to the REC button at the end of the interface. The Advanced Recorder is also provided if you want to screen record more creatively. Later, you can stop the recording and save the video file on your computer.

FoneLab Screen Recorder allows you to capture video, audio, online tutorial, etc on Windows/Mac, and you can easily customize size, edit the video or audio, and more.
- Record video, audio, webcam and take screenshots on Windows/Mac.
- Preview data before saving.
- It is safe and easy to use.
Option 2. Screenshot Bar
The Screenshot Bar is another built-in feature for screen recording on Mac. If you use it often, you can go to the Options menu, right-click its icon, and choose the option to keep it in the Dock.
Go along with the following guide below to record screen and sound using the QuickTime alternative, Screenshot Bar:
Step 1Push the Shift + Command + 5 buttons on your keyboard to display the screenshot bar tools.
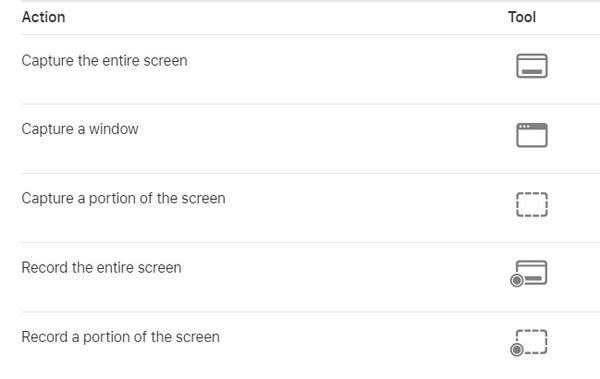
Step 2Click the appropriate icon for screen recording. There is one button for recording the entire screen and one for only a portion of the screen.

FoneLab Screen Recorder allows you to capture video, audio, online tutorial, etc on Windows/Mac, and you can easily customize size, edit the video or audio, and more.
- Record video, audio, webcam and take screenshots on Windows/Mac.
- Preview data before saving.
- It is safe and easy to use.
Part 3. FAQs about QuickTime and Its Alternatives
Can the screenshot bar edit video recordings?
No, it can't. The screenshot bar is developed to document or record the activities on your screen alone. Unlike the other screen recorders, it has no features for editing recorded videos. Fortunately, you can always download a separate tool for editing. Or much better if you install a screen recorder with editing features like FoneLab Screen Recorder.
Is it possible to trim the video after the screen recording?
Yes, you can. However, not all screen recorders have enough features to cut or trim videos. If you need that function, you need to install a program that can do that. Thus, we recommend the FoneLab Screen Recorder. It has an advanced trimming feature, and the steps are effortless.
Can FoneLab Screen Recorder record gameplay?
Yes, it can. Aside from video recordings online, tutorials, vlogs, etc., FoneLab Screen Recorder can capture gameplay. In fact, it has its specialized feature for this aspect. Hence, you can expect a better recording experience, tool performance, and high quality. It's the perfect tool for documenting your game.
That is all for using QuickTime and its high-end alternatives. You no longer need to waste your time trying to figure out the program you're not fond of using. You only need to install an excellent alternative like FoneLab Screen Recorder to ease your recording experience.
FoneLab Screen Recorder allows you to capture video, audio, online tutorial, etc on Windows/Mac, and you can easily customize size, edit the video or audio, and more.
- Record video, audio, webcam and take screenshots on Windows/Mac.
- Preview data before saving.
- It is safe and easy to use.
