Snipping Tool on Mac: Information You Should Know
 Updated by Lisa Ou / July 29, 2024 09:15
Hello, I hope you're doing well. I'm reaching out because I need assistance learning how to use the Snipping Tool. I need it because I am taking notes for my upcoming exam. Could you please provide me with a step-by-step guide or any tips you have? Your help would be greatly appreciated. Thank you!
The Snipping Tool is a screenshot utility bound to the Windows operating system. It enables users to record certain screen sections, such as a free-form region, a rectangle, a window, or the entire screen. The question is: Is there a Snipping tool on Mac? Read this well-worth-it post for the mentioned topic as you scroll down.


Guide List
Part 1. How to Use Snipping Tool on Mac
As a Windows user, you might be familiar with the Snipping tool for taking screenshots on that operating system. You might ask: Is there a Mac Snipping tool? Unfortunately, no. There is no particular Snipping tool program on Macs. The good news is that Macs have built-in screenshot tools with similar functionalities. You can use the shortcut key commands as an alternative. We will list them for more information about their functions. Scroll down to continue reading.
FoneLab Screen Recorder allows you to capture video, audio, online tutorial, etc on Windows/Mac, and you can easily customize size, edit the video or audio, and more.
- Record video, audio, webcam and take screenshots on Windows/Mac.
- Preview data before saving.
- It is safe and easy to use.
Shift + Command + 3
This shortcut key command takes a screenshot of your Mac's entire screen. Pressing the Shift + Command + 3 keys simultaneously performs the capturing procedure. You will see the screenshot preview at the bottom right corner of the main interface. This alternative to the Snipping tool on Mac is beneficial for individuals who take screenshots for larger screens, like watching movies, playing computer games, and more. The reason is that you can capture the entire screen in one click.
Shift + Command + 4
However, some prefer to capture only a portion of the Mac's screen. If that’s the case, the Shift + Command + 4 command key is the best Mac Snipping tool shortcut. It can capture the part of a screen depending on your preference. You no longer need to cut or crop the image in this case. You can be specific with the screenshot and do not need to edit it. The cursor will be the tool you need to act. Once it is released, the screenshot will be taken automatically.
Shift + Command + 5
Pressing the Shift + Command + 5 shortcut keys on a Mac raises the Screenshot toolbar. This feature gives you multiple options, as shown in the screenshot below. The included tools are Capture Entire Screen, Capture Selected Window, Capture Selected Portion, Record Entire Screen, and Record Selected Portion. You only need to click them, and you will quickly learn their function because they are easy to navigate.

Part 2. Alternatives for Snipping Tool on Mac
If you're seeking alternatives to the Snipping Tool on Mac, you have a few strong options in this post because we will list them below. Many third-party programs provide more advanced screenshot capabilities than the built-in utilities. Screenshots can be edited with text, shapes, and highlights; some even allow you to blur important information.
Many programs support easy sharing by interacting with cloud services or social media networks. These alternatives include adjustable capture areas, video recording, and advanced editing capabilities. 2 of the leading alternatives of the Snipping tool MacBook are posted below.
Alternative 1. Use FoneLab Screen Recorder
FoneLab Screen Recorder is a powerful tool that lets you capture video, audio, and online tutorials on your computer. It supports recording audio and screen and taking high-quality snapshots on iOS and Android devices. You can customize the recording size to suit your needs and edit video and audio easily. The software supports various video and audio files formats, offering flexibility for your projects.
With features like customized hotkeys, the ability to record around the mouse or without a specific window, and the option to hide the desktop taskbar when recording, FoneLab Screen Recorder provides a comprehensive solution for all your recording needs. Customized shortcuts further enhance its ease of use. Discover how to use this alternative Snipping tool in Mac.
FoneLab Screen Recorder allows you to capture video, audio, online tutorial, etc on Windows/Mac, and you can easily customize size, edit the video or audio, and more.
- Record video, audio, webcam and take screenshots on Windows/Mac.
- Preview data before saving.
- It is safe and easy to use.
Step 1After visiting the official website of FoneLab Screen Recorder, click the Free Download button. The tool can be set up by dragging its file into the Application folder. The software will then be launched. Later, please choose the Screen Capture button at the bottom right of the main interface.

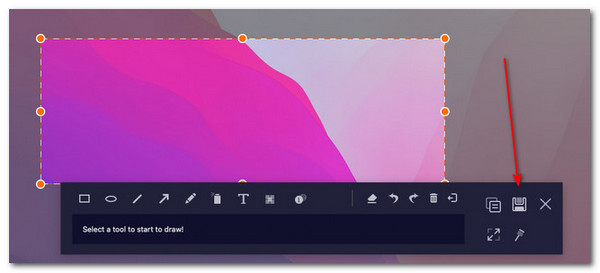
Step 2The software will now allow you to use the cursor to choose the portion of the screen you want to screenshot. Select the screen section you prefer to screenshot. Then, the software's editing feature will be shown on the screen. You can use them to edit the screenshot. Finally, click the Save icon at the top right of the software toolbar.
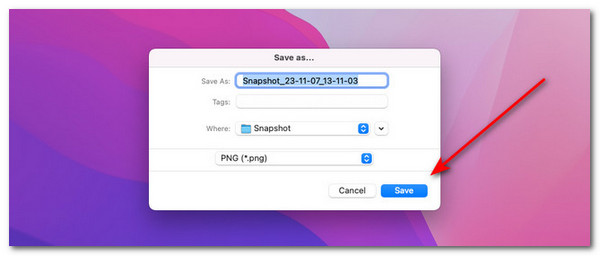
Step 3A small window will be shown on the Mac screen. The software will allow you to rename the screenshot file. You can use your keyboard to do that. Then, you can also select where you prefer to store the snapshot. Then, click the Save button to complete the procedure. The process will only last a second. You can find it in the destination folder you choose.
FoneLab Screen Recorder allows you to capture video, audio, online tutorial, etc on Windows/Mac, and you can easily customize size, edit the video or audio, and more.
- Record video, audio, webcam and take screenshots on Windows/Mac.
- Preview data before saving.
- It is safe and easy to use.
Alternative 2. Xnapper
Xnapper is a versatile tool that improves your screenshot experience by letting you capture stunning images with flexible backgrounds, such as colors or portraits. It provides a quick and effective workflow via keyboard shortcuts and allows editing and emphasizing with its built-in editor.
The tool mentioned makes sharing screenshots simple, with quick options for social media sharing via copy and paste. It also contains a feature that blurs away important information, protecting your privacy and security. While Xnapper offers basic editing and highlighting, it lacks advanced editing capabilities that may require more detailed work.
Discover how to use Snipping tool on Mac alternatives by following the detailed steps below.
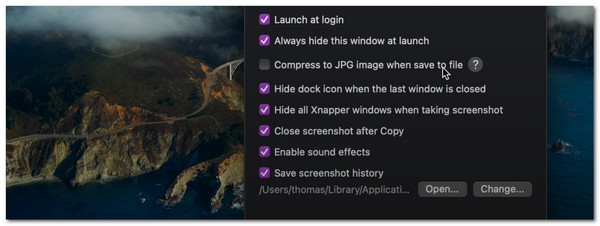
Step 1Download the tool from its official website. You must choose the Mac version, which is incompatible with Apple devices. You can allow settings you prefer by ticking their boxes on the left. Click the Change button at the bottom right corner of the screen. Later, launch the tool to start the process.
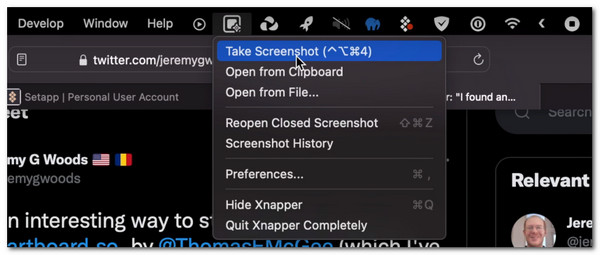
Step 2Please put the cursor at the top of the screen. Then, the toolbar will show various Mac features. Click the Box icon among them and drop-down options will appear. Choose the Take Screenshot button afterward to continue. The cursor will be replaced with a Plus icon. Use it to take the screen section you prefer to take a screenshot. Once the cursor is released, the screenshot will take place.
Step 3The current window will close, and the software interface will appear. It will show you all the basic and advanced editing features it offers. In addition, the tool will give the screenshot a background automatically, and you can remove it using the features on the right.
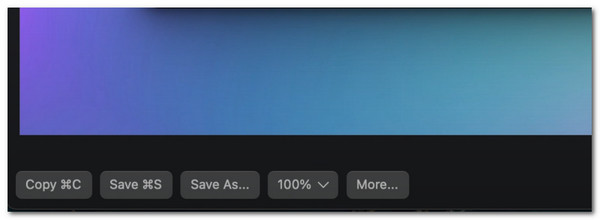
Step 4You will see this in the screenshot below. Then, tick the Save icon at the bottom left corner of the main interface. The File Saved interface will appear on the screen once the saving process is complete.
FoneLab Screen Recorder allows you to capture video, audio, online tutorial, etc on Windows/Mac, and you can easily customize size, edit the video or audio, and more.
- Record video, audio, webcam and take screenshots on Windows/Mac.
- Preview data before saving.
- It is safe and easy to use.
Part 3. FAQs about Snipping Tool on Mac
1. Where are my screenshots saved on a Mac?
By default, Mac screenshots are saved on the Desktop after you perform the action. You can also locate them on the Finder program that the mentioned Apple device offers. It has folders that store your data depending on their classification. However, taking screenshots on the Mac will show you a preview of the image file. If you edit the screenshot file, it will be stored in another folder. The reason is that the process will require you to save the file and choose a destination folder.
2. Are there editing options for screenshots on a Mac?
Yes, after taking a screenshot using the MacBook snipping tool, click the thumbnail in the corner of the screen to open it in Markup for editing. The basic editing tools will be shown on the Mac screen. Some tools are highlighters, pens, pencils, and more. However, the mentioned tools do not have advanced features. If you want some, you can use FoneLab Screen Recorder to capture your Mac screen and edit them using its advanced editing features.
On a Mac, the built-in screenshot utility is a comparable version of the Snipping Tool, which may be accessed using keyboard shortcuts. This post posts alternatives to the Snipping Tool on Macs version. In addition, FoneLab Screen Recorder can take screenshots on your Mac with advanced editing features. Do you want to know more? Ask us anything about the topic by leaving them in the comment section below. Thank you!
FoneLab Screen Recorder allows you to capture video, audio, online tutorial, etc on Windows/Mac, and you can easily customize size, edit the video or audio, and more.
- Record video, audio, webcam and take screenshots on Windows/Mac.
- Preview data before saving.
- It is safe and easy to use.
