- Part 1. Transfer Photos from iPhone to Windows 10 through FoneTrans for iOS
- Part 2. Transfer Photos from iPhone to Windows 10 via iCloud
- Part 3. Transfer Photos from iPhone to Windows 10 through iTunes
- Part 4. Transfer Photos from iPhone to Windows 10 via A USB
- Part 5. FAQs about Transferring Photos from iPhone to Windows 10
Professional Ways to Transfer Photos from iPhone to Windows 10
 Posted by Boey Wong / May 17, 2023 09:00
 My iPhone is slowly getting lagging as the storage fills up and becomes insufficient. Most of the files on my device are photos, so I want to move most of them to my computer running Windows 10 to free up space. Can someone help me discover effective iPhone to PC photo transfer methods?
iPhones are well-known to have excellent camera quality. Hence, it's unsurprising to know the photos you take on your iPhone are a bit large. Naturally, this fills up your storage faster, especially if you like taking pictures whenever and wherever. But if you have a PC, you can store your other photos and free up space on your iPhone. This doesn't only let you take more pictures; it also improves your device's performance.

Aside from that, doing this will let you view the photos on your computer's larger screen. Thus, transferring your iPhone photos to your Windows computer provides some advantages. That being said, this post will give you the details regarding the professional techniques to share files on Windows 10. A step-by-step process for each method will be included for assistance. Please begin the transfer by proceeding to the next parts.

Guide List
- Part 1. Transfer Photos from iPhone to Windows 10 through FoneTrans for iOS
- Part 2. Transfer Photos from iPhone to Windows 10 via iCloud
- Part 3. Transfer Photos from iPhone to Windows 10 through iTunes
- Part 4. Transfer Photos from iPhone to Windows 10 via A USB
- Part 5. FAQs about Transferring Photos from iPhone to Windows 10
Part 1. Transfer Photos from iPhone to Windows 10 through FoneTrans for iOS
Among the top transfer tools you can find on the web is the FoneTrans for iOS. This third-party program is known for safely transferring various files between different devices, including iPhone, iPad, iPod Touch, and both Windows and Mac computers. Thus, you can expect it to have the ability to move photos in several formats from your iPhone to different versions of Windows, including Windows 10, 11, 7, and more. With this program’s efficiency, you can quickly transfer without encountering complications using only straightforward instructions. You may also enjoy its other features afterward.
With FoneTrans for iOS, you will enjoy freedom to transfer your data from iPhone to computer. You can not only transfer iPhone text messages to computer, but also photos, videos and contacts can be moved to PC easily.
- Transfer photos, videos, contacts, WhatsApp, and more data with ease.
- Preview data before transferring.
- iPhone, iPad and iPod touch are available.
See the exemplar directions underneath for iPhone photo transfer to Windows 10 with FoneTrans for iOS:
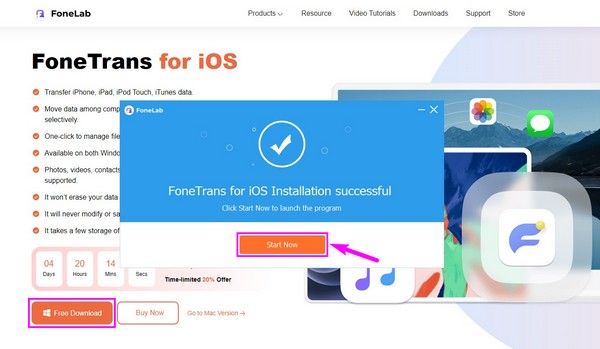
Step 1Install the FoneTrans for iOS tool by getting its installer file on its official site. Hit Free Download with the Windows logo on the left to do that. When saved, you can authorize the tool to make changes to your device and start the installation. After around a minute, hit the Start Now button that will appear on the program window to launch it.
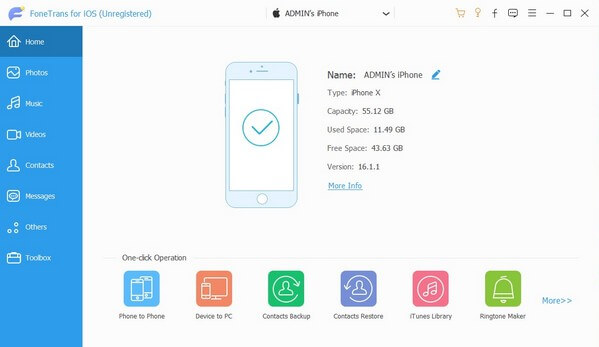
Step 2When the primary interface reveals, you must join your iPhone and Windows 10 using a lightning cable to manage your data. Instructions will be displayed on the interface to assist you with the connection. Afterward, access the pulldown bar at the top and choose your iPhone from the appearing list to have your iPhone as the sender.
Step 3The program’s interface contains the supported data types on the left portion. From there, choose the Photos tab, and an additional column will appear, revealing the folders of the pictures stored in your iPhone. Click the folder that contains the photos you intend to transfer. After that, select them using the checkboxes on each image.
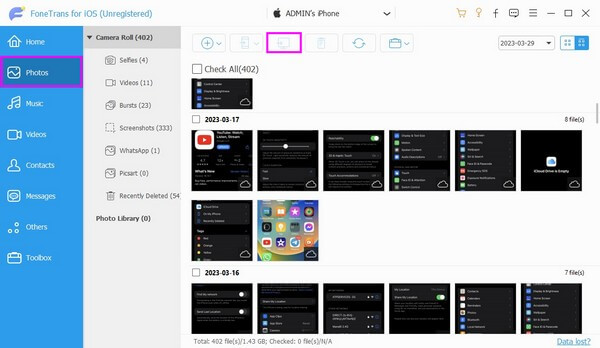
Step 4Once your desired files are selected, hit the tab with the computer icon in the upper center. The images will then transfer from the iPhone to your Windows 10.
With FoneTrans for iOS, you will enjoy freedom to transfer your data from iPhone to computer. You can not only transfer iPhone text messages to computer, but also photos, videos and contacts can be moved to PC easily.
- Transfer photos, videos, contacts, WhatsApp, and more data with ease.
- Preview data before transferring.
- iPhone, iPad and iPod touch are available.
Part 2. Transfer Photos from iPhone to Windows 10 via iCloud
iCloud is one of the efficient methods for transferring files between an iPhone and a computer with USB physical connections. You can use its official site or its program for Windows.
Option 1. iCloud Official Page
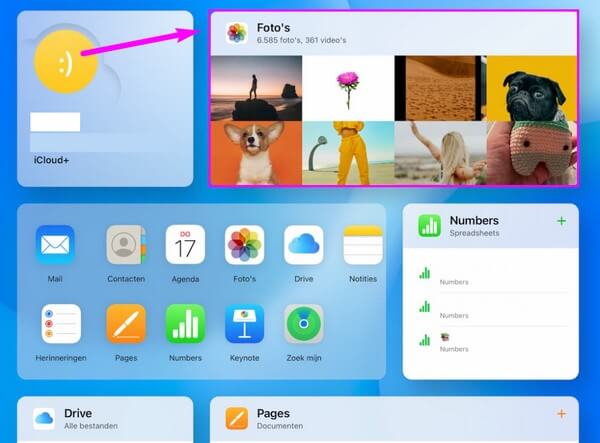
iCloud’s official webpage is icloud.com, and you can visit it by opening a web browser on your computer.
Stick to the uncomplicated steps below for iPhone to transfer photos wirelessly from iPhone to Windows on the official iCloud website:
Step 1Enter Settings on your iPhone, then tap your profile on top. From the list of services, choose iCloud and open the Photos section.
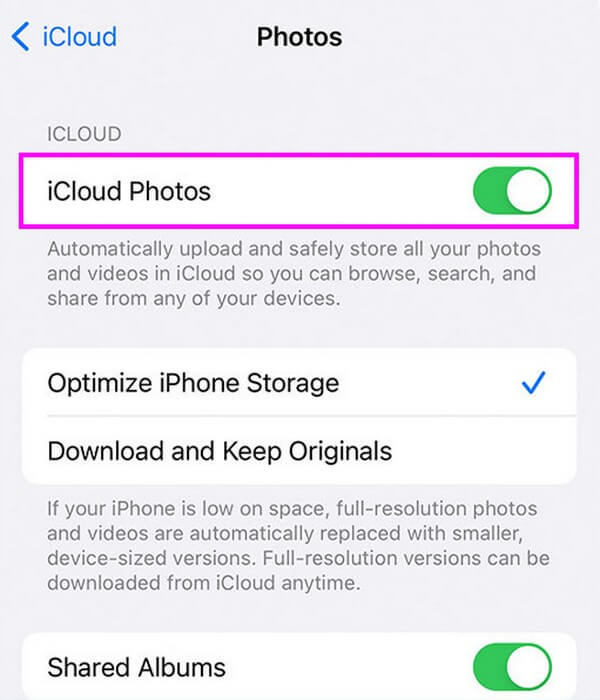
Step 2Next, toggle the slider beside the iCloud Photos option to sync your iPhone photos to iCloud. After that, proceed to your computer and open a browser.
Step 3Enter icloud.com on the address bar and log into the same Apple ID you use on your iPhone. From there, you will see the iPhone photos you have synced on iCloud.
Option 2. iCloud for Windows
Meanwhile, you no longer have to run a browser if you install the iCloud for Windows program on your Windows 10 and later versions.
Adhere to the manageable process underneath for Windows 10 import photos from iPhone with iCloud for Windows:
Step 1On your iPhone, tap Settings > iCloud > Photos, then enable iCloud Photos to sync your iPhone photos with iCloud.
Step 2Launch the Microsoft Store and install iCloud on your Windows 10 computer. Afterward, log in using the Apple ID on your iPhone.
Step 3Access Photos on the iCloud for Windows program to see the synced photos from your iPhone.

Part 3. Transfer Photos from iPhone to Windows 10 through iTunes
Like the previous method, syncing your iPhone photos using iTunes allows you to view them on your Windows 10 computer. You can get the iTunes program on the Microsoft Store.
Pay attention to the direct instructions below to sync iPhone photos to Windows 10 with iTunes:
Step 1Install and run the latest iTunes version on your Windows 10. Once launched, attach your iPhone to it using a USB cord. Then click the mobile phone button on the interface.
Step 2From the left options on the next screen, click Photos to manage your iPhone images. To transfer, check Sync Photos and choose the Photos app from the Copy photos from: locations.
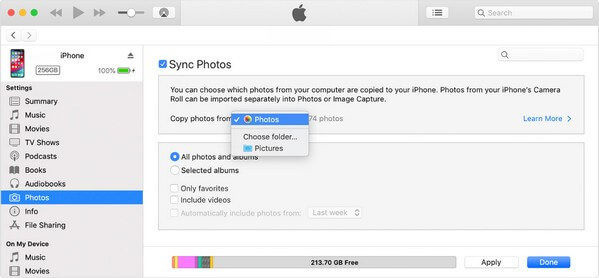
Step 3Manage the sync options on the box below, then hit Apply to have your iPhone pictures on your Windows 10.
With FoneTrans for iOS, you will enjoy freedom to transfer your data from iPhone to computer. You can not only transfer iPhone text messages to computer, but also photos, videos and contacts can be moved to PC easily.
- Transfer photos, videos, contacts, WhatsApp, and more data with ease.
- Preview data before transferring.
- iPhone, iPad and iPod touch are available.
Part 4. Transfer Photos from iPhone to Windows 10 via A USB
If you prefer not to install a program, using a USB cable alone is enough to transfer your iPhone pictures to the computer on the Windows 10 Photos app.
Emulate the simple guidelines underneath for USB photo transfer from iPhone to Windows 10:
Step 1Link your iPhone with the use of a lightning cord to the computer. Ensure your device is unlocked for your Windows 10 to access your data.
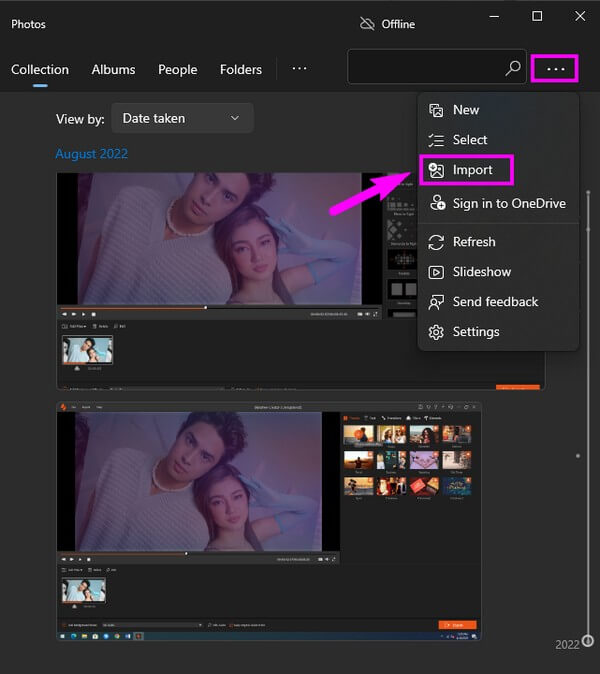
Step 2Click the Start icon on your desktop screen and open the Photos app. On the top-right of the screen, click the three-dot symbol, then select Import.
Step 3After that, click From a connected device. Then comply with the following prompts to select your iPhone photos and transfer them to your Windows 10 computer.
Part 5. FAQs about Transferring Photos from iPhone to Windows 10
1. Why can't I transfer photos from my iPhone to Windows 10?
Your USB cable may be malfunctioning. Many transfer methods require a USB cable to share files between devices. Thus, you must ensure the cable works properly to transfer your data. If it's defective, try other USB cables for the transfer process.
2. Why won't my iPhone photos show up on my Windows 10?
It was mentioned above that your iPhone must be unlocked when you connect. Hence, you must open it for the computer to recognize your iPhone and show its content. Also, you should abide by the permissions and trust the computer on your device.
With FoneTrans for iOS, you will enjoy freedom to transfer your data from iPhone to computer. You can not only transfer iPhone text messages to computer, but also photos, videos and contacts can be moved to PC easily.
- Transfer photos, videos, contacts, WhatsApp, and more data with ease.
- Preview data before transferring.
- iPhone, iPad and iPod touch are available.
Each method in this article is guaranteed to be safe and efficient. Thanks for your dedication in trying them out, and we hope to have helped with your transfer concern.
