Remarkable Guide on How to Scan on An iPhone Easily
 Updated by Lisa Ou / Aug 14, 2023 16:30
Greetings! Scanning various codes and documents has become a routine in my everyday life, so I've downloaded different scanners on my device, but most are not easy to use. Thankfully, I found out iPhone has a native scanning feature, which would be a great help. However, I have no idea how to scan something on iPhone. Can someone please guide me? Thanks!
Recently, technology has become more advanced with the introduction of code scanners. With QR codes, barcodes, etc., accessing various data, activities, and more is now more convenient. By only scanning, you can connect to different devices, view documents, photos, and even websites. Thus, devices with built-in scanners, like iPhones, make life easier. But do you know the process of scanning on an iPhone? Well, worry no more; this post will introduce the proper guidelines for scanning codes and data with your iPhone. Instructions were also simplified to provide you with more convenience.

FoneLab enables you to fix iPhone/iPad/iPod from DFU mode, recovery mode, Apple logo, headphone mode, etc. to normal state without data loss.
- Fix disabled iOS system problems.
- Extract data from disabled iOS devices without data loss.
- It is safe and easy to use.

Guide List
Part 1. How to Scan Code on iPhone
An iPhone has a built-in code scanner that can be used on QR codes; for barcodes, you can install a third-party app. Below are the instructions for scanning both codes, so perform the steps correctly for a successful process.
Section 1. How to Scan QR Code on iPhone
QR, or a Quick Response code, is an image comprising an array of black and white squares. It is a machine-scannable code for storing information, such as URLs, social media, etc. And with iPhone’s native scanning feature, you will be able to access these types of information on your device by navigating only a few steps. Scanning QR codes may also let you automatically open web pages, download apps, send messages, and more.
Act by the simple guidelines below to master how to scan QR code on iPhone:
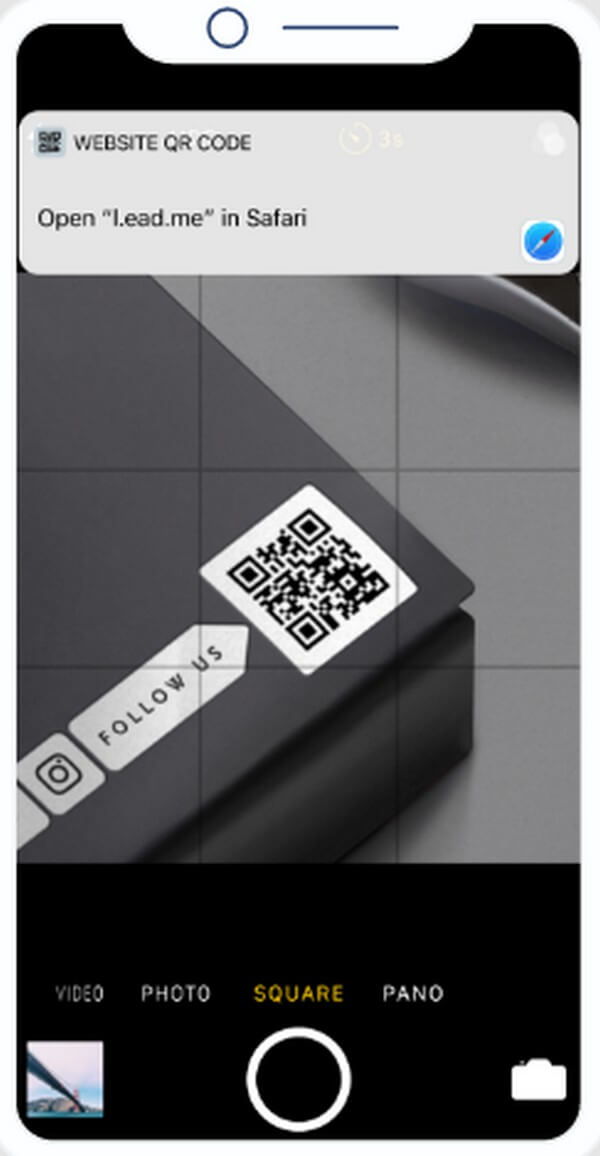
Step 1Locate and run the Camera on your iPhone, then focus it on the QR code you wish to scan. Ensure to keep it steady for the scanner to read it correctly.
Step 2When a QR code notification appears on the upper part of the screen, tap it to access its information, whether it is a website, etc.
FoneLab enables you to fix iPhone/iPad/iPod from DFU mode, recovery mode, Apple logo, headphone mode, etc. to normal state without data loss.
- Fix disabled iOS system problems.
- Extract data from disabled iOS devices without data loss.
- It is safe and easy to use.
Section 2. How to Scan Barcode on iPhone
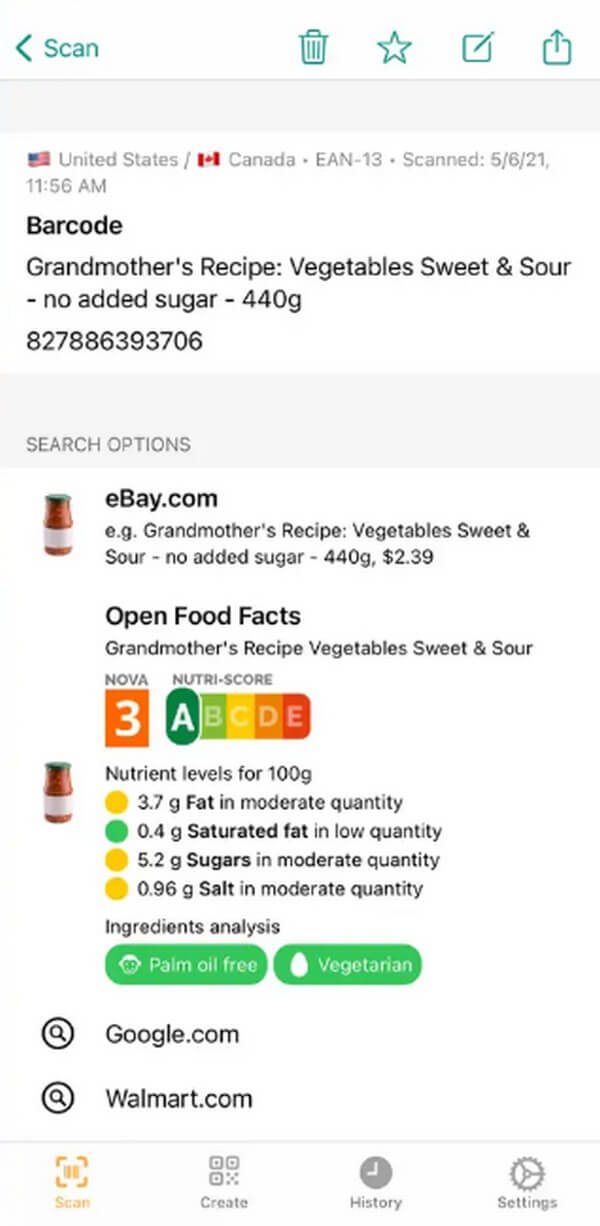
A barcode is an image with bars and spaces. Like the previous part, it is also a machine-scannable code primarily used to identify store products. By scanning barcodes, you will know the product inventory, pricing, etc. You can scan them on your iPhone using a barcode-scanning app like QR Code & Barcode Scanner.
Stick to the straightforward steps underneath to understand how to scan a barcode on iPhone:
Step 1Open the App Store and enter QR Code & Barcode Scanner in the search field. Once you find the app, tap it and select the Get tab to install it on your device. After that, launch the scanner on your iPhone.
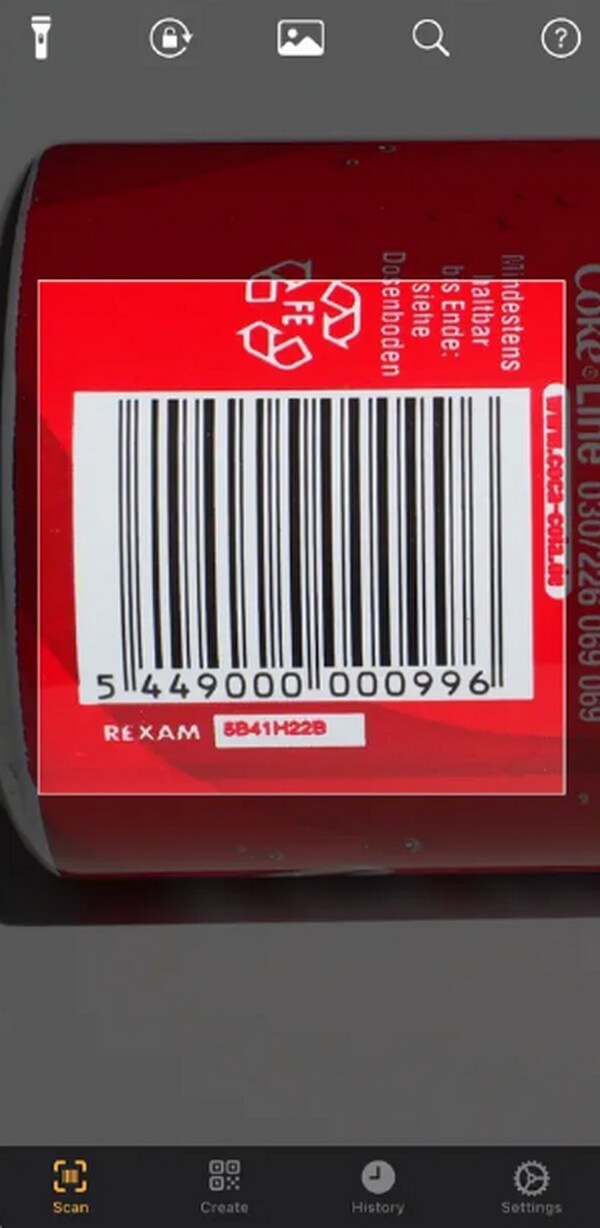
Step 2Once the app is running, ensure you are in the Scan section. Then, focus the camera view on the barcode you will scan. Keep it steady, and its information will display on the screen once scanned.
Part 2. How to Scan Documents on iPhone
Besides QR and barcodes, you can also scan documents using your iPhone without additional third-party tools. Proceeding to the Notes app on your iPhone will allow you to scan a document picture. You can do this by choosing the Scan Documents option, and then you will have the choice to save it as a PDF file. The process is simple, and you can expect it to finish within a few moments.
Note the uncomplicated instructions below to grasp how to scan a photo on iPhone:
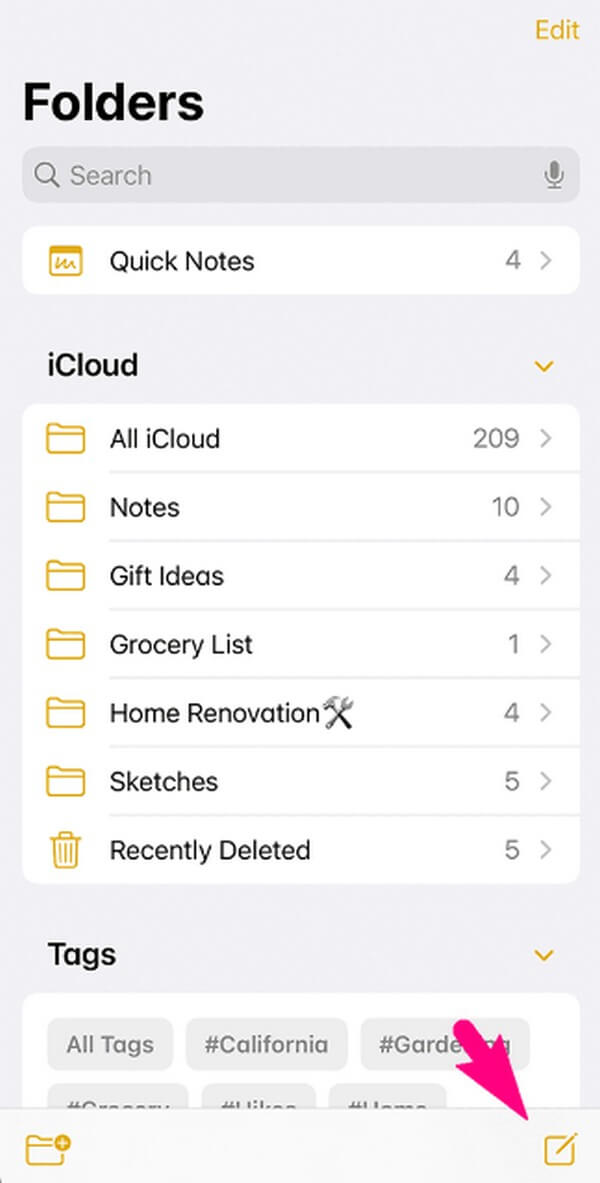
Step 1Run the Notes app on your iPhone. Then, tap the Create New Note icon at the bottom right of the screen, followed by the Plus icon. A new note will then appear on the following screen. Once you’re on the notes interface, select the camera icon.
Step 2Hitting the camera icon will reveal multiple options. From there, choose Scan Documents and focus the document photo on the camera view. To scan, hit the Shutter icon. Avoid unsteady movements for the app to scan properly.
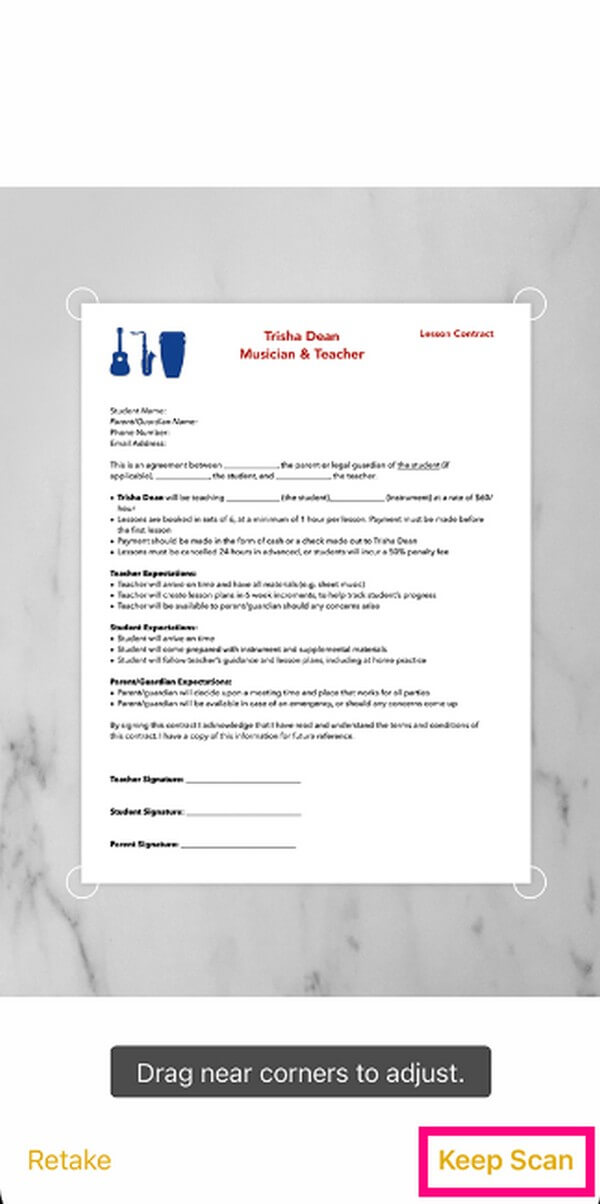
Step 3Afterward, you may drag the corners of the captured document to adjust it more cleanly. Then, tap Keep Scan to save it on your notes. If you desire to save it as a PDF, hit the Share icon on the Note interface’s top right > Create PDF.
Part 3. Fix iPhone Scanner with FoneLab iOS System Recovery
If your iPhone scanner doesn’t work, they may be an underlying issue on the device. To fix it, try a professional program like FoneLab iOS System Recovery. This tool offers 2 repair modes useful for mending issues on iOS devices. It can fix your malfunctioning iPhone scanner, an iOS device stuck in a certain screen, and more, regardless if you wish to clear or not lose your data during the repair process. Hence, it is more advantageous, as you can use it on an iPad and iPod Touch if an issue occurs. Moreover, FoneLab iOS System Recovery only requires simple understanding because of its user-friendly interface.
FoneLab enables you to fix iPhone/iPad/iPod from DFU mode, recovery mode, Apple logo, headphone mode, etc. to normal state without data loss.
- Fix disabled iOS system problems.
- Extract data from disabled iOS devices without data loss.
- It is safe and easy to use.
Accept the simple guidelines below as a pattern of how to fix your iPhone scanner with FoneLab iOS System Recovery:
Step 1Secure a program file of FoneLab iOS System Recovery using its Free Download tab on the official website. The macOS and Windows versions are available, so pick the download button for your computer. Afterward, operate the permissions and install the tool on your computer. You will see the installation status at the bottom of the program window, and once it’s completed, you can begin launching the repair tool.
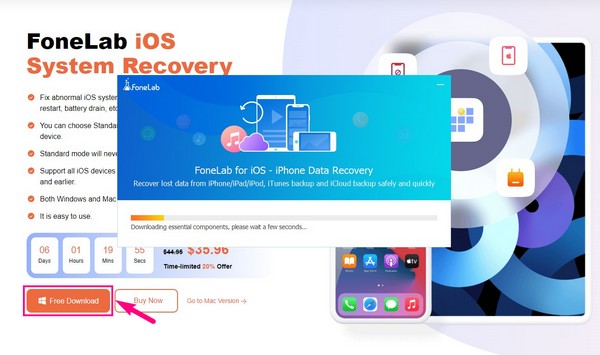
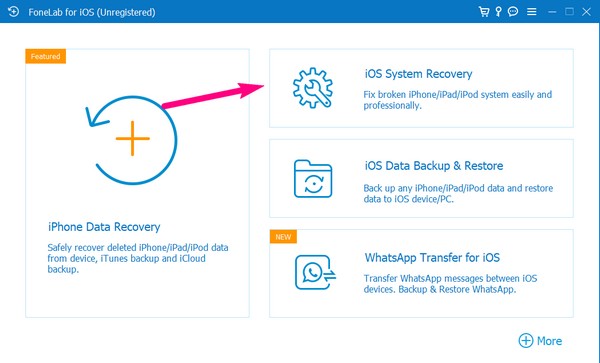
Step 2See the iOS System Recovery feature in the tool’s prime interface. It is on the top right box above the iOS Data Backup & Restore feature. The following interface will then display the issues that are fixable by the program. It includes several screens, devices, iOS modes, and iTunes issues. Afterward, hit the Start tab.
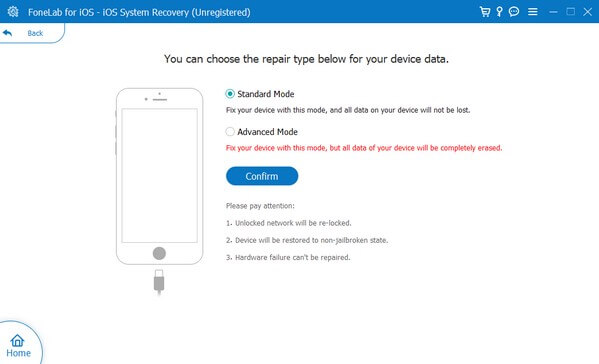
Step 3The Standard and Advanced modes will be on the following screen. Read their descriptions and choose the repair mode you prefer. Ensure to read carefully to avoid losing your data, as one of the modes will automatically erase your device data. Next, click the Confirm tab to see the instructions on the next interface.
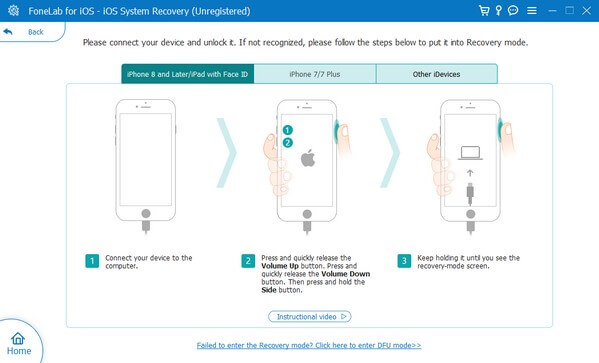
Step 4Select your iPhone version from the tabs on the upper part, then perform the on-screen directions carefully. This will lead you to Recovery mode, and from there, start fixing the iPhone issue using the firmware package that will automatically be downloaded.
FoneLab enables you to fix iPhone/iPad/iPod from DFU mode, recovery mode, Apple logo, headphone mode, etc. to normal state without data loss.
- Fix disabled iOS system problems.
- Extract data from disabled iOS devices without data loss.
- It is safe and easy to use.
Part 4. FAQs about How to Scan on iPhone
1. Why can't my iPhone scan a QR code?
The most possible reason your iPhone can't scan a QR code is expiration. Perhaps, the code you are scanning is no longer available or expired, so your device can't scan it. Or, it may also be because of your iPhone outdated version or you didn't enable this feature on settings yet. QR scanning is supported only on iOS 11 and above versions.
2. How do I put my iPhone camera in scan mode?
You must enable the scanning feature on Settings first. To do this, access the Settings application, then enter the Camera option. Toggle on the Scan QR Codes slider when the camera options display to put your iPhone in scan mode.
That is all for the notable techniques on how to scan on your iPhone. For more tips like these, check out the FoneLab iOS System Recovery webpage and explore its offered solutions.
FoneLab enables you to fix iPhone/iPad/iPod from DFU mode, recovery mode, Apple logo, headphone mode, etc. to normal state without data loss.
- Fix disabled iOS system problems.
- Extract data from disabled iOS devices without data loss.
- It is safe and easy to use.
