Capture video, audio, online tutorial, etc on Windows/Mac, and you can easily customize size, edit the video or audio, and more.
Easy Guide on How to Screenshot A Specific Area on Mac
 Updated by Lisa Ou / August 13, 2024 10:20
Would you like to know how to screenshot a certain area on Mac? We know it is among the easiest processes on the said computer, but we also understand that not all are informed about the feature. Perhaps it's your first time owning a Mac, or you have never found any reason to use it. Hence, we encourage you to learn it through the methods in the following parts. Once you become well-versed in the feature, we guarantee it will benefit your Mac experience since capturing the entire or a part of the screen on your computer brings various advantages.

For instance, taking a screenshot is the most hassle-free action you can take if you're trying to share something with a friend online. Suppose it is an image or something on a video. You can take its screenshot directly instead of saving the file first. Meanwhile, learning to capture only a portion of your computer screen will be more beneficial. This way, you no longer have to edit and crop unnecessary parts. You can capture your desired area directly. Thus, don't hesitate to explore the information below if you think this screenshot method is helpful and advantageous.

Guide List
Part 1. How to Screenshot A Specific Area on Mac with A Keyboard Shortcut
Like other devices or computers, Mac provides a built-in screenshot feature for users. So, if you plan to take a screenshot, it is the first one you must try since it is already on the computer and doesn’t require any installation. The process also only requires the Mac’s keyboard, as the screenshot takes place through a keyboard shortcut or combination. It is the most effortless way to capture a screen on a Mac. Meanwhile, you may already know the hotkey for taking regular screenshots, but with this method, you can capture only your desired specific area.
Bear in mind the simple operation below to grasp how to take screenshot on Mac of a certain area with a keyboard shortcut:
Step 1Open the app containing the display or activity you plan to capture. When ready, press the Shift + Command + 4 keys simultaneously for the crosshair feature to appear.
Step 2Drag the crosshair on the screen until your desired area is selected. While dragging, ensure you long-press the Space bar, then release it to take the screenshot.

The screenshots are saved on the Mac desktop by default. You can view them afterward and use Preview’s editing functions to enhance the image. However, you will only find basic features if you intend to edit the screenshot. Instead, we suggest heading to the following section for more benefits.
FoneLab Screen Recorder allows you to capture video, audio, online tutorial, etc on Windows/Mac, and you can easily customize size, edit the video or audio, and more.
- Record video, audio, webcam and take screenshots on Windows/Mac.
- Preview data before saving.
- It is safe and easy to use.
Part 2. How to Screenshot A Specific Area on Mac through The Screenshot Toolbar
The Screenshot Toolbar is also built-in on Mac computers. It contains various screen-capturing functions, such as taking screenshots of a specific area on the Mac. You will see buttons with certain uses on the toolbar, but you only need to select the one designated to your goal. Thus, you won’t have difficulty learning about it on your Mac, especially since the process is quick and straightforward. Also, you only need the right keyboard shortcut to see the bar on the screen.
Take to heart the convenient steps below to master how to screenshot certain areas on Mac through the Screenshot Toolbar:
Step 1First, open the Screenshot Toolbar by pressing Shift + Command + 5 on the keyboard. Once launched, select the third tab, a dashed rectangle.
Step 2When the crosshair appears, like the prior part, drag it using the space bar and the mouse or trackpad until you get your desired area on the screen. Finally, release it once you’re satisfied with the output.

Like the previous screenshot method, your outputs will automatically be saved on the desktop. This method is effortless, but it also has the same disadvantage. Unfortunately, the editing features you can encounter once you preview the photo are limited, allowing you to make only basic enhancements.
Part 3. How to Screenshot A Specific Area on Mac Using Mac FoneLab Screen Recorder
Relying on a professional tool like FoneLab Screen Recorder is also advantageous when taking screenshots. Even though it fronts as a recorder, you can depend on its specialized screen capture feature. You can easily select and capture your desired part on the screen, and it even offers editing functions afterward. For instance, it allows you to draw anything on the screenshot or add text, numbers, shapes, etc.. Also, it is effortless to navigate, even for starters.
FoneLab Screen Recorder allows you to capture video, audio, online tutorial, etc on Windows/Mac, and you can easily customize size, edit the video or audio, and more.
- Record video, audio, webcam and take screenshots on Windows/Mac.
- Preview data before saving.
- It is safe and easy to use.
After maneuvering FoneLab Screen Recorder’s screen capture function, you can enjoy its other features later. After all, it is developed to record various activities on a computer in high quality. It lets users record almost anything on the screen, like gaming, webcam, activities on a certain window, and more. You can even link your mobile device to the program if you’d like to record its screen. Hence, acquiring it will provide several benefits for taking snapshots and recordings.
Perceive the user-oriented process below as a sample of how to take a screenshot of a specific area on a Windows or Mac computer with FoneLab Screen Recorder:
Step 1Find FoneLab Screen Recorder’s site on your browser, then click Go to Mac Version when it appears on the left page. The screen will show you the Free Download tab with the Apple icon, so tick it to obtain the installer. Afterward, use it for the installation process.

Step 2The program’s functions will greet you on the initial interface. Simply click the Screen Capture option in the leftmost section. The crosshair will be displayed, prompting you to select your chosen area on the computer screen.

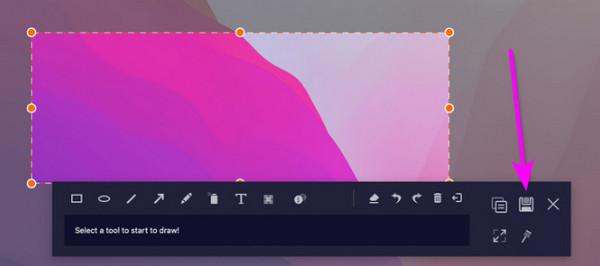
Step 3You can drag the crosshair by long-clicking the mouse until the specific portion you want is selected. The program will then immediately take the screenshot once you release your hold. A bar containing various editing functions will also appear. You can use them to enhance your screenshot and get the best output possible.

Aside from the advantages above, you will also be thrilled that the FoneLab Screen Recorder is compatible with macOS and Windows computers. Thus, it doesn’t matter which operating system you use since this tool can take snapshots and recordings on both.
FoneLab Screen Recorder allows you to capture video, audio, online tutorial, etc on Windows/Mac, and you can easily customize size, edit the video or audio, and more.
- Record video, audio, webcam and take screenshots on Windows/Mac.
- Preview data before saving.
- It is safe and easy to use.
Part 4. FAQs about How to Screenshot A Specific Area on Mac
1. Does Mac have the Snipping Tool?
No, it doesn't have. The Snipping Tool is often seen on Windows computers but not on macOS. Instead, it has built-in screenshot features, discussed in the article above. You can use them or the recommended screenshot program if you'd like to capture your Mac or computer screen.
2. Can I save my screenshots in a specific folder?
Yes, you can. If you don't prefer saving the screenshots on your Mac's desktop, you can manage the options and choose your desired folder as their destination.
FoneLab Screen Recorder allows you to capture video, audio, online tutorial, etc on Windows/Mac, and you can easily customize size, edit the video or audio, and more.
- Record video, audio, webcam and take screenshots on Windows/Mac.
- Preview data before saving.
- It is safe and easy to use.
Once you understand the information above, we guarantee success in taking screenshots of a specific area on your computer, especially with the FoneLab Screen Recorder program.
