- Part 1. Transfer Photos from iPhone to Mac through iCloud
- Part 2. Transfer Photos from iPhone to Mac through Finder
- Part 3. Transfer Photos from iPhone to Mac via Built-in Photos App
- Part 4. Transfer Photos from iPhone to Mac through Mac FoneTrans for iOS
- Part 5. FAQs about Transferring A Photo from iPhone to Mac
How to Transfer Photos from iPhone to Mac Effectively
 Posted by Somei Liam / Nov 22, 2023 09:00
 Good day! As I checked the storage of my iPhone this afternoon, it is near to full storage. I also saw that my photos took up so much space on it. I cannot delete them because they are all precious to me. I plan to copy photos from iPhone to Mac. However, I do not know if I can do that. Can you help me instead and suggest methods that I can use? Thank you so much in advance!
Photos are one of the important data on your iPhone. So, why delete them if you can transfer them to Mac instead? See how by browsing the methods below that we have listed for you.


Guide List
- Part 1. Transfer Photos from iPhone to Mac through iCloud
- Part 2. Transfer Photos from iPhone to Mac through Finder
- Part 3. Transfer Photos from iPhone to Mac via Built-in Photos App
- Part 4. Transfer Photos from iPhone to Mac through Mac FoneTrans for iOS
- Part 5. FAQs about Transferring A Photo from iPhone to Mac
Part 1. Transfer Photos from iPhone to Mac through iCloud
How to download photos from iPhone to Mac to transfer them? iCloud is the best choice you can use! It is the cloud-based storage of Apple devices to be responsible for backing up their data. In this process, you only need to move the iPhone photos to iCloud Drive. Download the backed-up images on the iCloud official website to access them on Mac. For more information, please imitate the detailed steps below. Move on.
Step 1Go to the Photos application of your iPhone and choose all the photos you want to transfer. After that, please tap the Share icon at the bottom right corner of your iPhone main screen. You will see more options for sharing your photos afterward. Tap the Save to Files button, and another set of options will be shown on the main interface. Select the iCloud Drive button once the Location section appears.

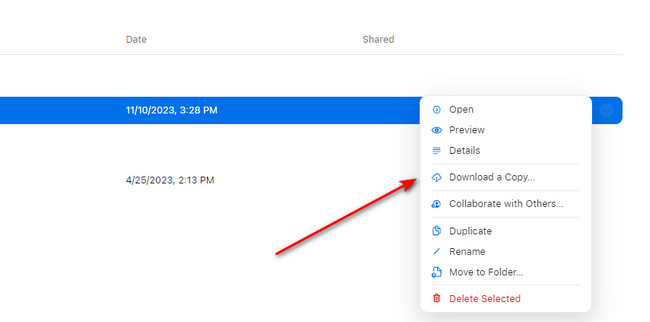
Step 2On your Mac, you must log in with the same Apple ID you used on your iPhone through a web browser. You only need to search for the iCloud website. After logging in, choose the Drive button at the top right. You will now access the photos you added to the iCloud drive on your iPhone. Tick the Three Dots icon and choose the Download A Copy button afterward.
With FoneTrans for iOS, you will enjoy freedom to transfer your data from iPhone to computer. You can not only transfer iPhone text messages to computer, but also photos, videos and contacts can be moved to PC easily.
- Transfer photos, videos, contacts, WhatsApp, and more data with ease.
- Preview data before transferring.
- iPhone, iPad and iPod touch are available.
Part 2. Transfer Photos from iPhone to Mac through Finder
If you use Finder to transfer, it will sync photos from iPhone to Mac. The good thing about this process is that you can sync all the photos in one process. Also, it can transfer photos on your Mac to each album. See how this tool works by following the detailed steps below.
Step 1Launch the Finder tool on your Mac. Connect your iPhone to the Mac with a compatible USB cable. Please unlock your iPhone and allow the permissions your Mac asks for. Later, it will appear on the left side of the main interface. Click it to see more options for it.
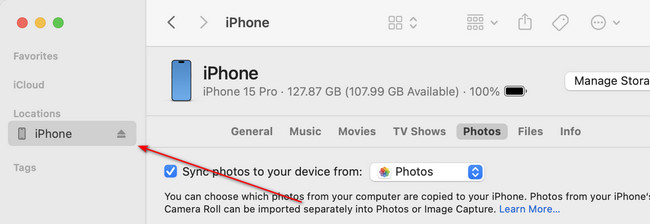
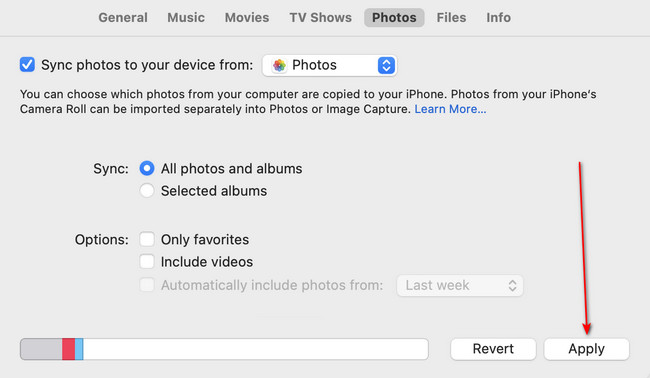
Step 2Please click the Photos tab under the name of your iPhone. After that, options will appear on the screen. If you prefer to transfer all the photos from your iPhone to your Mac, clicking the All Photos and Albums button is recommended. But if you want to move a particular album, select it in the Options section. Start moving the photos by clicking the Apply button.
Part 3. Transfer Photos from iPhone to Mac via Built-in Photos App
You can also use the Photos app on your Mac to transfer photos from your iPhone. In the process, you only need a USB cable to attach your iPhone to the Mac. The import procedure will start automatically.
However, you may encounter iPhone photos not showing up on Mac error. If you experience it, you only need to check whether the USB cable is broken. If it malfunctions, you only need to replace it with a new compatible one.
Please see the detailed steps below on how to do this procedure. Move on.
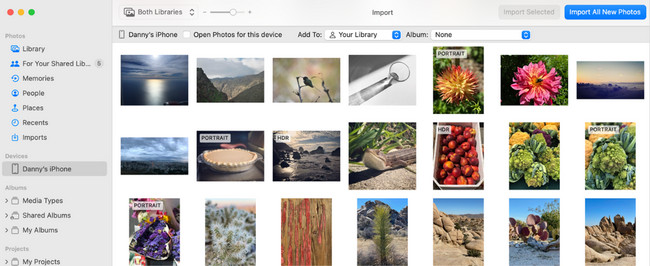
Step 1Attach the iPhone to the Mac using the compatible USB cable you have. After that, please launch the Photos app on your Mac. The photos app will show you the Import interface immediately. Also, it will automatically select the iPhone Name or Device on the left side of the main interface.
Step 2The photos of your iPhone will appear on the Mac now. Please select the images that you want to transfer on your Mac. After that, click the Import Selected button. Alternatively, clicking the Import All New Photos button will lead you to transfer all of your iPhone photos.
Part 4. Transfer Photos from iPhone to Mac through Mac FoneTrans for iOS
Mac FoneTrans for iOS is the most reliable alternative with the built-in tools above for transferring photos from iPhone to Mac. The tool can transfer photos from different devices. It includes iPhones, iPads, iPods Touch, Windows, and Macs. In addition, it can transfer various data types. Some are messages, documents, WhatsApp data, contacts, videos, and photos.
Moreover, transferring your file to another device will not lead to data loss. The reason is that the software does not delete or modify the data you choose to move. It will preserve them in their original quality or locations.
With FoneTrans for iOS, you will enjoy freedom to transfer your data from iPhone to computer. You can not only transfer iPhone text messages to computer, but also photos, videos and contacts can be moved to PC easily.
- Transfer photos, videos, contacts, WhatsApp, and more data with ease.
- Preview data before transferring.
- iPhone, iPad and iPod touch are available.
Do you want to learn how to transfer photos from iPhone to Mac with Mac FoneTrans for iOS? See the detailed steps on how.
Step 1Locate the Free Download button in this article. After that, click it to download the tool. Later, set it up and launch it afterward.

Step 2Get a USB cable and connect the devices. After that, you will receive the iPhone information if the connecting process is complete. Please click the Photos button on the left. The software will begin scanning your iPhone photos.
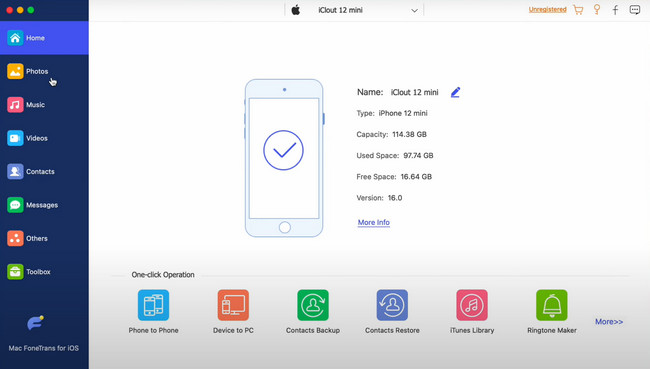
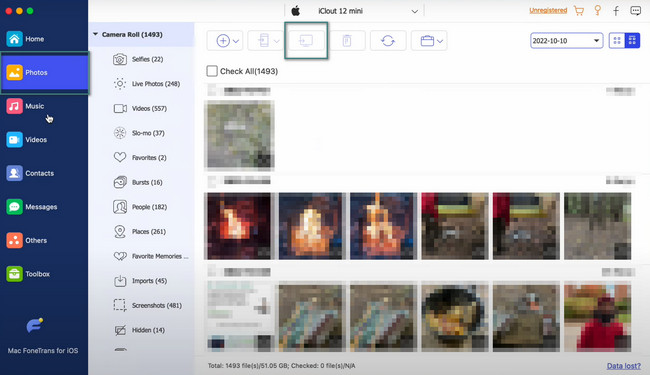
Step 3Please select the photos on the right of the main interface. After that, please click the Computer icon at the top. The software will start to transfer the images afterward.
With FoneTrans for iOS, you will enjoy freedom to transfer your data from iPhone to computer. You can not only transfer iPhone text messages to computer, but also photos, videos and contacts can be moved to PC easily.
- Transfer photos, videos, contacts, WhatsApp, and more data with ease.
- Preview data before transferring.
- iPhone, iPad and iPod touch are available.
Part 5. FAQs about Transferring A Photo from iPhone to Mac
1. Why are my iPhone photos not importing to my Mac?
If you use Finder or iTunes, your photos may be stored on iCloud, not your iPhone. So, once you connect your iPhone to your Mac, it cannot read the images since they are not stored on your iPhone.
2. Why are my Mac photos stuck on imports?
Sometimes, you experience the Preparing to Import Photos error message from your iPhone and Mac. One of the reasons for that issue is the outdated iOS version, which may lead to incompatibility. To fix it, you only need to restart both of the devices.
With FoneTrans for iOS, you will enjoy freedom to transfer your data from iPhone to computer. You can not only transfer iPhone text messages to computer, but also photos, videos and contacts can be moved to PC easily.
- Transfer photos, videos, contacts, WhatsApp, and more data with ease.
- Preview data before transferring.
- iPhone, iPad and iPod touch are available.
We are happy to assist you in transferring your photos from iPhone to Mac. Now, you can free up space on your iPhone without deleting photos. Do you have more questions? Please do not hesitate to inform us. Thank you!
