How to Screen Recorder on Laptop [Straightforward Ways]
 Posted by Valyn Hua / May 28, 2024 09:00
 Good day! I have an online presentation for my students since it is an online class. I do not want to discuss it in real time because I have other stuff to do. I decided to record it and send it to our group chats. However, I don't know which tool to use to learn how to record a screen on a laptop. Do you have any suggestions for this procedure? I will be patiently waiting for an answer. Thank you, guys!
Screen recording of the laptop screen can be performed on Mac and Windows operating systems. The good thing about this post is that it contains both procedures. See more details about the mentioned processes by scrolling down below.
![How to Screen Recorder on Laptop [Straightforward Ways]](/images/screen-recorder/record-laptop-screen.jpg)

Guide List
Part 1. How to Screen Record on Laptop with Built-in Tools
Built-in tools are the most convenient and quickest ways to perform a procedure on devices like laptops. Below are some of them based on the laptop’s operating system. See how to use them for screen recording.
Section 1. For Mac Users
Laptops with macOS operating systems are some of the luckiest regarding screen recording. They support 2 built-in ways to learn how to record video on a laptop. Please see their procedures by scrolling down below.
Option 1. Use Key Combinations
Let’s start by using the key combinations that show you the screen recording features on Mac. It is the quickest method because it does not require software. See the key combinations below, including their procedures to screen record laptops.
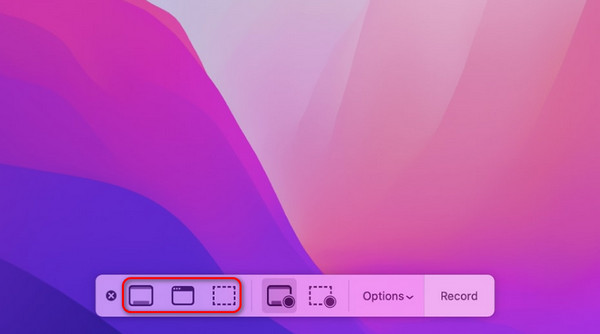
Please press and quickly release the Shift + Command + 5 key combinations on your Mac keyboard. The Screenshot Toolbar section will appear on the screen. Please select the screen recording tool you prefer on the left and click it to operate.
FoneLab Screen Recorder allows you to capture video, audio, online tutorial, etc on Windows/Mac, and you can easily customize size, edit the video or audio, and more.
- Record video, audio, webcam and take screenshots on Windows/Mac.
- Preview data before saving.
- It is safe and easy to use.
Option 2. Use QuickTime Player
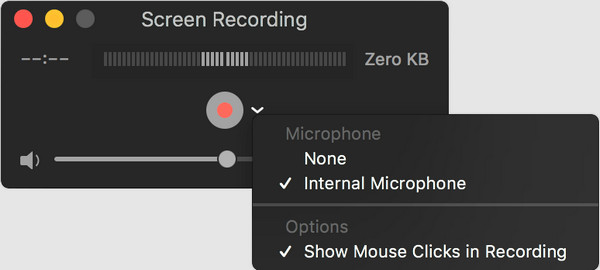
Alternatively, you can use the built-in program of the macOS operating system, QuickTime Player, to learn how to screen record laptops. It is built for playing audio and video files but has screen recording features, including additional functions. It includes Microphone and Mouse Clicks in Recording options.
However, this tool captures high-quality, screen-recorded videos. This only means it consumes a lot of space on your Mac, especially if the recording is too long. If so, please ensure you have enough storage space on your Mac. Learn how to record your laptop screen using QuickTime recorder by scrolling below.
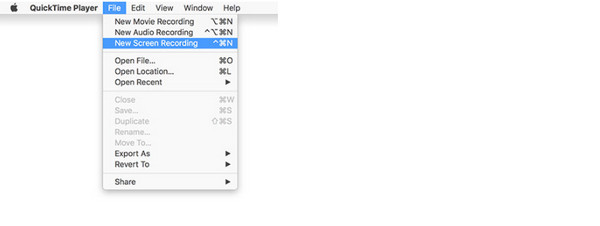
Step 1Launch the QuickTime Player on your Mac. You can locate it in the Finder tool by searching for its name. After that, choose the File button on the Menu Bar and the New Screen Recording button on the drop-down options.
Alternatively, you can locate the QuickTime Player icon on the Dock and right-click it. Later, options will be shown on the screen, and choose the New Screen Recording button.
Step 2The QuickTime Player interface will appear on the screen. Afterward, you can set up the software by turning on and off the additional functions. Once your screen is ready, please click the Record icon at the center of the software.
Section 2. For Windows Users
Can you screen record on a laptop from the Windows operating system? Like the macOS computers, Windows has a built-in Game Bar tool to record the screen. This procedure can also be executed using the shortcut keys. Please see the detailed instructions below on how to operate the tool.
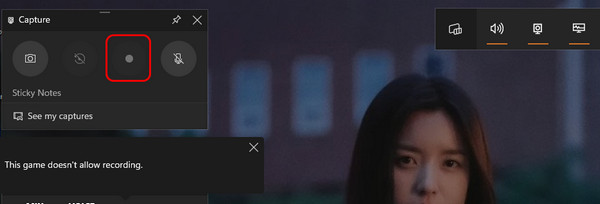
Step 1Go to the screen where you want to perform the screen recording. After that, please press the Windows Key + G keys to access the Game bar tool. Alternatively, you can access it on the Windows Search Bar at the bottom left of the main interface.

Step 2The Game Bar tools will be shown on the screen. Please click the Record icon at the top left of the screen. Later, the screen recording will begin. Once done, you must only click the Record icon again to stop the procedure.
Part 2. How to Screen Record on A Laptop with FoneLab Screen Recorder
Using a third-party tool to record laptop screens on Windows and macOS operating systems would be convenient. FoneLab Screen Recorder is one of the top-picked software you could ever use. This tool is available on Mac and Windows operating systems. Aside from screen recordings, you can also use it to take a snapshot using the relevant tool.
FoneLab Screen Recorder allows you to capture video, audio, online tutorial, etc on Windows/Mac, and you can easily customize size, edit the video or audio, and more.
- Record video, audio, webcam and take screenshots on Windows/Mac.
- Preview data before saving.
- It is safe and easy to use.
You can also edit the recorded videos. The recording tool offers basic editing tools for the video product. Please see the detailed steps below for using the tool to record the laptop screen.
Step 1Click the Free Download button on the tool’s main website. The software will then be set up according to its requirements and launched. Later, wait for the software to pop up on your computer.

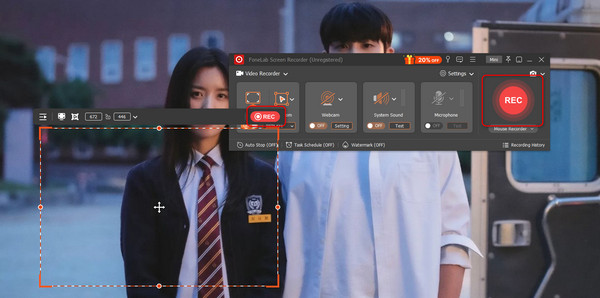
Step 2At the top left of the main interface, select the Arrow-down icon and choose the Video Recorder options. The associated features will then be shown. You can select the Full button in the first section to capture the entire screen. In contrast, select the Custom button to capture only a screen portion using the cursor. Later, please go to the laptop screen where you prefer to record.

Step 3Tick the REC icon to start the recording process. The tool will count down from 3 to 1 second to allow you to prepare the screen. Once you've finished recording, click the Box icon at the bottom left of the tool. Later, it will show you a preview of the recorded video, which you can edit. Save the video by clicking the Export Now button.
Part 3. FAQs about How to Screen Record on A Laptop
How do I edit my screen recordings?
The editing procedure for screen recording depends on the software or procedure you use to capture it. You can use its Photos app if the screen recording is recorded on Windows. On the other hand, QuickTime Player is responsible for editing your screen recordings. However, using the recommended software in this post, you can use the Recording History section or the computer album, which stores the screen recordings.
Why is my screen recording lagging?
If the laptop settings or the tool you use are faulty, the screen might lag when recording. In addition, we cannot prevent multitasking when using our laptops. We want to inform you that the background software and tools you use while recording the screen will cause the issue. Also, the tool you use for screen recording might exceed your laptop's hardware limitations.
That's how you screen record on a laptop! This post introduced the top picks methods for screen recording on Macs and Windows operating systems. However, if you use the FoneLab Screen Recorder, you do not need a separate tool for the mentioned operating systems. The software supports both of them. Do you have more questions left unanswered? Please put them in the comment section at the end of this post. Thank you!
FoneLab Screen Recorder allows you to capture video, audio, online tutorial, etc on Windows/Mac, and you can easily customize size, edit the video or audio, and more.
- Record video, audio, webcam and take screenshots on Windows/Mac.
- Preview data before saving.
- It is safe and easy to use.
