How to Restore iMessages from iCloud - 4 Best Recommendations
 Updated by Boey Wong / July 28, 2022 09:15
Can I retrieve iMessages from iCloud? I would like to know how iMessage downloading message from iCloud? Thanks!
Apple users would be required to use iOS devices with an authorized iCloud account. It is a convenient and powerful feature to help you backup and restore iPhone data. So, your data, such as photos, videos, contacts, messages, etc., will be saved to iCloud if you have enabled the features.
In the same way, you can also restore these data from backup files completely or selectively. If you want to know the detailed steps to do this, you can check them in the following parts with clear instructions.


Guide List
Part 1. How to Restore iMessages from iCloud with FoneLab for iOS
As you might know, Apple is one of the largest mobile phone suppliers. In order to meet the requests from these users, there are many third-party from the market to help you finish what you want effortlessly.
Here, FoneLab iPhone data recovery is the one that stands out from other competitors you should not miss. Compared with Apple ways, it provides more customized options to restore iOS data, so that you can recover data from the device directly or backup files accordingly.
Moreover, you can download and install it on either Windows or Mac computers. And all data are supported, including WhatsApp, documents, call logs, notes, voicemails, and more. Below is the demonstration for you.
With FoneLab for iOS, you will recover the lost/deleted iPhone data including photos, contacts, videos, files, WhatsApp, Kik, Snapchat, WeChat and more data from your iCloud or iTunes backup or device.
- Recover photos, videos, contacts, WhatsApp, and more data with ease.
- Preview data before recovery.
- iPhone, iPad and iPod touch are available.
Step of Recovering iMessages from iCloud Backup:
Step 1Click the Download button and follow the on-screen instructions to install FoneLab for iOS on the computer. Launch it after that.
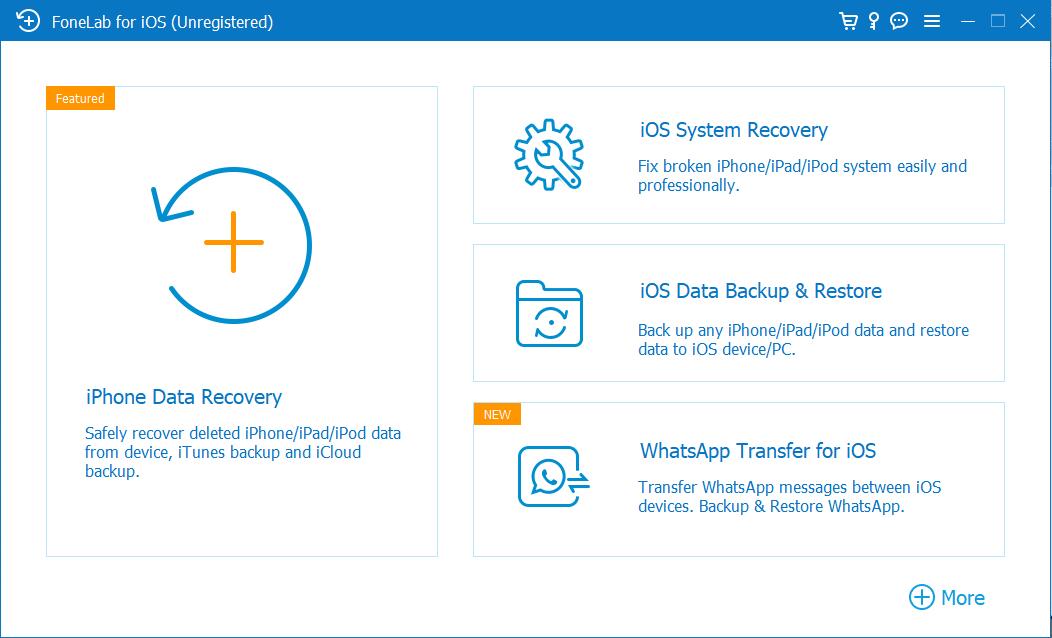
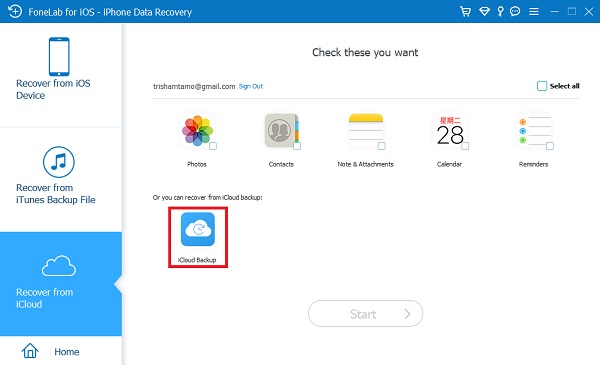
Step 2Choose the iPhone Data Recovery tab > Recover from iCloud Backup Files, it will ask you to enter your account and passcode to log into your Apple ID. Then choose iCloud Backup > Start button.
Step 3Select the Messages from the left panel and select items on the right side. You can also enable to feature to display the deleted items only.
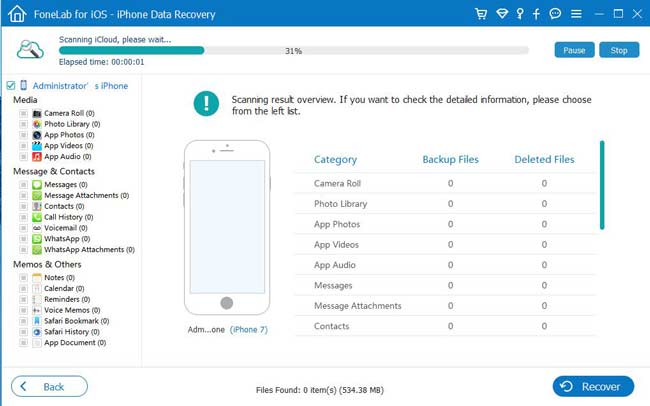
Step 4Click the blue Recover button.
Some users might ask about free iMessage recovery, you should note that free tools have some limitations. While FoneLab for iOS allows you to restore data from device or backup files freely and safely.
As a cloud service specialized for iOS devices, you can’t simply access iMessages on iCloud official site directly. In the following parts, we will show you the available and reliable methods to quickly recover deleted iMessages from iCloud.
Part 2. How to Recover Deleted iMessages from iCloud through Settings App
If you know iCloud well, you should know that enabling Messages for iCloud on Settings app can sync both Messages and iMessages across devices with the same Apple ID. It should be the easiest option to restore deleted iMessages from iCloud. This method will not replace data on the device but get lost data back. Below is the tutorial.
Step of Recovering iMessages from iCloud Backup:
Step 1Go to the Settings app on device, and tap [your name] > iCloud.
Step 2Toggle off the Messages and select Keep on My iPhone.
Step 3Then toggle it on again. The iMessages from iCloud will be synced to your device.
Similarly, you can also retrieve iMessages from iCloud if you are a Mac user.
With FoneLab for iOS, you will recover the lost/deleted iPhone data including photos, contacts, videos, files, WhatsApp, Kik, Snapchat, WeChat and more data from your iCloud or iTunes backup or device.
- Recover photos, videos, contacts, WhatsApp, and more data with ease.
- Preview data before recovery.
- iPhone, iPad and iPod touch are available.
Part 3. Retrieving iMessages from iCloud on Mac
Different from Windows computer, Mac enables you to manage your data under Apple ID on computer as well. You can log into your Apple ID on Mac and set it up to restore iMessages from iCloud as below.
Step of Recovering iMessages from iCloud Backup:
Step 1Turn on iCloud for Messages through Messages > Preferences > iMessage.
Step 2Sign out iCloud account from Mac and quit Messages app.
Step 3Open Finder and search ~/Library/Messages/, click to open it.
Step 4Select a folder and click the Restore button.
Note: You need to upgrade to two-factor authentication for Apple ID before enabling this feature on Mac. And you can’t disable it after that.
Part 4. Restore iMessages from Backup After Resetting
If the above methods are not working, you can also try to restore a complete iCloud backup after resetting. Note that seriously and backup your essential data before restoring. Then, follow the steps below to restore iMessage from iCloud backup.
With FoneLab for iOS, you will recover the lost/deleted iPhone data including photos, contacts, videos, files, WhatsApp, Kik, Snapchat, WeChat and more data from your iCloud or iTunes backup or device.
- Recover photos, videos, contacts, WhatsApp, and more data with ease.
- Preview data before recovery.
- iPhone, iPad and iPod touch are available.
Step of Recovering iMessages from iCloud Backup:
Step 1First, you need to reset iPhone to factory settings through Settings > General > Transfer or Reset iPhone > Reset All Content and Settings.
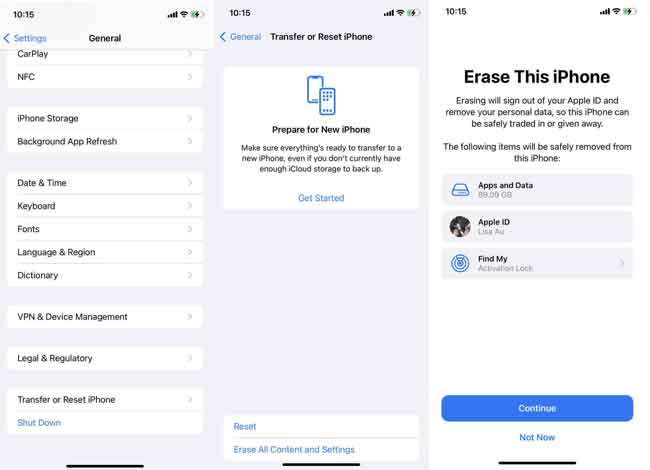
Step 2Follow the instructions to confirm you want to reset iPhone. Please wait until it finishes.
Step 3Set up iPhone and choose Restore from iCloud Backup in the App & Data section.
Step 4Select a backup file containing your iMessages and begin restoring.
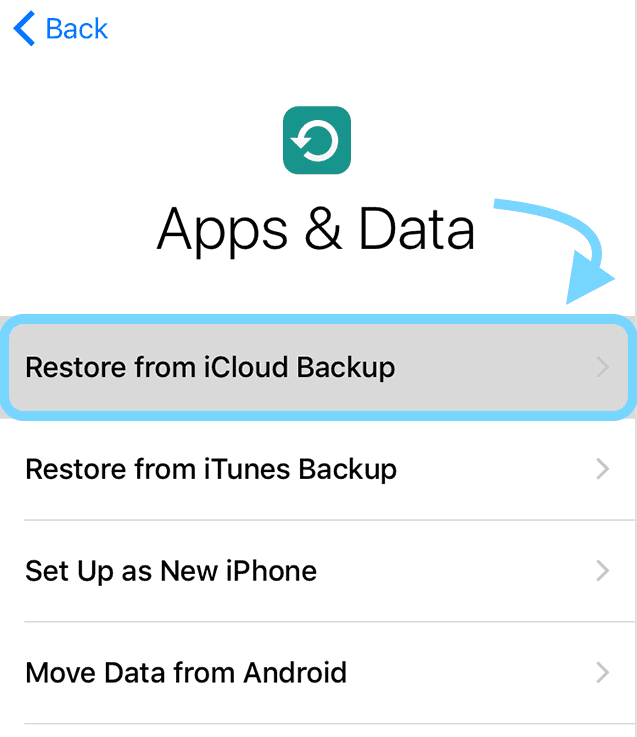
As you can see, this method will erase all data on your iPhone or other iOS devices. If you choose it, please backup data to prevent data loss.
With FoneLab for iOS, you will recover the lost/deleted iPhone data including photos, contacts, videos, files, WhatsApp, Kik, Snapchat, WeChat and more data from your iCloud or iTunes backup or device.
- Recover photos, videos, contacts, WhatsApp, and more data with ease.
- Preview data before recovery.
- iPhone, iPad and iPod touch are available.
Part 5. FAQs about Restoring iMessages from iCloud
How do you restore iMessages on iPhone?
First, you can try to recover iMessages on iPhone through the Settings app. Toggle it on for iCloud. But it is not 100% workable. You can also try FoneLab iPhone data recovery, then let it scan your device and restore iMessages directly without backup files. It is easy and safe to use.
How do I restore my iMessages from iCloud to my new iPhone?
First, you should backup iMessages to iCloud through the Settings app on device > [your name] > iCloud > Messages. Then repeat the steps on your new iPhone.
Alternatively, you can also backup all data to iCloud through Settings app > [your name] > iCloud > iCloud Backup > Back Up Now. After that, set up your new iPhone and select Restore from iCloud Backup to restore iMessages from iCloud to your new iPhone.
Can you access iMessages via iCloud?
Yes. But you are unable to view them on iCloud official. You need some tools to access them without hassle.
How do I recover all my iMessages?
Yes. You can easily recover all iMessages from iTunes or iCloud backup files with ease. However, you can also try FoneLab iPhone data recovery to do that without losing data selectively.
That's all you should know about how to recover iMessages from iCloud backup files. However, FoneLab iPhone data recovery is the best choice among the above and other competitors because of its outstanding features and user-friendly design. What's more, no matter what types of data you want to recover, it can help you get them back within a few clicks. Why not download it on the computer and enjoy its benefits now!
With FoneLab for iOS, you will recover the lost/deleted iPhone data including photos, contacts, videos, files, WhatsApp, Kik, Snapchat, WeChat and more data from your iCloud or iTunes backup or device.
- Recover photos, videos, contacts, WhatsApp, and more data with ease.
- Preview data before recovery.
- iPhone, iPad and iPod touch are available.
