Shared Album on iPhone [Information You Must Know]
 Posted by Lisa Ou / Jan 26, 2024 09:00
 Hi, guys! For the wedding photoshoot theme for our major subjects, my team decided to merge the photos we have online. One of our teammates suggested that we use shared albums on iPhone. We considered her suggestion, and the final decision depends on mine. However, I do not know what is a shared album on iPhone and how it functions. Can you help me learn the must-know information about it? Thank you in advance!
A shared album on an iPhone is a convenient feature for your photos and videos. There is a lot more to know about it. You only need to scroll down below to discover them. Move on.
![Shared Album on iPhone [Information You Must Know]](/images/ios-system-recovery/shared-album-iphone/shared-album-iphone.jpg)

Guide List
FoneLab enables you to fix iPhone/iPad/iPod from DFU mode, recovery mode, Apple logo, headphone mode, etc. to normal state without data loss.
- Fix disabled iOS system problems.
- Extract data from disabled iOS devices without data loss.
- It is safe and easy to use.
Part 1. What is Shared Album iPhone
For sure, you and your friends make unforgettable moments through photos and videos. The shared album is one of the features that you can use to share your photos and videos with your friends. The good thing about this feature is that they can add pictures to the album. It is like a compilation of multiple images from different individuals.
Moreover, not everybody can access the shared album on iPhone. You can select which users can gain access to it. In addition, you may share your thoughts and opinions with the pictures. The reason is that the feature allows you to add comments to the videos and images.
Part 2. How to Make A Shared Album
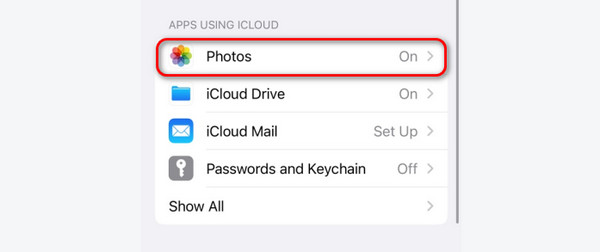
An iCloud account is necessary to make a shared album on your iPhone. Logging in your Apple ID and its password will be the main requirement. Before you can make a shared album, it is recommended to turn on the feature on the Settings app. Do you know how to do it? Please follow the detailed steps below. Move on.
Step 1On your Settings app, please choose the Name of the Owner at the top. After that, select the iCloud icon in the section box. Additional settings will be shown afterward. Please choose the Photos button on the screen.
Step 2You will be directed to a new interface. Please swipe down on the screen. After that, tap the Share Albums slider at the bottom. Leave it in Green color.
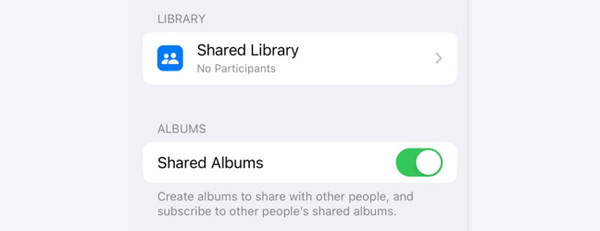
Now that you turn on the shared album feature, it is time to learn how to create one. This process is easy. You only need to use the Photos app of your iPhone and follow the detailed steps below. Please scroll down to learn how to make a shared album. Move on.
Step 1On your Home Screen, please tap the Photos Album icon. The recently captured photos will be shown on your screen. Please tap the Albums button at the bottom. Later, the classifications of the pictures and videos will be shown with their names.

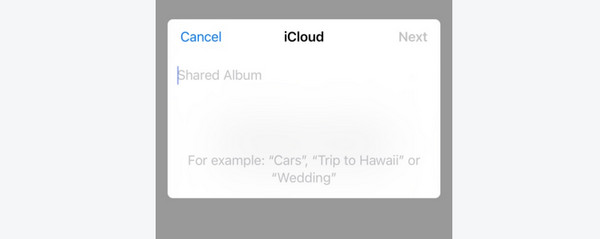
Step 2At the top right of the screen, please choose the Plus icon. Later, drop-down options will be shown on the screen. Please tap the New Shared Album button. Now, you will be directed to the new interface. Name the album and tap the Next button. After that, follow the onscreen instructions to complete the process.
FoneLab enables you to fix iPhone/iPad/iPod from DFU mode, recovery mode, Apple logo, headphone mode, etc. to normal state without data loss.
- Fix disabled iOS system problems.
- Extract data from disabled iOS devices without data loss.
- It is safe and easy to use.
Part 3. How to Accept Shared Album Invite
Now, as an answer to the scenario above, here’s a method of the post to learn how to accept shared album invites. You will only need the Photos app on your iPhone. Please imitate the detailed steps below. Move on.
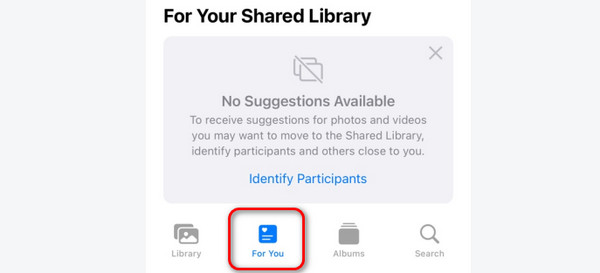
Step 1Open the iPhone Photos app. After that, you will be directed to the first interface of the app. Please tap the For You button at the bottom of the main interface. The shared albums will be revealed afterward.
Step 2Please locate the shared album invites that you prefer to have access to. After that, please choose the Accept button on the new album.
But what if you also want to send or invite individuals to a shared photo album? We got you! This additional information will help you make that progress. You only need to imitate the detailed steps we have prepared below. Move on.
Step 1Please open the Photos app on your iPhone. After that, locate the Share Album location on the Albums button at the bottom of the main interface. Tap the See All button to view all of the lists. Now, please long-press the album you prefer to share. Drop-down options will be revealed on the screen. Please choose the Invite People icon.

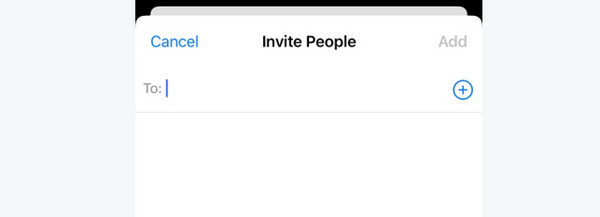
Step 2You will be directed to a new interface, and the screen will load for a few seconds. All you need to do is wait. After that, tap the Invite People button or the Plus icon at the top. You will be directed to the new screen. In the To section, please type the number of individuals you want to invite.
Alternatively, you can tap the Plus icon at the top right and choose from your contacts. Later, please tap the Add button at the top right. You only need to wait for the individuals you invite to accept the invitation for them to have access to the shared album.
Part 4. How to Fix Shared Album Not Showing Up
What if the shared album not showing up on the iPhone? You will learn 3 ways to fix it accordingly.
Option 1. Check Your Network
Ensure you have a stable network connection, and try reconnecting it after disabling your WiFi or cellular data.
If there is something wrong with your network connection, you can try to change another one or reset the network settings on your iPhone directly.
Open Settings. Choose General, then select Transfer or Reset iPhone. Later, choose the Reset Network Settings button.
Option 2. Enable The Shared Album Again
You can disable the Shared Album on iPhone Settings and then turn it on after a few minutes.
Open Settings. Choose the Account at the top. Later, choose iCloud, then the Photos button. Later, scroll down and tap the Shared Albums button.
Option 3. FoneLab iOS System Recovery
FoneLab iOS System Recovery is a third-party tool that you can use! Various iPhone malfunctions are supported. Some are screen issues, charge issues, loop restart, and battery drain. The good thing about this tool is that it supports almost all iOS versions and models.
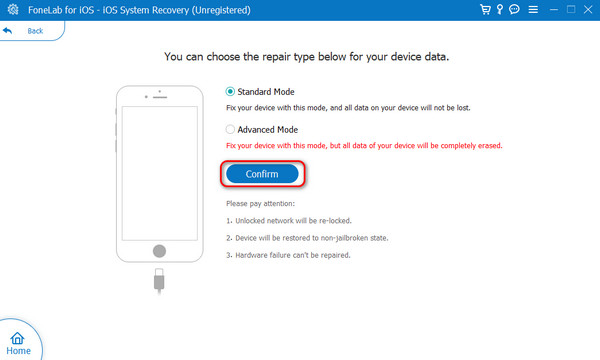
Moreover, it has 2 repair modes that you can execute. They have different procedures you must know to avoid errors in the process.
FoneLab enables you to fix iPhone/iPad/iPod from DFU mode, recovery mode, Apple logo, headphone mode, etc. to normal state without data loss.
- Fix disabled iOS system problems.
- Extract data from disabled iOS devices without data loss.
- It is safe and easy to use.
- Standard Mode - It repairs your iPhone issue without deleting even a single piece of data.
- Advanced Mode - It fixes your iPhone issue but deletes all stored data. Backing up your data on an iPhone is recommended in this issue.
Now, it is time to know how FoneLab iOS System Recovery functions to fix shared album not updating or showing up. Move on.
Step 1Download the iOS recovery software. Choosing the Free Download button will execute that. The download process will take a few seconds, depending on the strength of your network.

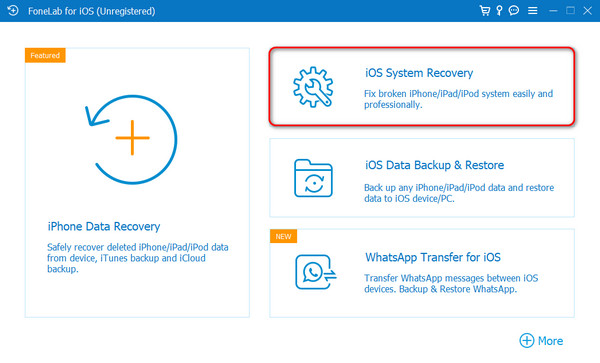
Step 24 main features will be revealed on the next interface. Please select the iOS System Recovery button among all of them. You will be directed to the new interface afterward. Please click the Start button to continue the process.
Step 3Get a USB cable. Use it to plug the iPhone into the computer to permit the software. Later, the 2 repair mode selection section will be shown. Please choose between the Standard Mode or Advanced Mode. After that, click the Confirm button.
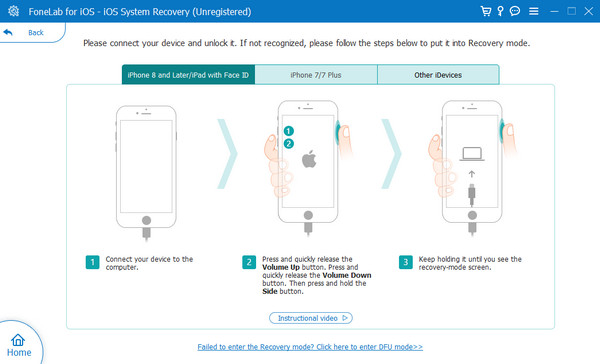
Step 4The guide for the recovery mode process will be posted. Please follow the appropriate one by following the onscreen instructions. Later, click the Optimize or Repair button.
FoneLab enables you to fix iPhone/iPad/iPod from DFU mode, recovery mode, Apple logo, headphone mode, etc. to normal state without data loss.
- Fix disabled iOS system problems.
- Extract data from disabled iOS devices without data loss.
- It is safe and easy to use.
Part 5. FAQs about Shared Album iPhone
Is there a limit for shared albums?
Yes. There are limits for the shared albums on your iPhone. Using the feature, you can create 200 albums through iCloud photo sharing. Each album can accumulate 5,000 videos and photos. In addition, the users that can access the shared albums have limits. Only 100 subscribers are allowed to have access to each album.
Why am I not receiving a shared album invite?
The invitation can be sent to an email address. If you cannot receive it, there may be an issue with the sending process. So, ask the invitee to resend the email invitation. In addition, you may be experiencing network issues. One of the reasons is that the invitation process needs an internet connection.
Why is the shared album iPhone not working?
The shared album on the iPhone will not work when there's a service down on the Apple system. You can review it on their official website. In addition, the feature needs a Wi-Fi or cellular network to function. If you do not have one, the shared album will not also work.
That's all about the iPhone shared album! We hope you learned a lot from this post. It includes how to create and accept invitations from the feature. Also, we must be ready if something software issues happen. If the shared album is not working or showing up, you can use FoneLab iOS System Recovery. Do you have more questions? Do not hesitate to ask us by leaving them in the comment section below. Thank you!
FoneLab enables you to fix iPhone/iPad/iPod from DFU mode, recovery mode, Apple logo, headphone mode, etc. to normal state without data loss.
- Fix disabled iOS system problems.
- Extract data from disabled iOS devices without data loss.
- It is safe and easy to use.
