- Empty Trash
- Delete Mail App
- Clear Cache on Mac
- Get More Storage on Mac
- Make Chrome Use Less RAM
- Where is Disk Utility on Mac
- Check History on Mac
- Control + Alt + Delete on Mac
- Check Memory on Mac
- Check History on Mac
- Delete An App on Mac
- Clear Cache Chrome on Mac
- Check Storage on Mac
- Clear Browser Cache on Mac
- Delete Favorite on Mac
- Check RAM on Mac
- Delete Browsing History on Mac
How to Get Rid of Junk Mail on Mac Using Guaranteed Methods
 Updated by Lisa Ou / Oct 12, 2023 09:15
Good day! I was creating a mail on Mac and noticed it runs a bit slowly. When I checked the junk section, I found out they had piled up, which may be why my Mail app is not performing as fast as before. Hence, I hope I can erase them immediately. But before that, I have to ask, what is junk email? And how do I get rid of it? Thanks for answering in advance!
If you enter the Mail app on your Mac, you will notice the Junk section in its interface's left pane. There, you will find various junk your Mail app has accumulated over time. It includes the emails you marked as junk, spam, and other unwanted emails. You may be acquiring these types of emails occasionally, but as time passes, they inevitably stack up, especially if you never delete them. Hence, this may be why you're interested in learning how to delete the junk files on your Mail app. Thankfully, we have already tested numerous methods for erasing email junk, and since this concern has emerged, we have organized the proven ones in the article below. Try out the designated guidelines for every technique in the following parts to get rid of the email junk on your Mac successfully.


Guide List
Part 1. How to Delete Junk Mail on Mac Mail App
Since your email junk files are stored in the Mail, you will find an official way to delete them on the app. If you access it and proceed to the Junk section, the app will give you various options to manage the junk in your Mail, including their deletion. The procedure is effortless, especially with the guidelines. Hence, successfully removing your email junk can be done within a few minutes. However, note that they will automatically transfer to your Mail Trash afterward, so you must also delete them from there to erase them permanently.
Adhere to the stress-free instructions underneath to determine how to empty junk mail on Mac:
Step 1Launch your Mac Mail app by hitting its icon on the Dock. If you don’t see it there, use the Spotlight search feature at the top right to find it faster and open the app. Once its window is exhibited on your desktop, click the Junk tab on the left area of the interface.
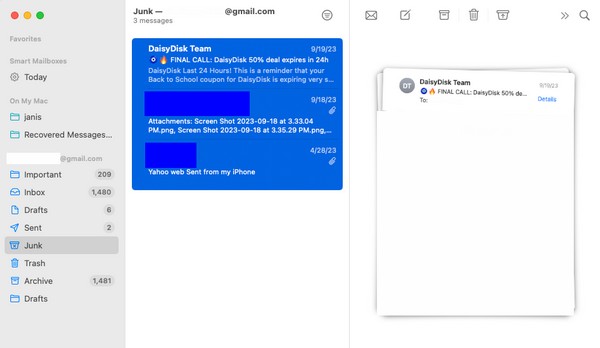
Step 2Your junk mail will then be shown afterward. Choose the items you desire to remove, or press Cmd + A to select everything on your junk list. After that, click the trash icon on the upper right section to erase the items from the Junk.
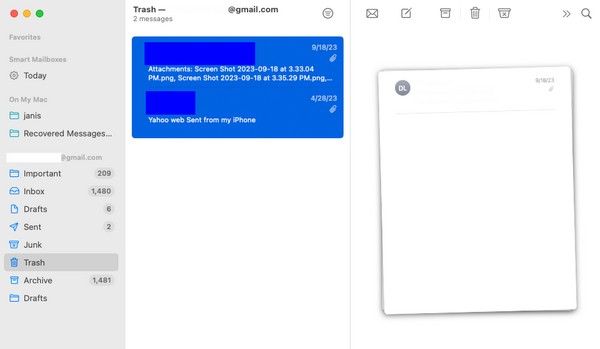
Step 3Once erased, proceed to the Trash section to select them all. Then, hit the trash symbol at the top to eliminate them permanently from your Mail.

With FoneLab Mac Sweep, you will Clear system, email, photo, iTunes junk files to free up space on Mac.
- Manage similar photos and dulplicate files.
- Show you the detailed status of Mac with ease.
- Empty trash bin to get more storage.
Part 2. How to Delete Junk Mail on Mac via Preferences
Preferences is a section on different apps containing their settings. Thus, you will also find it on the Mail app and manage your junk mail by accessing it. With this method, you will be able to set when to erase your junk messages automatically. The automatic deletion may be set as ‘Never’ since it is the default option. But don’t worry; you have the choice to set it to anything you want from the choices in the pulldown menu. Meanwhile, you may find this Preferences method longer than the previous one, but it’s actually more convenient in the long run since it automatically deletes your junk afterward.
Conform to the effortless directions below to understand how to delete junk mail on Mac via Preferences:
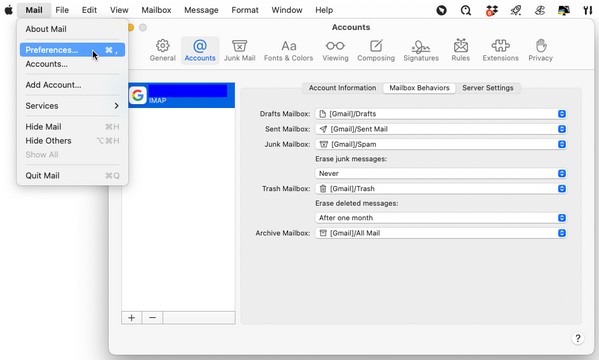
Step 1Use the Mail icon on the Dock to run the app on your Mac. After its interface launches, direct to the Mail tab on the uppermost area of your desktop and click Preferences from the pop-up menu list. Another window containing the settings will appear.
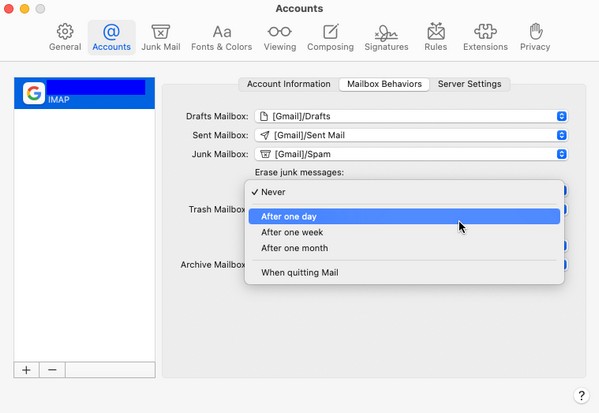
Step 2From there, choose the Accounts tab at the interface’s top portion. Then, click the Mailbox Behaviors tab on the upper area to view the Mailbox options. Click the bar under Erase junk messages and choose when to erase your junk mail automatically. Your junk emails will then be erased after one day, one week, etc., depending on your preferred option.
Part 3. How to Delete Junk Mail on Mac with FoneLab Mac Sweep
The methods above are guaranteed to be helpful, as they are the official mail junk deletion procedures on Mac. But if you want a proven technique with advantageous features, the FoneLab Mac Sweep program is highly-suggested. This sweeping tool, also known as Mac cleaner, contains various functions for cleansing different Mac aspects, like your Mail junk. Navigating its interface on your Mac will help you remove all unnecessary junk and data without wasting much time. Aside from that, you can use its Status feature to check the storage of your Mac. Its straightforward interface will make all these processes easy, so quickly install it, and you can explore its functions smoothly afterward.

With FoneLab Mac Sweep, you will Clear system, email, photo, iTunes junk files to free up space on Mac.
- Manage similar photos and dulplicate files.
- Show you the detailed status of Mac with ease.
- Empty trash bin to get more storage.
Refer to the unchallenging process underneath as an example of how to clean junk files on Mac with FoneLab Mac Sweep:
Step 1Find the Free Download tab underneath the tool descriptions when you enter the official FoneLab Mac Sweep webpage. After that, click it and let the program file be downloaded on your Mac. Other information about the tool will be below once you scroll through the page. Once downloaded, save the file straight to the Applications folder and run.

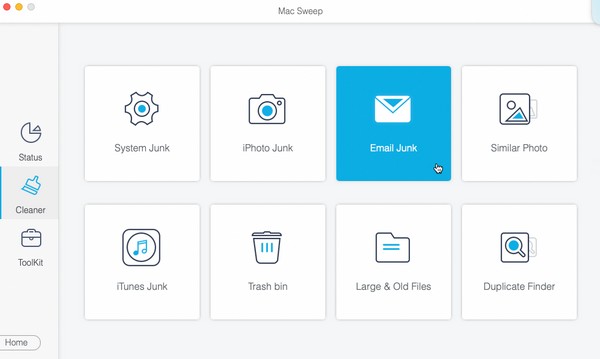
Step 2FoneLab Mac Sweep has the Status, Cleaner, and ToolKit features displayed on the prime interface. Select the Cleaner option to view more of the program’s functions. The Email Junk box is among them, so click it to move on to the following screen. Click Scan to allow the cleaner to browse your Mail data, then hit View afterward to display them.
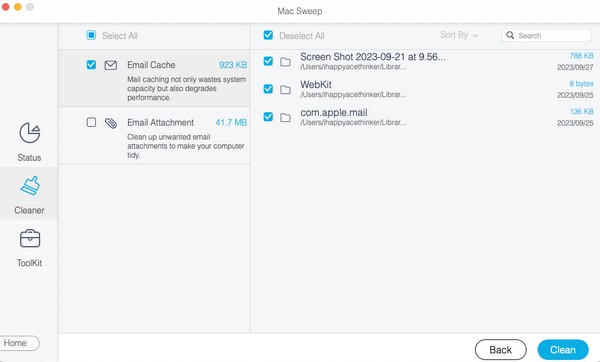
Step 3Select the checkbox of the items you desire to delete from your Mail data. You may choose the entire category on the left or the specific items on the right. When done choosing, select the Clean button on the down-right corner of the interface to delete your junk mail on the Mac.
Part 4. FAQs about How to Delete Junk Mail on Mac
1. How to delete all junk mail at once on Mac?
You can delete all your junk mail simultaneously on Mac with the guidelines we have provided in Part 1 of this article. It demonstrates the procedure to select all your data on the junk list so that you can erase them all at once. Alternatively, you may also use FoneLab Mac Sweep in Part 3, which also offers a Select All option to delete all your Mail data or junk simultaneously.
2. Where is the junk mail on my MacBook?
If you have followed the processes in this article using your Mac, you may repeat the same procedures to find them on your MacBook. They only have the same steps, so don't worry about getting lost while locating the junk mail. Refer to Part 1 to access them easily on your MacBook.
We're happy to help you with your Mac concern by providing the guaranteed processes for deleting junk mail on your Mac. Do them all correctly and experience a successful junk deletion process.

With FoneLab Mac Sweep, you will Clear system, email, photo, iTunes junk files to free up space on Mac.
- Manage similar photos and dulplicate files.
- Show you the detailed status of Mac with ease.
- Empty trash bin to get more storage.
