- Part 1. How to Turn Off Do Not Disturb on iPhone through Control Center
- Part 2. How to Turn Off Do Not Disturb on iPhone through Settings
- Part 3. How to Turn Off Do Not Disturb on iPhone through Turning Off Schedule
- Part 4. How to Fix iPhone Do Not Disturb Not Turning Off with FoneLab iOS System Recovery
- Part 5. FAQs about How to Turn Off Do Not Disturb on iPhone
How to Turn Off Do Not Disturb on iPhone [3 Methods to Perform]
 Posted by Lisa Ou / April 09, 2024 09:00
 Hi, guys! I kept not receiving any notifications on my iPhone this morning, including calls and text messages. I'm not tech-savvy to know what to do in this situation. I called my son about what is happening on my iPhone, and he said that the Do Not Disturb feature may be turned on. Can you help me turn off Do Not Disturb iPhone? Thank you so much in advance!
Turning off the feature is easy, but there are 3 ways. You only need to browse this post to discover them and then perform. Please scroll down below for more information. Move on.
![How to Turn Off Do Not Disturb on iPhone [3 Methods to Perform]](/images/ios-system-recovery/how-to-turn-off-do-not-disturb-on-iphone/how-to-turn-off-do-not-disturb-on-iphone.jpg)

Guide List
- Part 1. How to Turn Off Do Not Disturb on iPhone through Control Center
- Part 2. How to Turn Off Do Not Disturb on iPhone through Settings
- Part 3. How to Turn Off Do Not Disturb on iPhone through Turning Off Schedule
- Part 4. How to Fix iPhone Do Not Disturb Not Turning Off with FoneLab iOS System Recovery
- Part 5. FAQs about How to Turn Off Do Not Disturb on iPhone
FoneLab enables you to fix iPhone/iPad/iPod from DFU mode, recovery mode, Apple logo, headphone mode, etc. to normal state without data loss.
- Fix disabled iOS system problems.
- Extract data from disabled iOS devices without data loss.
- It is safe and easy to use.
Part 1. How to Turn Off Do Not Disturb on iPhone through Control Center
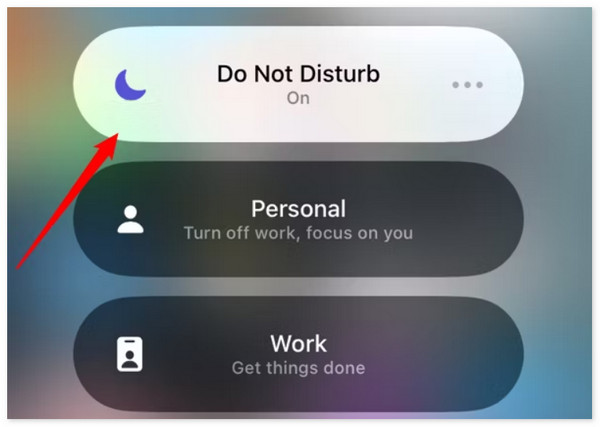
iPhone has the Control Center feature, which holds the active tiles on your iPhone to access some of the tools or features it contains quickly. The good thing about it is that you can access it in seconds only. In addition, the do not disturb feature on the Control Center cannot be removed from the section. If so, you'll see it quickly on the feature. Do you want to know how to turn off the Do Not Disturb feature on the Control Center? Please see the detailed instructions below.
Open the iPhone and unlock it if there is a required passcode. After that, please swipe at the top right corner of the main interface to see the Control Settings section. The active tiles will be shown on the next interface. Please locate the Do Not Disturb button or the Moon icon and tap it. Later, you must leave it in gray to ensure it is turned off.
FoneLab enables you to fix iPhone/iPad/iPod from DFU mode, recovery mode, Apple logo, headphone mode, etc. to normal state without data loss.
- Fix disabled iOS system problems.
- Extract data from disabled iOS devices without data loss.
- It is safe and easy to use.
Part 2. How to Turn Off Do Not Disturb on iPhone through Settings
Aside from the Control Center, the Do Not Disturb feature has a built-in setting on your iPhone. You can locate it on the iPhone settings app and customize it.
Please ensure that you perform the detailed steps below correctly. It is to avoid future problems that may happen on your iPhone.
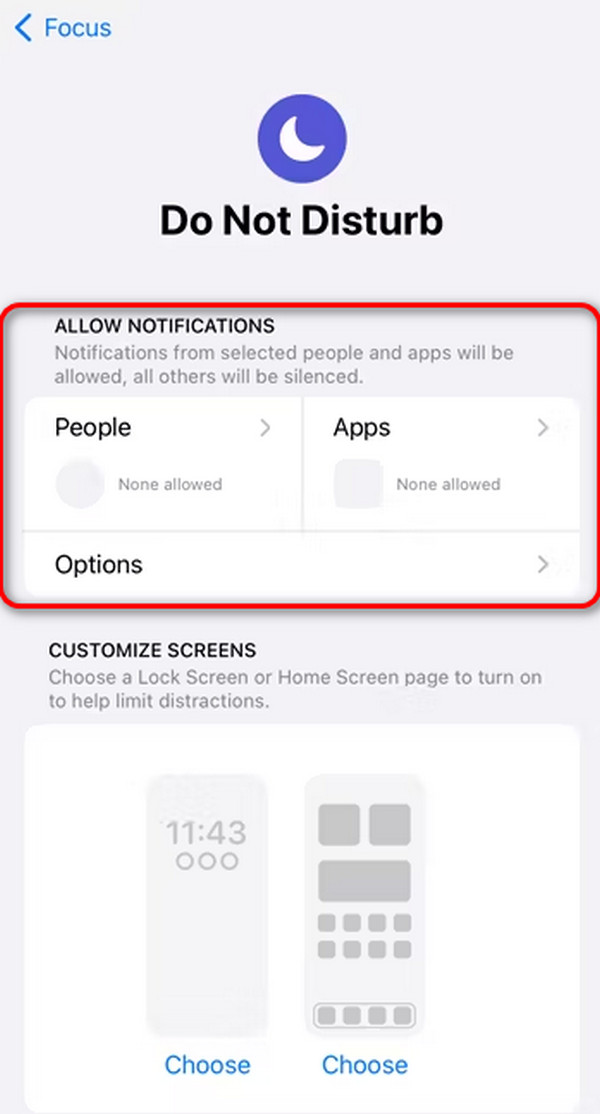
Step 1Open the Settings application icon on your iPhone and choose the Focus button on the initial interface. After that, please select the Do Not Disturb option at the top of the screen.
Step 2You will be directed to the default and customization settings of the feature. You will see the People and Apps buttons. Please select one of them, and you will see separate icon options. You only need to tap the Allow Notifications From button to turn off the feature.
Part 3. How to Turn Off Do Not Disturb on iPhone through Turning Off Schedule
Aside from manually turning off the Do Not Disturb on iPhone, it also allows you to schedule the feature's turning-off time. You only need to turn off the scheduled time through the built-in settings of the mentioned feature. You may be wondering how it works, and you may think it is difficult to perform. You only need to properly imitate the detailed steps we have prepared for the best results. Please scroll down below to discover them. Move on.
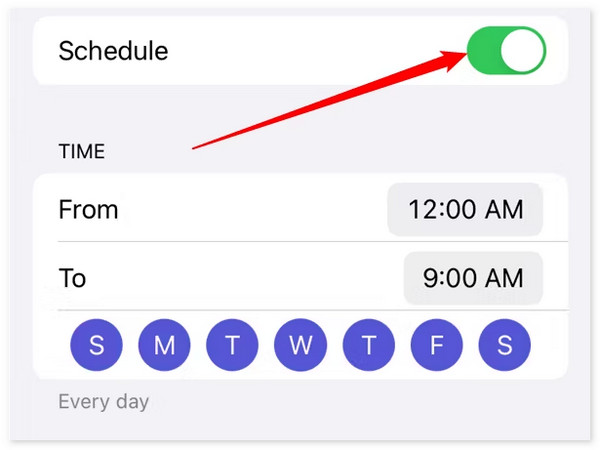
Step 1Go to the Settings app of your iPhone and tap the Focus button on the main interface to access features about the Do Not Disturb feature. Choose the Do Not Disturb button at the top to see more options.
Step 2Swipe down on the screen and choose the Do Not Disturb feature schedule. After that, toggle the Schedule slider to turn it off.
Part 4. How to Fix iPhone Do Not Disturb Not Turning Off with FoneLab iOS System Recovery
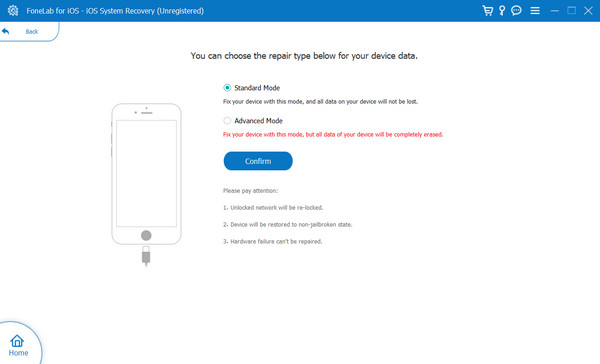
But what if you cannot turn off your iPhone's Do Not Disturb feature? Your iPhone may be experiencing softer issues if that's the case. In this situation, using FoneLab iOS System Recovery is the best thing you can do. The software offers repair modes for fixing the mentioned issue on your iPhone. The Standard Mode will not delete the data on your iPhone. In contrast, the Advanced Mode will do the opposite.
FoneLab enables you to fix iPhone/iPad/iPod from DFU mode, recovery mode, Apple logo, headphone mode, etc. to normal state without data loss.
- Fix disabled iOS system problems.
- Extract data from disabled iOS devices without data loss.
- It is safe and easy to use.
In addition, the tool supports 50+ iOS and iPadOS malfunctions, including loop restart, battery issues, software glitches, and more. Aside from fixing malfunctions, this software can also upgrade and downgrade the iOS version of your iPhone. Do you want to know how to use FoneLab iOS System Recovery? Please see the detailed steps below. Move on.
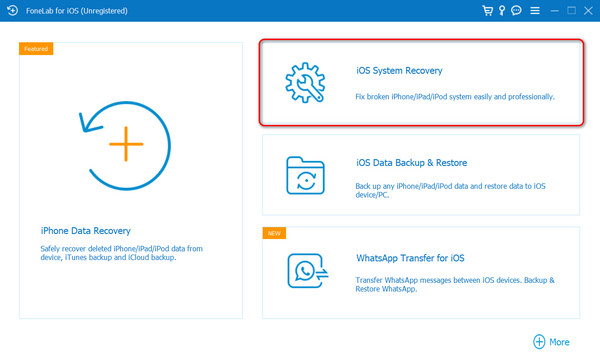
Step 1Tick the Free Download button to download the software. After that, set it up and launch it on your computer. Please choose the iOS System Recovery button on the initial interface to continue the process.
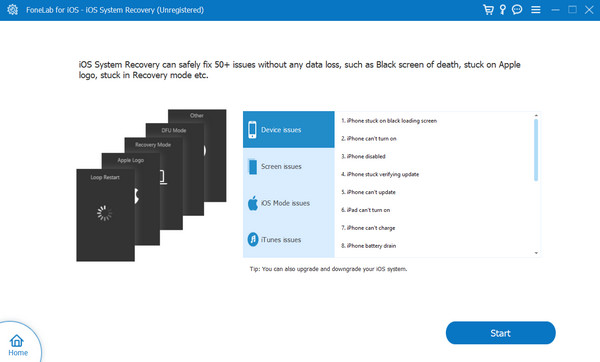
Step 2You will see the 50+ malfunctions that the software supports. Please click the Start button to see the next step you need to perform. The software will require you to plug the iPhone into the computer. Please plug the 2 devices using a USB cable. You must see the iPhone name on the left side of the main interface.
Step 3Please choose between the Standard Mode and Advanced Mode for the repair process. Select the Confirm icon to move to the next step. The software will show you how to put your iPhone into recovery mode. Please follow the all-screen instructions to do that. Once successful, please click the Optimize or Repair button afterward to fix the issue mentioned. After the fixing process, please unplug the iPhone to the computer safely.
FoneLab enables you to fix iPhone/iPad/iPod from DFU mode, recovery mode, Apple logo, headphone mode, etc. to normal state without data loss.
- Fix disabled iOS system problems.
- Extract data from disabled iOS devices without data loss.
- It is safe and easy to use.
Part 5. FAQs about How to Turn Off Do Not Disturb on iPhone
Will turning off Do Not Disturb restore all notifications?
Yes. Turning off the iPhone Do Not Disturb feature will restore all the notifications on your iPhone as usual. When there are notifications on the iPhone, they will be visible and audible. However, ensure that the Silent Mode is also turned off.
Can I still use my phone's alarm when Do Not Disturb is on?
Yes. Turning on the Do Not Disturb feature will not affect the alarm on your iPhone. Whatever you do, it will still ring unless you lower the volume of the alarm. The reason is that they have their separate default setting on your iPhone.
That's how quickly you can perform the iPhone Do Not Disturb turn off procedure. You only need the help of the 3 approaches in this article. In addition, this post offers FoneLab iOS System Recovery if your iPhone does not allow you to turn off the mentioned feature. Do you have more questions? Please go to the comment section below and put them. Thank you!
FoneLab enables you to fix iPhone/iPad/iPod from DFU mode, recovery mode, Apple logo, headphone mode, etc. to normal state without data loss.
- Fix disabled iOS system problems.
- Extract data from disabled iOS devices without data loss.
- It is safe and easy to use.
