How to Update iPad [4 Leading Procedures to Perform]
 Updated by Lisa Ou / March 18, 2024 09:30
The devices in this generation, like iPads, contain built-in features that give us better experiences. The good thing about these is that their operating system version, like iPadOS, can be updated to get new features. However, checking if the device is eligible for updating is necessary.
In this post, the goal is to update the iPadOS to the newest version so that users can access the newly released feature from Apple. The 4 proven and tested methods are posted in this article to help you get the new iPadOS new features. Discover how to update iPad by scrolling down.
![How to Update iPad [4 Leading Procedures to Perform]](/images/ios-system-recovery/how-to-update-ipad/how-to-update-ipad.jpg)

Guide List
Part 1. How to Update iPad with Built-in Settings
There’s nothing easier than the built-in settings of an iPad to update the iPadOS version it contains. Third-party tools or programs are not needed in the procedure, only the iPad itself. Additionally, professional skills are not required because this process can be done for novices.
The only requirement is to know where the feature of the iPad you can use for the updating process. We assume you do not know where to locate it since this is your first time. Please follow the detailed steps below to execute the procedure smoothly. Move on.
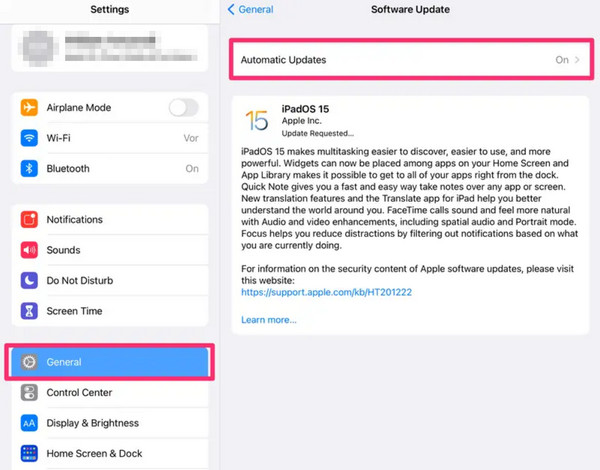
Step 1Navigate to the Home Screen of the iPad and locate the Settings app among all available apps. After that, you will be directed to all the customization settings of the iPad. Please choose the General button on the left; the contents will be shown on the right side of the main interface.
Step 2At the top, please select the Software Update button to access the feature you will use. The iPad will load for a few seconds to check if there are available updates for your operating system. Please choose the Download and Install button at the bottom if you find an update. In addition, your iPad can automatically update the iPadOS version if you turn on the Automatic Updates features at the top. Toggle the slider to turn it on.
FoneLab enables you to fix iPhone/iPad/iPod from DFU mode, recovery mode, Apple logo, headphone mode, etc. to normal state without data loss.
- Fix disabled iOS system problems.
- Extract data from disabled iOS devices without data loss.
- It is safe and easy to use.
Part 2. How to Update iPad with iTunes
iTunes is one of the most versatile programs for your Apple devices. It can stream songs, upload music to iCloud, convert video files, and more. The good thing is that you can use it to update iPad. Ensure you use it to back up your iPad and complete the program requirements before executing the procedure.
Furthermore, iTunes can only be accessed by the earlier macOS and Windows operating systems. Separate instructions will be shown in the procedures below. Follow the one available for you. Move on.
Use iTunes on The macOS Operating System
Primarily, iTunes is used for the macOS operating system until Finder has replaced it. If your Mac's operating system is one of the latest, you may skip this part and proceed to the next one. Follow the detailed procedures below to learn how to update your iPad with iTunes in the earlier macOS operating system. Move on.
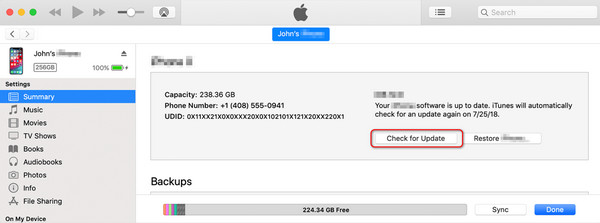
Step 1Get a compatible lightning cable and use it to plug the iPad into the computer. After that, please launch the iTunes program to start the updating process. On the left, please select the Summary button to see more options. Later, you will notice the pieces of information on the iPad on the right and click the Check for Update button.
Step 2iTunes will check for available updates for your iPadOS version. The process will only last for a few seconds or minutes. Once the available updates pop up on the screen, click the Download and Update button to start getting the new features for your iPad.
Use iTunes on The Windows Operating System
On the other hand, having the iTunes on your Windows operating system, this section is for you. This process and the previous one are almost the same. However, using iTunes on earlier macOS is much more convenient because iTunes on the Windows operating system has lag and crash issues.
In addition, the program will not function well if it is not updated to the latest version. If so, updating it will be another procedure you will make, and it will take much of your time. Do you want to use this to learn how iTunes iPad updates? Please follow the detailed steps below.
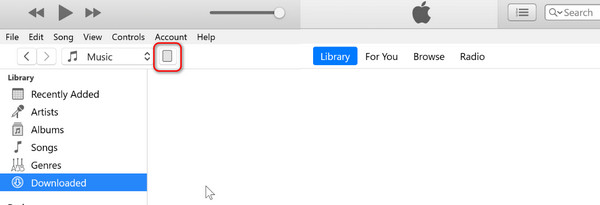
Step 1Get the lightning cable you will use for the iPad into the computer plugging procedure. You must perform it perfectly to access the iPad on the iTunes. Later, click it at the top left of the main interface. All the information on the iPad will be revealed on the PC screen.
Step 2The Settings section will be listed on the left, and choose the Summary button among all of them. The settings for the iPad will appear on the right. Please select the Check for Update button on the right. The program will scan if there are available updates for the iPadOS version. Select the Update button on the popped-up confirmation dialog to complete the action if there's any.
Part 3. How to Update iPad with Finder
Not having iTunes on your Mac or Windows is not a problem because there is an alternative: Finder. Their procedures are almost the same. Buttons are the only differences they have, and that’s why Finder is the best alternative for iTunes. In addition, Finder is available on earlier or latest macOS versions, unlike iTunes. Do you want to know how to update iPad from a computer with Finder? Please follow the detailed steps below. Move on.
Step 1Please connect the iPad to the Mac through your compatible USB cable. After that, launch the Finder program on the Mac to start the process. Later, the iPad icon must appear on the top left of the main interface, and then it must be clicked afterward.
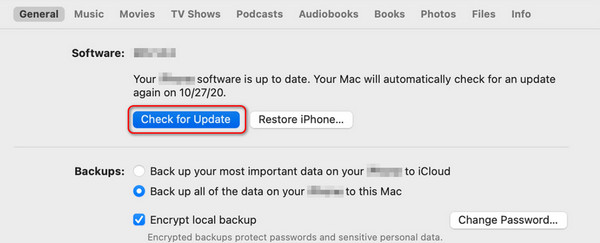
Step 2Selecting the General button will let you view the full settings for the updating software version of the iPad. After that, please go to the Software section and choose the Check for Update button afterward. The Finder will search if the iPad is eligible for a new update. Please wait a few minutes or seconds, then choose the Download and Update button to start updating the iPadOS version.
Part 4. How to Update iPad with FoneLab iOS System Recovery
A third-party tool can also update the software version of your iPad, like FoneLab iOS System Recovery. The mentioned software is designed to fix multiple iOS and iPadOS versions, including the earlier and latest ones. Some are loop restart, battery drain, disabled, charge issues, stuck on preparing updates, and more. The good thing is that the software is available for macOS and Windows operating systems.
FoneLab enables you to fix iPhone/iPad/iPod from DFU mode, recovery mode, Apple logo, headphone mode, etc. to normal state without data loss.
- Fix disabled iOS system problems.
- Extract data from disabled iOS devices without data loss.
- It is safe and easy to use.
Advanced Mode is the feature of the software that updates your iPad software version. With a few clicks, the tool will update your iPadOS version. However, the process will delete all the stored data on your iPad. If so, backing them up before you perform the process is recommended to be executed.
Do you want to use FoneLab iOS System Recovery to update your iPad software version? Please perform the detailed steps below accordingly. Move on.
Step 1Visit the official FoneLab iOS System Recovery website and click the Free Download button. The downloading process will start afterward and last a few seconds. Click the file and set it up according to your preference. Launch the software afterward.

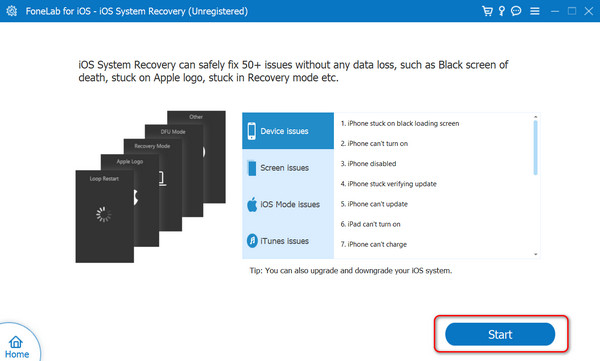
Step 2The software will reveal the supported malfunctions for your iPad. It will list all of them depending on their classification. Please disregard them and choose the Start button to process to the next interface. You only need to wait a few seconds to proceed to the next step.
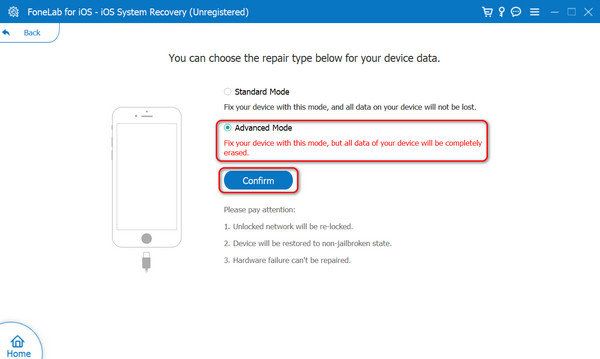
Step 3The tool will require you to plug the iPad you prefer to update into the computer. If that’s the case, you need a USB cable. After that, you must see that the connecting process is completed on the screen. Later, please select the Advanced Mode button at the top and click the Confirm button to proceed.
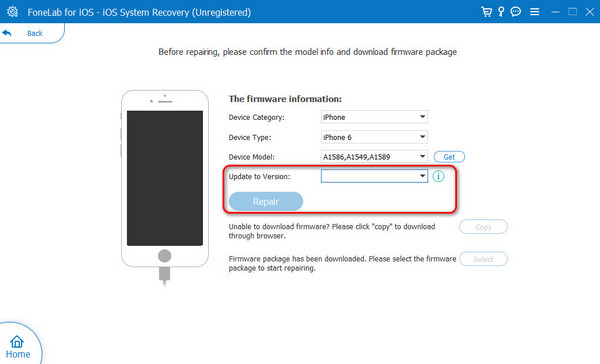
Step 4Please follow the onscreen instructions to learn how to put the iPad into recovery mode. After that, the information on the iPad will be shown on the screen. Please go to the Update to Version section. Later, choose your preferred version and click the Repair button to update your iPad software version.
FoneLab enables you to fix iPhone/iPad/iPod from DFU mode, recovery mode, Apple logo, headphone mode, etc. to normal state without data loss.
- Fix disabled iOS system problems.
- Extract data from disabled iOS devices without data loss.
- It is safe and easy to use.
Part 5. FAQs about How to Update iPad
What should I do before updating my iPad?
Before updating the iPadOS, backing up your iPad data is the most important thing you must consider. The process may delete some essential data on your iPad out of nowhere. Although there are no concrete reasons why it happens, it is better to prevent the issue from occurring.
Can I update my iPad if it's low on battery?
Yes. Updating the iPad software version on a low battery is possible. However, ensure a strong internet connection when you perform the procedure. One of the reasons is that if the iPad is turned off due to low battery, the updating process will be interrupted.
How long does it take to update an iPad?
The updating process of the iPad software version varies depending on the version you prefer to update, internet connection speed, iPad model, and more. Generally, the procedure will only last from 5 to 20 minutes. Having the fastest internet connection is the most suggested requirement you must have.
Can I cancel an update once it has started?
Canceling the update process when it starts is possible. Tapping the Cancel button on the iPad screen is the only way. However, if you prefer to download the software version again, you will start from the beginning because the process will not save the process.
That's how the iPad update procedure is being executed. Built-in settings, built-in programs, and third-party software are some of the methods you can use. The mentioned procedures are helpful, but which one do you find easiest? We hope it is FoneLab iOS System Recovery. The tool enables you to experience a smooth process by only clicking a few buttons. Do you have more questions? Please leave them in the comment section below to join the enjoyable discussion. Thank you!
FoneLab enables you to fix iPhone/iPad/iPod from DFU mode, recovery mode, Apple logo, headphone mode, etc. to normal state without data loss.
- Fix disabled iOS system problems.
- Extract data from disabled iOS devices without data loss.
- It is safe and easy to use.
