- Empty Trash
- Delete Mail App
- Clear Cache on Mac
- Get More Storage on Mac
- Make Chrome Use Less RAM
- Where is Disk Utility on Mac
- Check History on Mac
- Control + Alt + Delete on Mac
- Check Memory on Mac
- Check History on Mac
- Delete An App on Mac
- Clear Cache Chrome on Mac
- Check Storage on Mac
- Clear Browser Cache on Mac
- Delete Favorite on Mac
- Check RAM on Mac
- Delete Browsing History on Mac
Free Up Disk Space on Mac Using Efficient Strategies
 Updated by Lisa Ou / Sept 05, 2023 09:15
Hi! I want to download the newly released movie to watch it with my friends on my Mac. The problem is, the disk doesn't allow me, as there is no longer enough space to download more files. But how do I free up disk space on my Mac? I've never done it before, so please help.
Is your Mac disk running out of space? Well, you're not alone in facing such a situation, as many Mac users have also experienced this before. Hence, the methods to solve the problem have been laid out online, and you only have to find the appropriate ones to perform on your Mac. But don't worry, you no longer have to go off searching on the web since we have already gathered the most efficient strategies to free up space on your Mac disk in this article. All you need to do is keep browsing below and acquire the information on why it is recommended to clean your Mac Disk by freeing up space. Then, the guidelines to acquire more unoccupied space will be followed in each part to help you with the cleaning process.


Guide List
Part 1. Why Should I Free Up Disk Space on Mac
If this is your first time attempting to free up disk space on your Mac, it must be because you have encountered a limitation due to insufficient storage. For instance, you are trying to download a large video file, but your Mac can’t allow the process since there isn’t enough space. Hence, it is a natural indication that you should free up space on your Mac disk. It is the same situation when you want to install an app but can do so due to limited disk storage.
On the other hand, you must also start freeing up space when your Mac is performing poorly. If you notice it experiencing lags, crashes, or other related issues, there’s a huge chance it’s because of inadequate disk space. Hence, it’s another reason you should eliminate unneeded files to gain more storage on your Mac disk. Another possible reason is wanting the computer to perform more smoothly, as having more space makes a Mac run better.

With FoneLab Mac Sweep, you will Clear system, email, photo, iTunes junk files to free up space on Mac.
- Manage similar photos and dulplicate files.
- Show you the detailed status of Mac with ease.
- Empty trash bin to get more storage.
Part 2. How to Free Up Disk Space on Mac
Now that you know why freeing up your Mac's disk space is recommended, it’s time to apply the process by cleaning its storage. To gain more disk space, you can remove various data that are not needed on your Mac. The 2 methods below will provide you with simplified guidelines to do this, so feel free to choose which one you would likely feel comfortable performing for cleaning your Mac disk.
Option 1. Erase Unwanted Files
The official technique for freeing up disk space is by erasing files. It includes unwanted photos, videos, documents, and other data you no longer use. You can find and remove them from Finder, where your file folders are stored. However, the process doesn’t end there, as removing the files from Finder doesn’t directly erase them. They will only automatically transfer to the Trash, and you still have to empty the folder to erase them permanently from your Mac and free up disk space.
Bear in mind the worry-free instructions below to free up disk space on a Mac by erasing unwanted files and emptying the Trash folder:
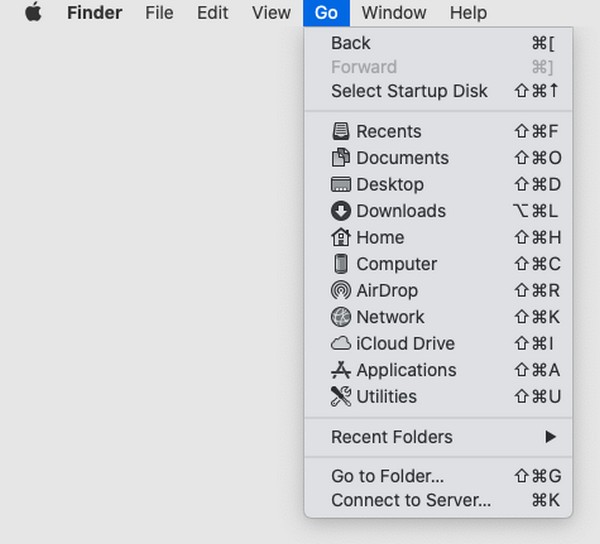
Step 1Locate the Finder icon on your Mac Dock, then run it to access the files and other data stored on the disk. On the Finder interface’s left column, click the location where your unwanted files are, or you may also click the Go tab at the top to select the folder where they’re saved.
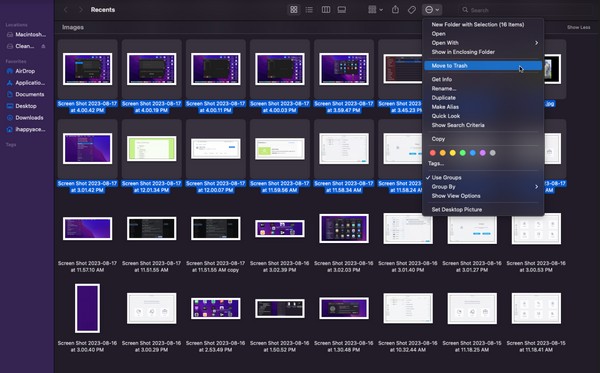
Step 2Once you find the unnecessary files you’d like to erase, select them, then hit the circled three-dot icon at the top of the window. Next, click the Move to Trash selection to eliminate them from your folder. After that, select the Trash icon on the Mac Dock to view the files you have removed.
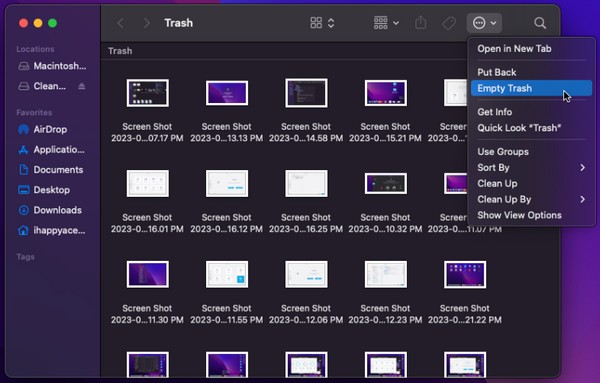
Step 3At the top of the Trash window, you will also see an encircled three-dot icon with a down arrow on the right portion. Click it to reveal the menu list, then hit empty Trash to get rid of the files from your Mac for good.
Option 2. Use FoneLab Mac Sweep
FoneLab Mac Sweep is an efficient cleaner on Mac that lets you erase unnecessary files, apps, and other junk stored on the computer disk. Unlike the previous method, you don’t need to locate the files you’d like to delete manually since this program automatically categorizes the data on your Mac. Hence, identifying and erasing unwanted files will be much quicker, as they are already displayed by data type on its interface. With this tool, you can free up disk space more conveniently, allowing you to manage your Mac data better.

With FoneLab Mac Sweep, you will Clear system, email, photo, iTunes junk files to free up space on Mac.
- Manage similar photos and dulplicate files.
- Show you the detailed status of Mac with ease.
- Empty trash bin to get more storage.
Accept the easeful directions underneath as a pattern on how to free up disk space on Mac using FoneLab Mac Sweep:
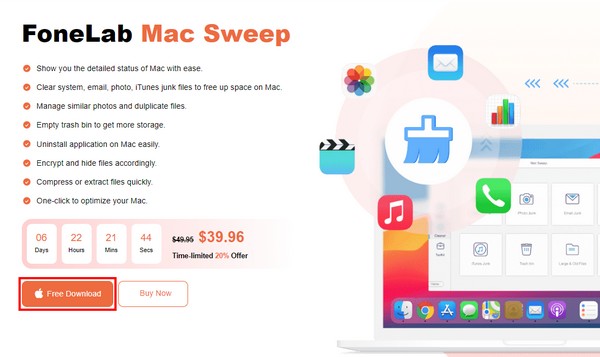
Step 1Enter on your Mac browser the FoneLab Mac Sweep website. Once accessed, hit the Free Download tab with an Apple icon under the program descriptions in the left section. While downloading, feel free to explore the rest of the page to understand its capabilities and the functions it supports. Afterward, transfer the file to your Applications folder and run the tool on your Mac.
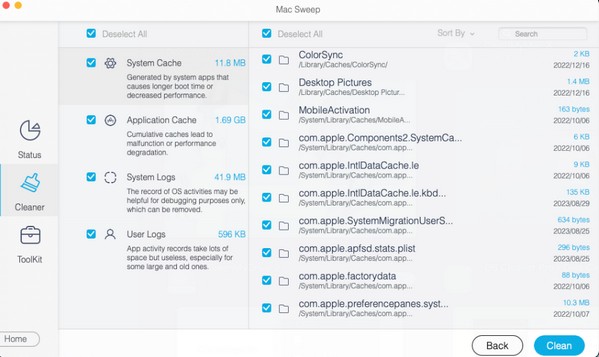
Step 2Click the Cleaner box at the center when the FoneLab Mac Sweep main interface displays. The program will then show you the junk and data types you can delete from the Mac. Select the box you first want to eliminate, and once the following interface appears, hit the Scan button. Afterward, click View to exhibit the scanned data on the disk.
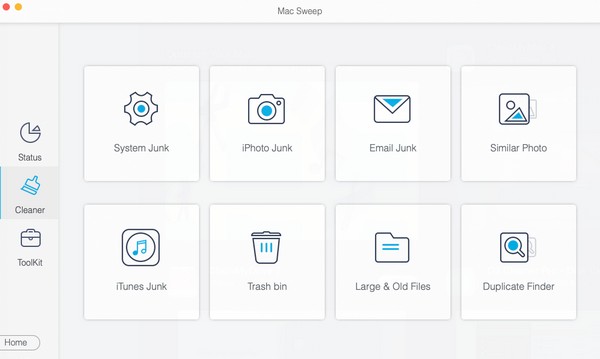
Step 3Once you see the data on the screen, select the items to delete, then hit the Clean button to erase them directly from your Mac disk. Afterward, you may return to the Cleaner interface to select the other junk or data to erase. Meanwhile, you may also explore the ToolKit to utilize its features. Then, proceed to the Status interface to check the current status of your Mac disk after being cleaned.

With FoneLab Mac Sweep, you will Clear system, email, photo, iTunes junk files to free up space on Mac.
- Manage similar photos and dulplicate files.
- Show you the detailed status of Mac with ease.
- Empty trash bin to get more storage.
Part 3. FAQs about How to Free Up Disk Space on Mac
1. Why is my disk space full on my Mac?
Your Mac disk may be full because you often download files on your Mac. The disk can fill up immediately, especially when the data you download are large, such as high-quality movies, large gaming apps, and more. But don't worry; you can mend this problem by freeing up disk space on your Mac. Simply refer to the article above; the methods will guide you in erasing unnecessary data to free up disk space.
2. Why does my Mac say I don't have enough disk space after deleting large files?
If you have already erased large files on your Mac, but the disk space is still insufficient, it may be due to other junk. Caches, cookies, temp files, and other junk on your Mac are not always visible, so it's understandable if you can't erase them manually. Fortunately, tools like FoneLab Mac Sweep allow you to remove these junks efficiently. Check Part 2, Option 2, for more information.
The techniques above are the most efficient ones we found, so trust they will help you, especially the FoneLab Mac Sweep, successfully free up space on your Mac disk.

With FoneLab Mac Sweep, you will Clear system, email, photo, iTunes junk files to free up space on Mac.
- Manage similar photos and dulplicate files.
- Show you the detailed status of Mac with ease.
- Empty trash bin to get more storage.
