- Empty Trash
- Delete Mail App
- Clear Cache on Mac
- Get More Storage on Mac
- Make Chrome Use Less RAM
- Where is Disk Utility on Mac
- Check History on Mac
- Control + Alt + Delete on Mac
- Check Memory on Mac
- Check History on Mac
- Delete An App on Mac
- Clear Cache Chrome on Mac
- Check Storage on Mac
- Clear Browser Cache on Mac
- Delete Favorite on Mac
- Check RAM on Mac
- Delete Browsing History on Mac
How to Hide Files on Mac via 3 Effortless Techniques
 Updated by Lisa Ou / Sept 14, 2023 09:15
Greetings! My current work requires us to download files on our Macs to study the issues our clients send us. My problem is that my son loves to use my Mac to play his favorite game. Yesterday, he almost deleted my essential files for work! Luckily, I prevented him from doing that. Now, I want to learn how to hide files on a Mac. Can you teach me how? Thanks!
Prevention is better than cure. Yes, you read that right! It is better to prevent your files from being deleted or accessed by someone who uses your Mac before it's too late. If so, hide them. To assist you, please see the 3 methods below that we have ready for you.


Guide List
Part 1. How to Hide Files on Mac through Terminal
Mac has a built-in tool called Terminal that can hide your files via encoding. Some Mac users use this tool when they want to perform an action involving multiple files or data on their Macs. It includes deleting files, formatting Mac, and more.
However, you have to be careful using Terminal. You need to make sure that the codes you enter are correct. A missing letter or space on it can change your command on the Mac. It can lead to another command that can make errors or issues to your files or, worse, the Mac itself. If so, follow the detailed steps below to avoid mistakes. Move on.
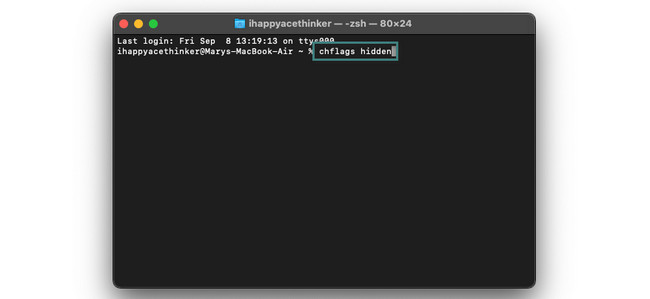
Step 1Press the Command+Space command key on your keyboard. After that, the Spotlight feature of Mac will appear on the main interface. Please type the Terminal word and click its icon once you see it on the drop-down options. Later, the tool will require you to type a code. Please type the chflags hidden code.
Step 2Please drop the files that you want to hide from your Mac. After that, press the Return or Enter key on your keyboard.
Part 2. How to Hide Files on Mac by Encrypting
What if you want to hide your Mac files through encryption? Please see the 2 methods below if that’s the case. Move on.
Option 1. Use FoneLab Mac Sweep
If you are afraid to use the method above because you are not tech-savvy, use FoneLab Mac Sweep. Our tool can instantly hide your files by knowing only their locations. Your files are safe because this tool will ask you to create a password before opening its feature. In this case, you are the only one that can access your hidden files.

With FoneLab Mac Sweep, you will Clear system, email, photo, iTunes junk files to free up space on Mac.
- Manage similar photos and dulplicate files.
- Show you the detailed status of Mac with ease.
- Empty trash bin to get more storage.
Additionally, the tool can encrypt the files on your Mac. Also, it can delete system junk, iPhotos junk, email junk, and more. In addition, this software can manage similar photos, empty trash and files on the Mac. If so, you can clear the duplicates.
See below for how tFoneLab Mac Sweep hides your files on Mac. Please proceed.
Step 1To download the tool, please search for FoneLab Mac Sweep on the Mac web browser. Choose its official website and click the Free Download button. You can also scroll down to see all the tool's features and for future reference. Later, set up the software and launch it by searching it using the Mac Spotlight or Launchpad.

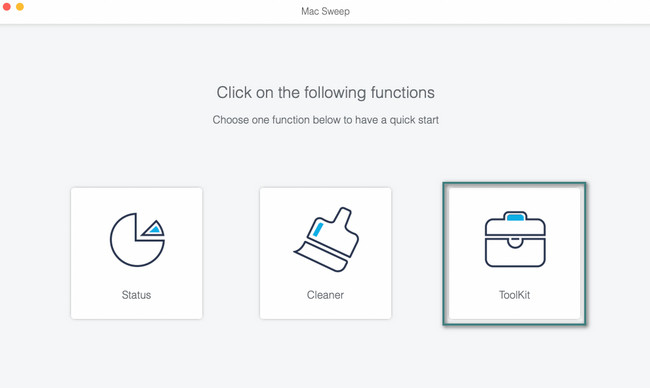
Step 2Later, the tool will appear on the screen containing the Cleaner, Status, and Toolkit features. Among the 3 options, please click the Toolkit icon.
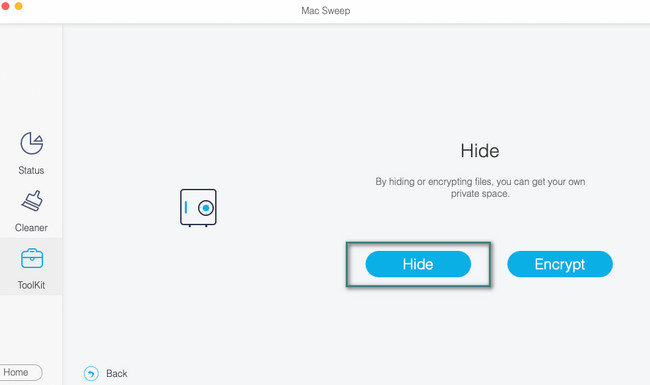
Step 3On the right of the main interface, please choose the Hide icon. Please read the feature description at the top to better understand its process. After that, click the Hide button on the right. The tool will require you to set a password to hide the files from your Mac. Please type the password on the box and confirm it to the other one.
Step 4Click the classification of the files you want to hide on your Mac. You can choose the File, Music, and Video buttons. Later, click the Plus icon on the right. Finder will appear on your screen. Choose the files from it that you prefer to hide. Later, click the Hide button on the right to hide them finally.

With FoneLab Mac Sweep, you will Clear system, email, photo, iTunes junk files to free up space on Mac.
- Manage similar photos and dulplicate files.
- Show you the detailed status of Mac with ease.
- Empty trash bin to get more storage.
Option 2. Utilize FileVault
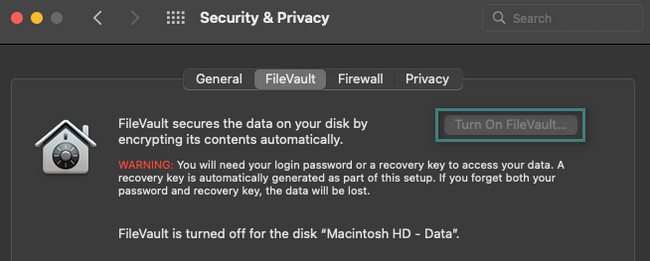
The FileVault feature of Mac will not thoroughly hide the files from it. But, it assures you that no one can access your files because the feature is used to encrypt them. It means that FileVault will require you to put a password for your files. You need to log in with the password or your recovery key to access them. One of the downfall of this feature is that you will lose your encrypted files once you forget their password. Anyway, let’s start with how to turn on this feature on your Mac to encrypt your files. Proceed below.
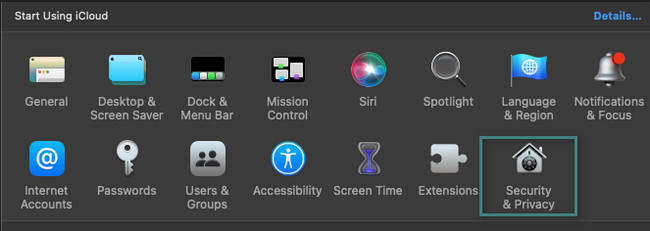
Step 1Turn on your Mac and tick the Apple icon at the top left corner. Its drop-down options will appear on the main interface. Please choose the System Preferences button among all of them. Later, a small window will be shown up on the screen. You will see many options and settings for your Mac. Please click the Security & Privacy button.
Step 2You will see 4 tabs at the top of the tool. You will see the FileVault as the second option from the left. Please click the button to see more options. You will see a warning sign under it. Please read it to understand the feature better. After that, click the Turn On FileVault button to activate the feature to encrypt your files on Mac.
Part 3. FAQs about How to Hide Files on Mac
1. How to unhide hidden files on a Mac?
You can use the Finder on your Mac. You only need to locate the original folder and the location of the hidden files. After that, press the Command+Shift+. (Period) command keys on your Mac keyboard. The hidden files will be shown on your screen. Alternatively, you can also use FoneLab Mac Sweep. Download the tool and launch it. Choose the Toolkit button. You will see the hidden files on the next screen. On the right, click the Reset button at the bottom right corner afterward.
2. How do I hide private photos on my Mac?
Go to the Photos app of your Mac. After that, please locate the location of the photos that you want to hide in the Photos section on the left. You can also find them in the Albums section. Later, control-click the images that you want to hide. Options will appear on your screen. Please select the Hide (Quantity) Photo button. Mac will hide all of the chosen photos afterward.
Thank you for reaching the end of our post! It means you read it and learned how to hide files on Mac. Do not hesitate to download our tool FoneLab Mac Sweep and experience it with your own hands. It can help you hide and unhide files. Download the software now!

With FoneLab Mac Sweep, you will Clear system, email, photo, iTunes junk files to free up space on Mac.
- Manage similar photos and dulplicate files.
- Show you the detailed status of Mac with ease.
- Empty trash bin to get more storage.
