[Easy iPad Restoration Tips] How to Recover Deleted Music from iPad
 Updated by Valyn Hua / Jan 08, 2021 09:05
I have downloaded videos to iPad with iTunes. After finishing download, I found that my songs were synced too. But there was no music in this iTunes music library before. So I lost all my music on iPad. These music are precious, which are no longer available for download. Can anyone help me?
In some respects, the built-in iPad music player is a relatively practical software because of its rich music resource, high tone quality, and so on. But it is not for free to download music. So, using iTunes to add music is a better option.
However,

Like the above example, someone feels annoyed that it's easy to lose existing music on iPad when they want to add music to their iPad via iTunes. Therefore, I must briefly touch on the way to add music before talking about iPad music recovery.

Guide List
1. How to Cancel Automatic Sync of iTunes
At the first, you should know how to prevent the iPad from syncing automatically after connecting to the computer.
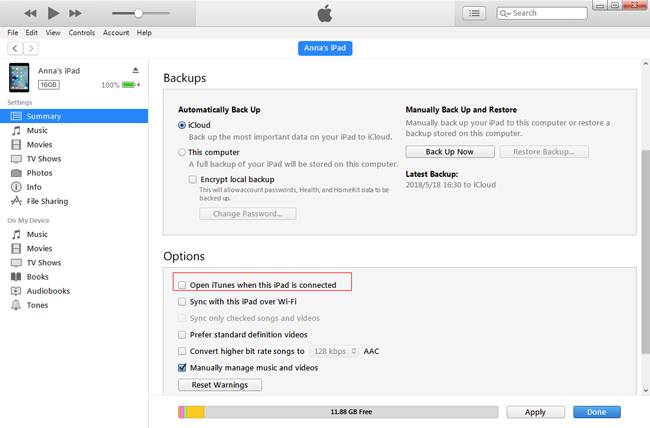
Option 1: Connect your iPad to computer. On the iTunes interface, click on the iPad icon on the top left. Then choose Summary. Go to the Options section and uncheck the Open iTunes when this iPad is connected option.
Option 2: If you want to stop the iPad from automatically sync just this once, you can try this way. Open the iTunes. While the iPad is connected, Press shift+control key until the iPad icon appears on iTunes interface.
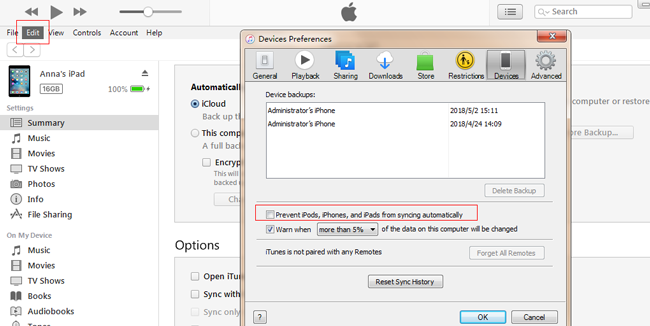
Option 3: If you want to prevent all iOS devices from syncing automatically, choose Edit > Preferences >Devices > Prevent iPods, iPhones, and iPads from Syncing Automatically. Then all the devices will not sync automatically, although you have chosen Automatically sync when this iPad is connected on the Summary interface.
Then, let's see the way to free add music to iPad.
2. How to Recover Music from Backup to iPad
Obviously, you are not allowed to transfer music from computer to iPad directly. You will need iTunes as the data tranfer tool between computer and iOS devices.
Method 1. Transfer iPad Music via iTunes
Step 1 Transfer Music from Computer to iTunes Library.
There are two ways to add music from local computer to iTunes.
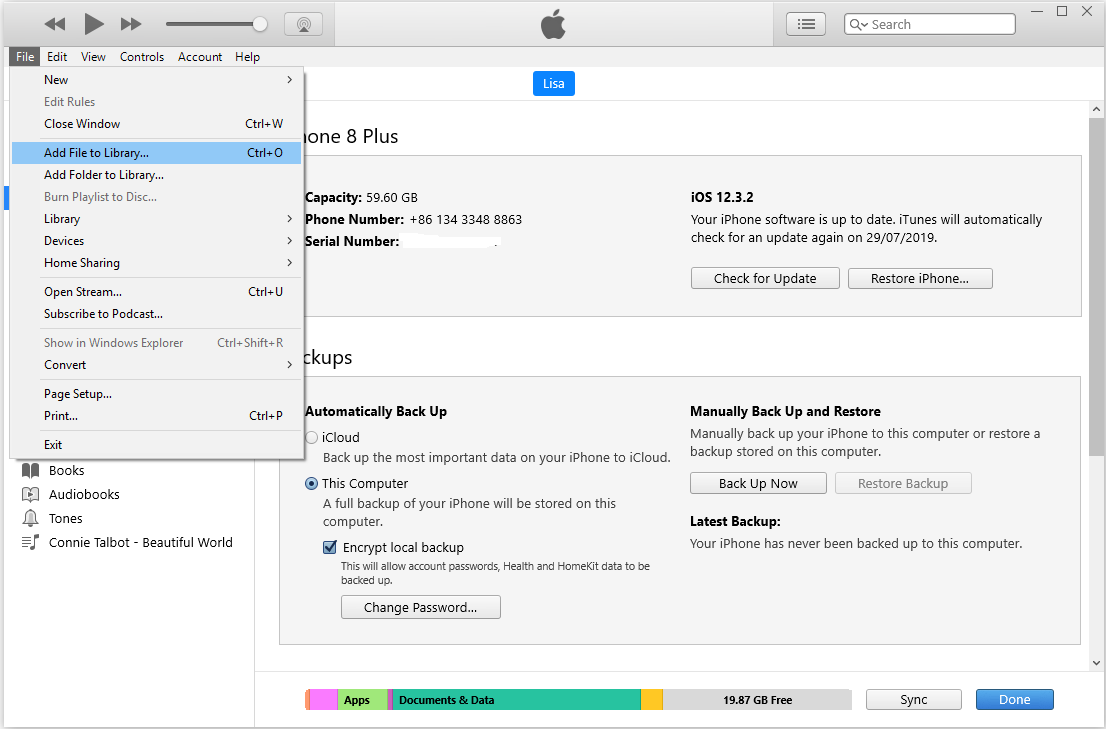
One is to choose File > Add File to Library. Also, you can choose File > Add Folder to Library. This just used for bulk adding. As an experienced user, maybe you are familiar with this way.
Another one is relatively direct. Click Songs at the Library section on the left sidebar. Drag the local music to the right side.
Step 2 Transfer Music from iTunes Library to iPad.
There are also two ways to add music from iTunes to iPad.
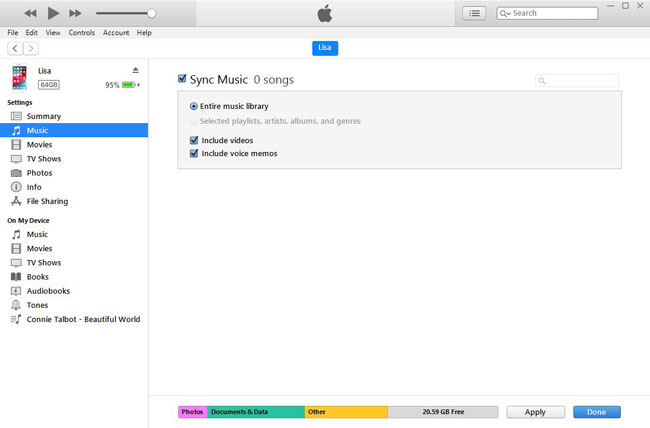
The first one is sync, which is mentioned above. Connect your iPad to computer. Click on the iPad icon after it appears. Choose Music at the left sidebar. Mark Sync Music and click Apply.
The second one is manual management. Click on the iPad icon and choose Summary. Check Manually manage music and videos, then go back to the previous page and drag the music from iTunes library to Devices section on the left side.
Now, you can free download new music without changing the existing music on iPad.
Method 2. Transfer iPad Music via iCloud
iCloud Music Library is a feature to help you get your facorite songs wherever you are. It is convenient and easy to use. If you have enabled iCloud Music Library feature on your iPad, you can easily follow below demonstration to get them back.
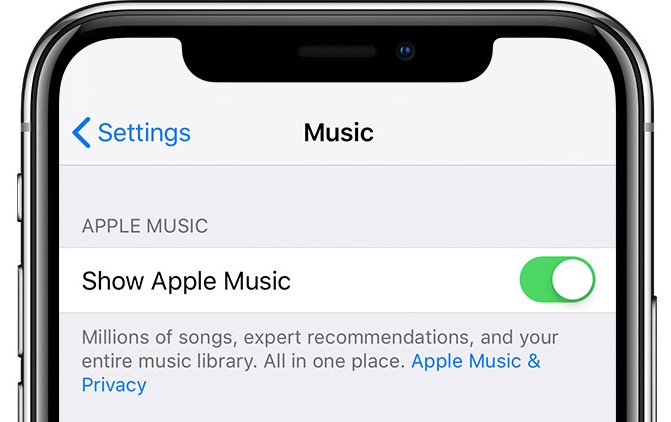
Step 1 Tap Settings > Music.
Step 2 Turn on Show Apple Music and iCloud Music Library.
Then your music should be downloaded on the iPad.
Method 3. Transfer iPad Music via FoneTrans
If you think above-mentioned solutions are too difficult to complete, you can try FoneTrans for iOS on computer. It is a third-party tool on PC to organize data between iOS device and computer like transfer data from on iPad to another, etc.
Step 1 Download and install program on computer, and then it will be launched automatically. You should connect iPad to computer with USB cable.
With FoneTrans for iOS, you will enjoy freedom to transfer your data from iPhone to computer. You can not only transfer iPhone text messages to computer, but also photos, videos and contacts can be moved to PC easily.
- Transfer photos, videos, contacts, WhatsApp, and more data with ease.
- Preview data before transferring.
- iPhone, iPad and iPod touch are available.
Step 2 After connection, click Music > + icon.
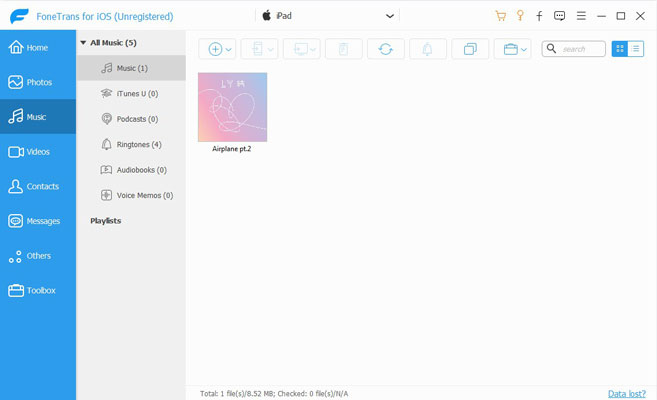
Step 3 Choose what you want to add to iPad and click Open.
Without further ado, let's get right into how to recover iPad music.
3. How to Recover iPad Music
What if you lose the precious music? This will not be a problem if they are still saved in the iTunes library. But what if you meet the same situation as the above example?
Referred to music recovery, most people think first of recovery from iCloud backup or iTunes backup. But there is the same problem as sync that recovery from a backup will change the current music library on iPad.
Actually, it is achievable to add music without changing the current music library on iPad. FoneLab iOS Data Recovery is able to make that happen.
You can also use this program to recover deleted music on iPhone.
With FoneLab for iOS, you will recover the lost/deleted iPhone data including photos, contacts, videos, files, WhatsApp, Kik, Snapchat, WeChat and more data from your iCloud or iTunes backup or device.
- Recover photos, videos, contacts, WhatsApp, and more data with ease.
- Preview data before recovery.
- iPhone, iPad and iPod touch are available.
This software is a powerful iOS data recovery tool, which can recover 19 different types of data for iPad, iPhone or other iOS devices. It allows you to preview the content before recovery and choose the desired data to recover.
Below is the user guide with detailed steps.
Step 1 Run The Recovery Program
Free download and install the software on the PC which has the latest version of iTunes. If you are the Mac user, the Mac version of the software is also provided. Launch this software for a try. It offers a 30-days free trial.
Step 2Scan Your iPad
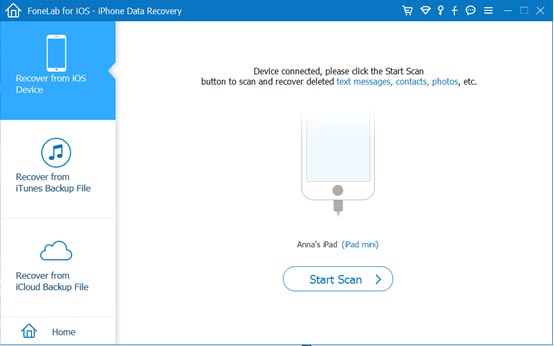
Connect your iPad to the computer with a USB cable. Choose iPhone Data Recovery > Recover from iOS Device > Start Scan. Then it will take minutes to analyze and scan all the data in the iPad including music. You can also choose to restore music from iCloud or iTunes according to your needs.
Step 3Preview and Recover Music
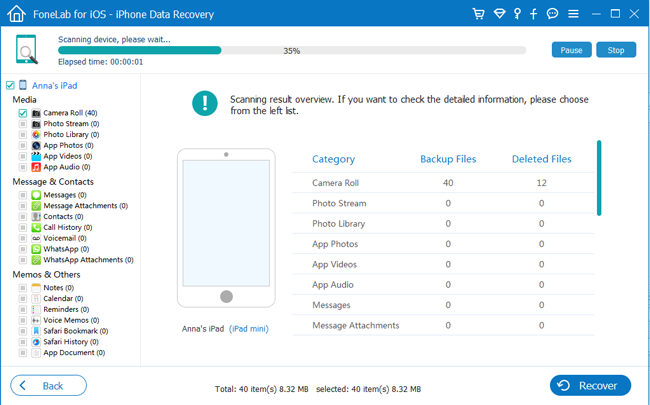
After finishing the scan. The software will list the different types of files at the left sidebar. Click App Audio and then preview the music name at the right. Mark the music name to recover. Just wait for the recovery to finish.
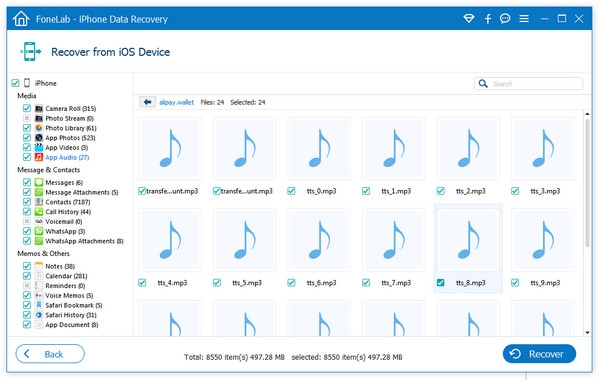
During the whole process, please keep your iPad connected. After finishing, the selected music are saved to your computer in the same format as before.
It should be noticed that the massive operation would overwrite the lost data on the iPad. So, for the completeness of data recovered, please do nothing with your iPad before recovery.
You can ignore this suggestion if you have a backup in iTunes or iCloud. Because this software supports recovery from a backup file without changing your current data. Just choose iPhone Data Recovery > Recover from iTunes Backup File or choose iPhone Data Recovery > Recover from iCloud Backup File.
Now, you can check and enjoy the music on the computer. Or you can transfer the music to your iPod , or iPad.
That's all. Hope it is helpful for you!
With FoneLab for iOS, you will recover the lost/deleted iPhone data including photos, contacts, videos, files, WhatsApp, Kik, Snapchat, WeChat and more data from your iCloud or iTunes backup or device.
- Recover photos, videos, contacts, WhatsApp, and more data with ease.
- Preview data before recovery.
- iPhone, iPad and iPod touch are available.
