- Empty Trash
- Delete Mail App
- Clear Cache on Mac
- Get More Storage on Mac
- Make Chrome Use Less RAM
- Where is Disk Utility on Mac
- Check History on Mac
- Control + Alt + Delete on Mac
- Check Memory on Mac
- Check History on Mac
- Delete An App on Mac
- Clear Cache Chrome on Mac
- Check Storage on Mac
- Clear Browser Cache on Mac
- Delete Favorite on Mac
- Check RAM on Mac
- Delete Browsing History on Mac
How to Delete Photos from Mac But Not iCloud Easily
 Updated by Lisa Ou / Nov 07, 2023 09:15
Hi! I have transferred some of my photos to iCloud, as I plan to remove them from my Mac. It is to gain storage since I want to save newer files, but I don't want to lose my older ones completely. However, I've learned that once I delete the photos from my Mac, they will also be removed from iCloud. Can someone help me delete photos from Mac but not iCloud?
iCloud is an Apple service that offers several features, and among its primary uses is that it allows you to sync various data types among your Apple devices. Thus, you can easily sync your Mac photos to iCloud to back up or keep them safe in the cloud. But as you have read in the scenario above, you can still lose the pictures once you delete them on Mac, even if they're already saved on iCloud. So, what should you do in this situation?
Well, there is no need to stress yourself out over this matter, as this article is here to guide you. But before we start, we will first inform you about the necessary details you must learn about this topic. Then, the techniques that will help you with the deletion will follow.


Guide List
Part 1. What Do Delete Photos Off Mac But Not iCloud Mean
Before anything else, be informed that when you go to your iCloud account on Mac and activate Photos, the pictures stored in your Photos app will be synced to iCloud. All the media files you save or delete on the app will also apply to the cloud. Hence, if you delete a certain image on your Mac Photos, it will also be deleted from iCloud.
It is advantageous for handling files, but as good as this feature may be, it still risks losing your photos if not used properly. That’s why many people ask, “How do I delete photos from MacBook but not iCloud?” Thankfully, this article will provide you with your desired answers.
Part 2. How to Delete Photos Off Mac But Not iCloud
Following our exploration and research on the web, we finally gathered the strategies for deleting photos on the Mac without eliminating them from iCloud. Whether you’re more comfortable using a third-party or built-in program, there is no need to worry, as we’ve got it all for you. Just be attentive to the instructions to delete your Mac photos with ease.
Option 1. FoneLab Mac Sweep
When it comes to data deletion, FoneLab Mac Sweep is the program several Mac users rely on. It is a professional cleaner and has a high success rate, so trust your photos with it, as it won’t disappoint. In addition, it has a great advantage since this program categorizes your data, letting you identify and erase the duplicated photos effortlessly. And once you delete them with this tool, you can trust them not to return, preventing others from seeing the files. But before that, ensure that iCloud Photos is disabled, or the deletion will also be synched.

With FoneLab Mac Sweep, you will Clear system, email, photo, iTunes junk files to free up space on Mac.
- Manage similar photos and dulplicate files.
- Show you the detailed status of Mac with ease.
- Empty trash bin to get more storage.
Aside from its photo deletion feature, you are also free to erase other data types on your Mac, including junk, email junk, large and old photos, trash, iPhoto junk, and more. Thus, it will greatly help if you plan to clean your Mac from unnecessary data and obtain more space.
View the succeeding instructions underneath as a pattern of how to delete photos on Mac but not iCloud with FoneLab Mac Sweep:
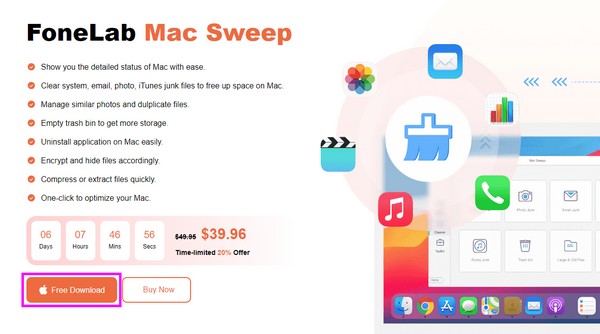
Step 1Go into the FoneLab Mac Sweep site to get the installer file by pressing Free Download. Once it begins downloading, you may browse the page to learn its features and, when done, open the file to drag the tool icon to the Applications folder. Double-tap the program icon afterward to launch on your Mac.
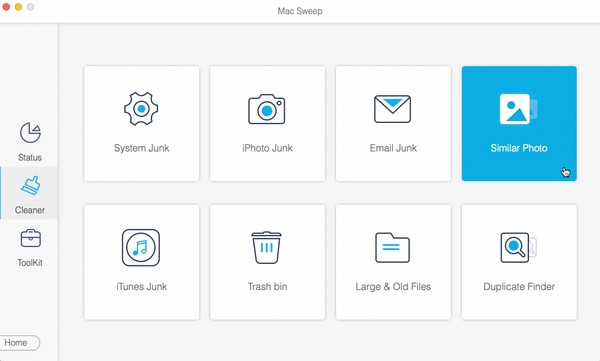
Step 2Hit the Cleaner box immediately once the initial interface displays. When the cleaning features are on the screen, choose the Similar Photo option. Then, hit Scan to let the tool skim through your Mac photos, and select View to display them.
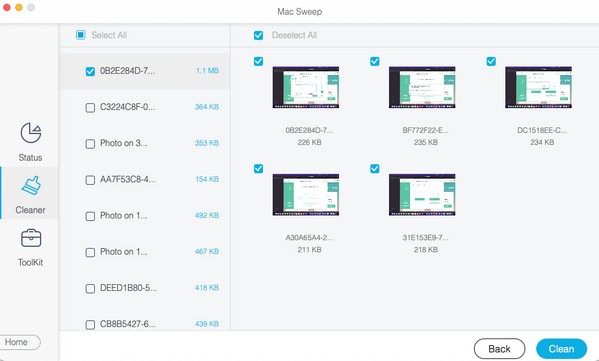
Step 3Once the pictures are presented, check the boxes next to the images you desire to erase. The ones on the left are categorized, while the ones on the right are specific, so choose accordingly. Lastly, pick the Clean button on the lowermost portion to delete them.

With FoneLab Mac Sweep, you will Clear system, email, photo, iTunes junk files to free up space on Mac.
- Manage similar photos and dulplicate files.
- Show you the detailed status of Mac with ease.
- Empty trash bin to get more storage.
Option 2. Photos App
The Photos is Apple’s media app containing your photos, live photos, and videos. It is mainly for viewing media files, but you can also utilize its editing functions. Meanwhile, if this app is enabled on your iCloud for syncing, the files you add or delete will also be added or deleted on the cloud. Hence, you must deactivate it first, then erase the pictures on your Mac. This way, the photos synced on iCloud won’t get affected and will be safe from deletion.
Abide by the easy procedure below to grasp how to delete photos on MacBook without deleting from iCloud:
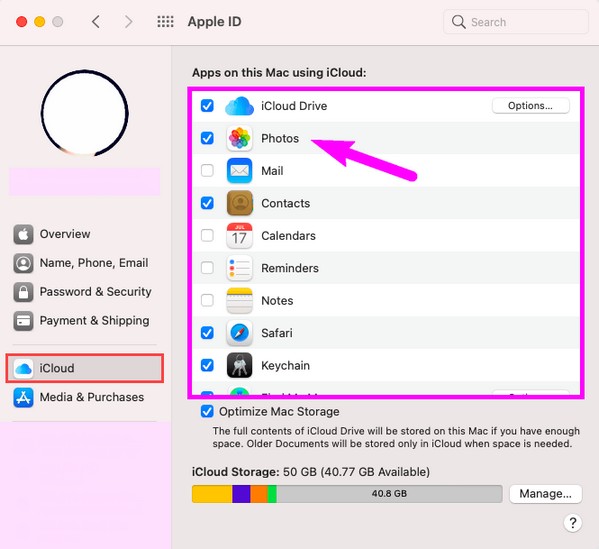
Step 1Disable iCloud Photos on your Mac by clicking the Apple icon > System Preferences > Apple ID > iCloud. Afterward, find the Photos option to turn it off. Open the Photos icon, which is usually located on the Dock of your Mac.
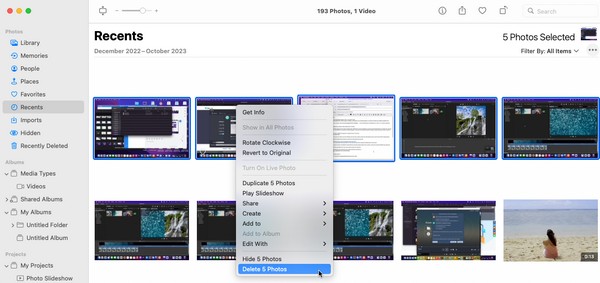
Step 2Once its window materializes, your photos in the Library section will automatically be presented. Choose the location of the image you plan to delete in the left pane. Next, select them and right-click to select Delete (number of items chosen) Photos.

With FoneLab Mac Sweep, you will Clear system, email, photo, iTunes junk files to free up space on Mac.
- Manage similar photos and dulplicate files.
- Show you the detailed status of Mac with ease.
- Empty trash bin to get more storage.
Option 3. Trash Bin
Whenever a photo or any other data type gets deleted on Mac, they aren’t immediately removed from the computer. Instead, they automatically get transferred to the Trash folder, where all the erased files are stored. Thus, you will only be able to erase them permanently by emptying the Trash or deleting them selectively from the folder. Don’t worry; deleting files on Trash doesn’t affect your data stored on iCloud.
Comply with the worry-free directions underneath to learn how to delete photos from MacBook but not iCloud:
Step 1Press the Trash icon on the Dock’s rightmost section to present the folder on your Mac desktop. The files you deleted from different file locations will then display.
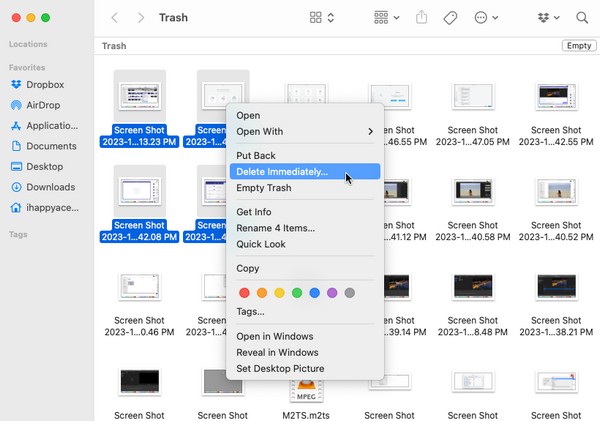
Step 2Select the photos you will delete, then right-click and pick Delete Immediately to erase them from your Mac permanently. Alternatively, choose the Empty tab on the top right to delete all the Trash content simultaneously.
Part 3. FAQs about How to Delete Photos Off Mac But Not iCloud
1. Can I delete pictures from my Mac but save them on my iPhone?
Yes, you can. If you have enabled iCloud Photos on both your Mac and iPhone, it would be best to deactivate it on your Mac. This way, the pictures will stay on your iPhone even if you delete them on Mac.
2. Why is Mac storage full when I have iCloud?
iCloud only offers free 5 GB of storage. Your files may have taken up all its space already, so the newer ones automatically use up your Mac storage, causing it to be full. If you need more storage, you must pay for a plan on iCloud.
Thanks for using our suggested methods in this post for deleting the photos on your Mac without removing them on iCloud. For more Mac solutions, visit the FoneLab Mac Sweep site.

With FoneLab Mac Sweep, you will Clear system, email, photo, iTunes junk files to free up space on Mac.
- Manage similar photos and dulplicate files.
- Show you the detailed status of Mac with ease.
- Empty trash bin to get more storage.
Below is a video tutorial for reference.
