- Unlock Apple ID
- Bypass iCloud Activation Lock
- Doulci iCloud Unlocking Tool
- Factory Unlock iPhone
- Bypass iPhone Passcode
- Reset iPhone Passcode
- Unlock Apple ID
- Unlock iPhone 8/8Plus
- iCloud Lock Removal
- iCloud Unlock Deluxe
- iPhone Lock Screen
- Unlock iPad
- Unlock iPhone SE
- Unlock Tmobile iPhone
- Remove Apple ID Password
Simple Guide to New iOS Update Using Proficient Means
 Posted by Lisa Ou / July 03, 2024 09:00
 Is it difficult to perform an Apple iOS update? It will be my first time doing it since I got my new iPhone, so I'm still unsure about the actions I should take. I'm afraid I'll make a mistake and mess up the device's system, so I hope someone can help me. I plan to update my iOS to the latest, especially since the current one doesn't support newer features, but I need your guide.
Like other brands, Apple keeps its devices improving through system updates. They frequently upgrade their iPhone, iPod Touch, iPad, and more by adding new features and services, giving users a better experience. But if you are among iOS device users and want to enjoy these upgrades, you must update the iOS, or they won't be available on your iPhone, iPod Touch, etc.

On the other hand, we understand if you are not yet familiar with the system update. The steps can be a little technical, depending on the method, so being cautious is fine. Hence, we have listed the detailed strategies for updating your iOS in the following parts. We assure you the step-by-step instructions in each section will help you efficiently finish the processes.

Guide List
Part 1. How to Update iOS on Settings
The Settings app is where the official process for updating your iOS is performed. Its Software Update section allows you to update manually or automatically. Both methods are straightforward, allowing you to perform the update effortlessly.
Update iOS on Settings Automatically
Updating your iOS on Settings can be considered the most hassle-free procedure. Coming from the word “automatically,” it performs automatic updates so that you no longer have to do the processes every time. Whenever an update is available, your device will immediately install it without you manually doing the update procedure. Its main advantage is that it saves time and effort, and dealing with the step-by-step method is no longer a problem.
Note the unexacting operation below to install the newest iOS update automatically on Settings:
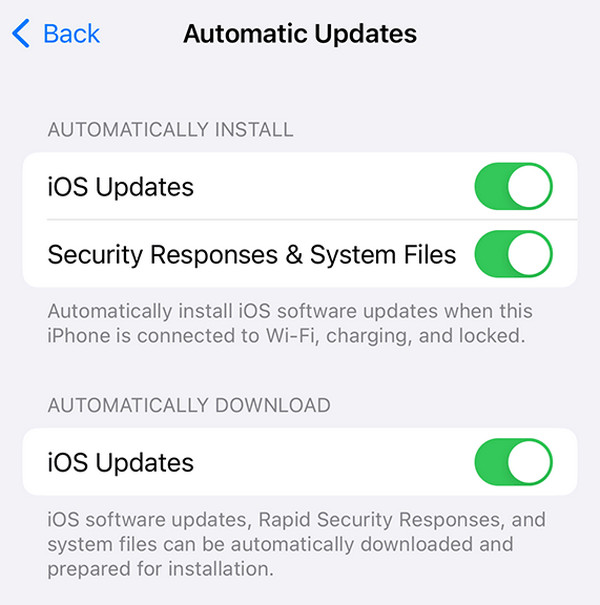
Step 1Open Settings on your iOS device’s Home screen, revealing various options like the General tab. Thus, tap it and choose Software Update to view its settings next.
Step 2After that, select Automatic Updates and enable the iOS Updates sliders under the Automatically Install and Automatically Download sections. Your iOS device will immediately download and install the updates once they are available.
Update iOS on Settings Manually
Meanwhile, although many prefer updating their iOS automatically because of convenience, many prefer doing the updates manually. That’s because it has advantages, such as the freedom to choose. For instance, Apple announced a new update, but some users didn’t find it helpful. An automatic update will immediately apply to your iPhone, iPod Touch, or iPad, but if you prefer to do it manually, you will get to learn the update first. You can read reviews online, and if you think the new update isn’t worth it, you can decide not to update the iOS instead.
Mirror the manageable steps underneath to get the next iOS update manually on Settings:
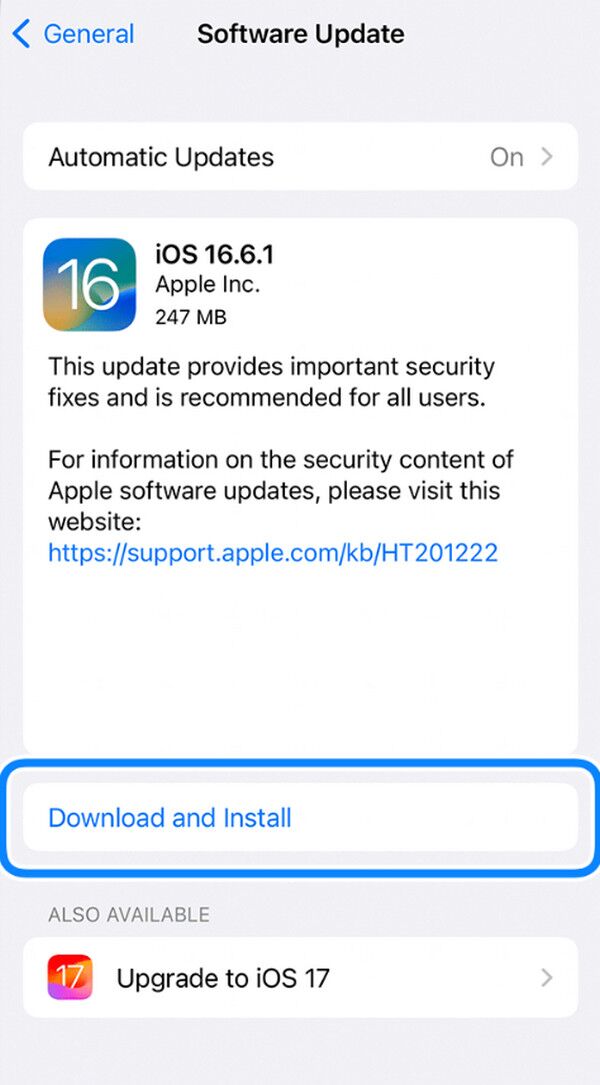
Step 1Like the previous process, you must go to your iOS device’s Settings and select the General option. Next, choose Software Update; if there is available, an update will be shown.
Step 2You may also see multiple updates, so tap the one you prefer. Finally, select Download and Install to get the latest iOS update for your device.
Besides enjoying new features and tighter security, some users update their iOS due to issues. For instance, they can’t navigate their device screens properly, making it difficult to perform the update. Fortunately, it is also possible to update your iOS on the computer. If you’re experiencing an issue or prefer using a computer to update, please move to the next parts.
Part 2. How to Update iOS with Finder
iTunes is an official program that can update an iOS device on a computer. You only have to link your iPhone, iPod Touch, or iPad to it and choose the correct options to update. A designated section displaying the options is available and can be accessed effortlessly. Besides, the steps are uncomplicated, thanks to iTunes’ simple interface. However, remember that this program is unavailable on newer macOS computers. It can only be found or installed in Windows and older macOS versions. Thus, head to the next section if your computer is a later macOS.
Adhere to the appropriate guide below for an iPod Touch, iPad, or iPhone iOS update with iTunes:
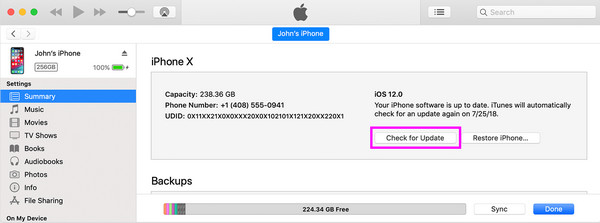
Step 1Attach the iOS device to the computer with a lightning cable and launch iTunes. When the program detects your iPhone, iPod Touch, or iPad, a mobile device symbol will appear on the upper left, so tick it.
Step 2You will see a column on the left section of the following interface. From there, click Summary; its options will be revealed on the right. Among them is the Check for Update tab on the upper right. Thus, select it to update your iOS if it is available.
Part 3. How to Update iOS via iTunes
You may know that iTunes is Apple’s official mobile device management utility, but if you haven’t yet been informed, Finder has already replaced it. That’s why it can only be found on the latest macOS computers and is unavailable on the older ones and even Windows. But even though it’s new, no worries since almost all services offered by iTunes are also provided, including the ability to update various iOS devices. The process is also practically the same, and only a few options have been changed, so navigating its interface on your Mac won’t be a problem.
Conform to the painless task below to grasp how to update iOS on Mac via Finder:
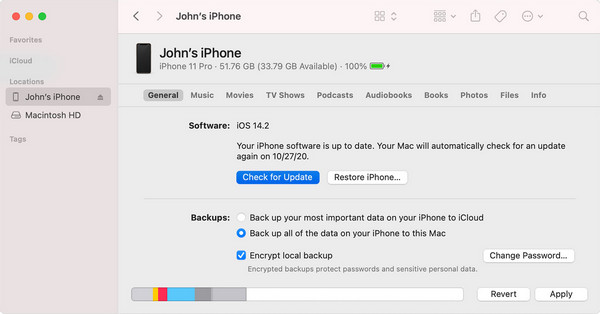
Step 1Initiate Finder on your macOS computer, then link your iPhone, iPod Touch, or iPad using a lightning cable. The device’s name will appear on the left area of the screen.
Step 2Click your device’s name, and the General section will automatically appear on the right. Hence, tick the Check for Update tab under the software information to update your iOS.
FoneLab enables you to fix iPhone/iPad/iPod from DFU mode, recovery mode, Apple logo, headphone mode, etc. to normal state without data loss.
- Fix disabled iOS system problems.
- Extract data from disabled iOS devices without data loss.
- It is safe and easy to use.
Part 4. How to Update iOS through Recovery Mode
On the other hand, Recovery mode is primarily used when fixing a device issue. If you link the iOS device to your computer, the problem can be quickly repaired by pressing the correct device buttons. But remember that the computer you use has iTunes or Finder installed because that program will display the option to update your iOS. So, if neither of them is on the computer, it won’t be able to detect and update your iPhone, iPod Touch, or iPad. Meanwhile, you must ensure the keys you push on the device are correct to enter iPhone recovery mode successfully.
Act according to the proper steps below to get the iOS new update through Recovery mode:
Step 1Ensure iTunes or Finder is in your computer before linking your iOS device to it with a lightning cable. Once attached, enter recovery mode through the designated buttons.
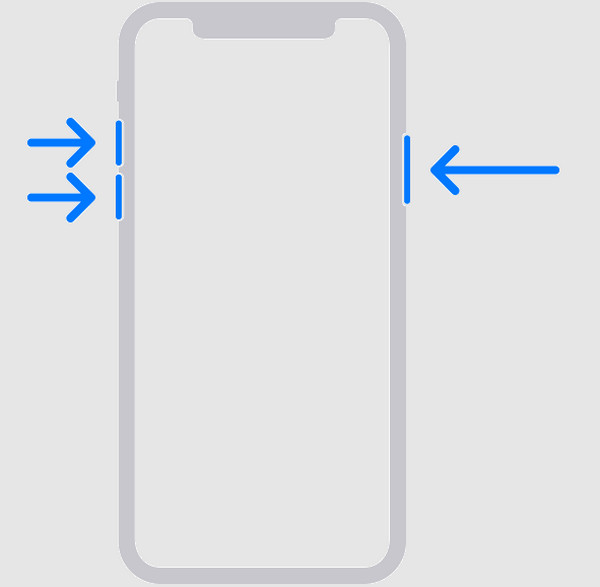
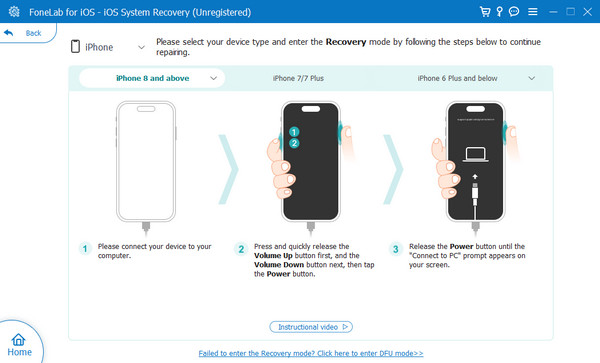
For an iPhone without a Home button: Press and immediately release your iOS device’s Upper Volume button, then do the same to the Lower Volume button. Right after, push and hold the Side key until the Recovery mode screen is shown on the screen.
For an iPhone with a Home button: Bear your thumb on the iOS device’s Sleep/Wake and Home buttons simultaneously for seconds. Then, free both keys when your screen exhibits the Recovery mode.

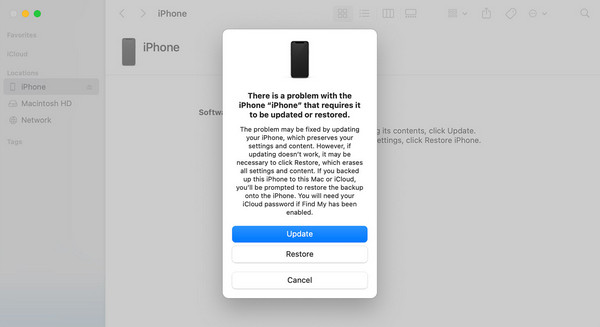
Step 2Once in Recovery mode, the iTunes or Finder interface will show some options on your computer. Thus, pick the Update tab to install the latest iOS update on your device.
Part 5. How to Update iOS Using FoneLab iOS System Recovery
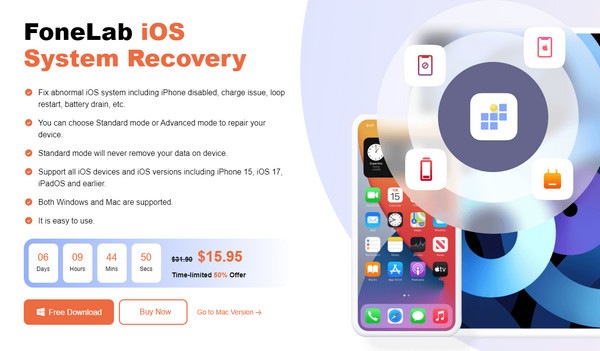
Finally, we gladly introduce you to FoneLab iOS System Recovery. Like Recovery mode, it is primarily used for device problems, especially system issues. If your iPhone, iPod Touch, or iPad experiences abnormalities due to being outdated or anything, this tool would be the perfect solution you can try. It can effortlessly fix iOS problems without complications and confusing steps. Also, thanks to its Standard and Advanced repair types, it protects your device's content.
FoneLab enables you to fix iPhone/iPad/iPod from DFU mode, recovery mode, Apple logo, headphone mode, etc. to normal state without data loss.
- Fix disabled iOS system problems.
- Extract data from disabled iOS devices without data loss.
- It is safe and easy to use.
FoneLab iOS System Recovery isn’t only for fixing outdated iOS problems. Other than that, you can also rely on it when facing battery issues, charging issues, an iOS device stuck in a looping restart, can’t update, has an unresponsive touch screen, and more. After all, nearly all iOS devices and versions are supported, and the program can be acquired on both Windows and Mac. Lastly, its intuitive interface will help you easily navigate the functions efficiently.
Identify the trouble-free process below as a pattern of how to update iOS using FoneLab iOS System Recovery:
Step 1Access the FoneLab iOS System Recovery webpage to display the Free Download tab. Once shown, click it to save the installer in your computer’s Downloads section. Then, open the file, and the config installation will finally start. It will only consume a few seconds, so don’t hesitate to wait until the Start button appears, letting you launch the program.
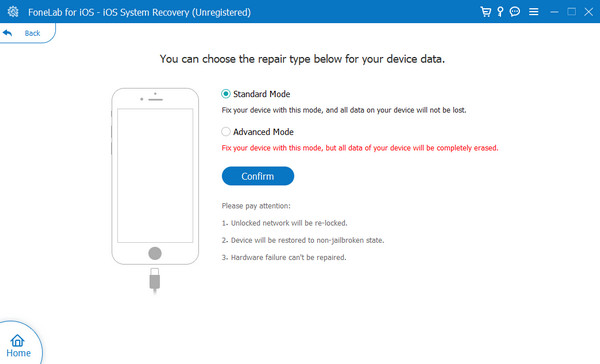
Step 2Key features will immediately be on the program’s main interface. Thus, select iOS System Recovery, then hit Start on the next screen. The repair types, Standard and Advanced modes, will appear afterward, but ensure you understand their functions before choosing the one you prefer. When satisfied, tick Confirm, and ensure your iOS device is attached.
Step 3The following screen contains instructions for entering Recovery mode, but don’t perform them immediately. At the top, choose your device model, and the screen will show the appropriate directions. Follow them to download the correct firmware package. Then, use it to update or repair your iOS, depending on its needs.
FoneLab enables you to fix iPhone/iPad/iPod from DFU mode, recovery mode, Apple logo, headphone mode, etc. to normal state without data loss.
- Fix disabled iOS system problems.
- Extract data from disabled iOS devices without data loss.
- It is safe and easy to use.
Part 6. FAQs about iOS Update
Why can't I update my iOS with Recovery mode?
Your macOS may not be up-to-date, or the iTunes on your computer may not be the latest version. If so, you will likely encounter complications during the update. Thus, ensure these are not outdated so you can experience a smooth update process.
Should I update to iOS 18?
Based on many user reviews, upgrading to iOS 18 has several advantages. Like other updates, it offers new features that you can enjoy. It also provides updated security and privacy, making your device more protected. However, it is not recommended for users with an older device model since updating might slow it down.
How to update to iOS 18?
For the beta version, visit beta.apple.com and log into your account. Otherwise, open the Settings app on iPhone > General > Software Update > Beta Update.
FoneLab enables you to fix iPhone/iPad/iPod from DFU mode, recovery mode, Apple logo, headphone mode, etc. to normal state without data loss.
- Fix disabled iOS system problems.
- Extract data from disabled iOS devices without data loss.
- It is safe and easy to use.
We are grateful for your trust in the procedures we have listed above. You can guarantee they are the official and most trusted strategies, so update your iOS comfortably.