Recover the lost/deleted data from computer, hard drive, flash drive, memory card, digital camera and more.
Windows Data Recovery: The Definitive Guide
 Updated by Lisa Ou / Feb 24, 2021 10:00
Microsoft Windows is a computer operating system, which controls a personal computer, with a graphical user interface. Its version 1.0 was first introduced on Nov. 10, 1983.
Moreover, there have been dozens of windows versions as its requirements for bigger and bigger memory, faster and faster chips, and more.
The latest Windows version is Win 10, which was released on July 15th, 2015, has features allows you to play Xbox One game on your PC or tablet, run another set of windows as if on another screen but without the physical monitor, look at all your notifications in Action Center…
If you are facing the same problems, please keep moving to check the common problems and their effective solutions.

Guide List
1. Windows Basics: Troubleshooting Basic Problems
As you know, there are three versions are used most now, Windows 7, Window 8 and Windows 10.
Before diving into the common issues, let’s have a small talk about their features.
Windows XP: It has 32-bit version only, and it won’t support DirectX versions beyond 9.0c.
Windows 7: You can choose 32-bit version or 64-bit one with more smooth and comfortable design for Desktop, Documents settings, Start menu, Libraries, HomeGroup, etc.
Windows 8: Start button is gone by default, in addition, you can get a simpler task manager, improvements to copy, move, rename and delete, features to reset your PC…
Windows 10: The Start Menu is back. It is surprising that you can have the Cortana to make the Start menu smarter and a central notification center, and you are allowed to run multiple tasks at once.
Well,
Did you meet the security certificate issues on Windows 7? Did you delete an important file accidentally into the recycle bin on a computer with Windows 8 without warning? Do you think your PC with Windows 10 runs too slow?
If your answer is Yes, I am sure that the following contents will satisfy you, as you will be taught to solve above-mentioned and more problems easily.
Windows 7:
1. How to Do to Perform Operations Smoothly?
As Windows 7 needs lots of free space to run system smoothly. It is no doubt that you can remove unwanted software to get more space on PC properly.
Different program will be installed, as there are different demands according to user’s needs. It is rare that user has the custom to clear the useless software on computer as they don’t think it will waste too much space on computer.
While, it can be an important part to fasten the computer operation speed.
Below is the demonstration.
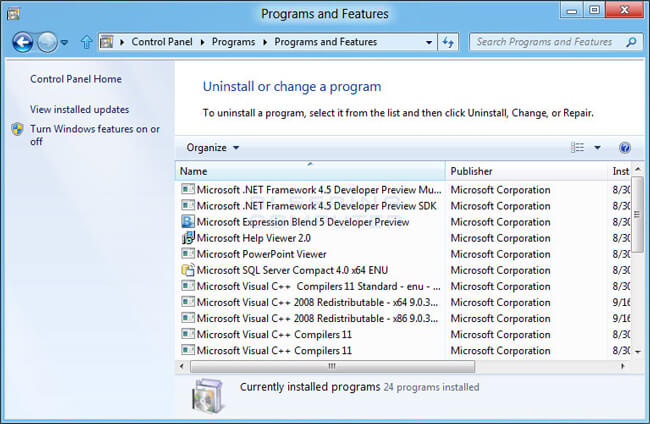
Step 1Click Start, then open Control panel.
Step 2Click Programs and Features.
Step 3Double-click the program you want to move and wait for the uninstalling finish.
2. How to Stop The Warning Dialog?
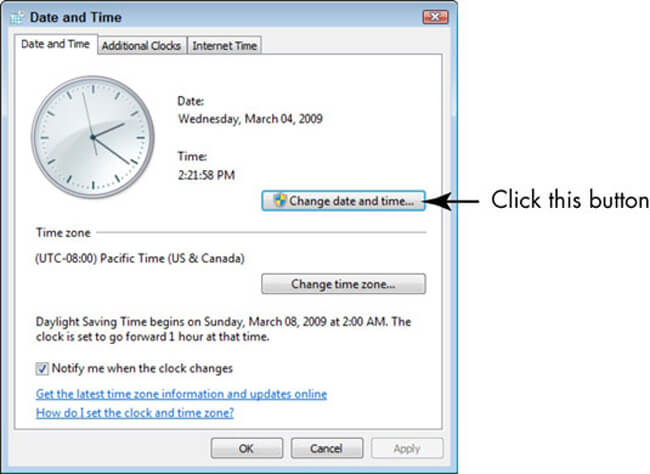
You might have encountered that the warning dialog pops up when you are visiting the website like there is a problem with this website’s security certificate. If you are familiar with it as you receive it often, it might because of your incorrect times and date.
Please follow below steps to correct it.
Step 1Click the clock, and then select Change time and date settings.
Step 2Correct the times and date.
3. How to Protect Computer from Virus?
Virus is an initial problem annoying each Windows users, so you are not available to identify which one is safe, while which one is unsafe to hurt your data. There are some PC data recovery programs help you to save the lost data, but you have to ensure your computer stays virus free.
You need to pay attention to:
- Antivirus program is up to date and the real-time protection has been turned on.
- Turn on Windows Firewall.
- Scan virus for your computer at least once a week.
- Be careful about any links or files.
4. How to Improve Video Performance?
There is a common problem for video playback on Windows 7, you might need below instruction if you don’t want to stop watching your video and throw the laptop away as its playback is poor.
Step 1Go to Start and search Power options.
Step 2Click Power options > Change plan settings > Change advanced settings > Multimedia settings.
Step 3Find Play video and click Optimize performance.
Windows 8:
1. How to Enable Deleting Confirmation Dialog Box?
It is not easy to be accustomed to having the new way to disable the deleting confirmation dialog box on Windows 8, especially for an experienced Windows 7 user.
So how can you customize the settings for it?
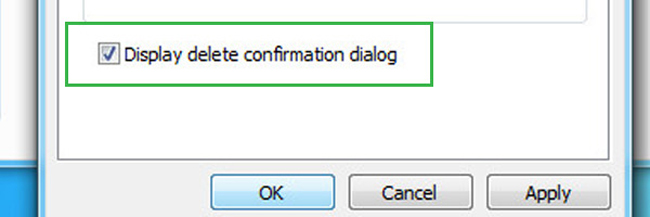
Step 1Right-click Recycle bin and click Properties.
Step 2Tick the box next to Display delete confirmation dialog box.
Step 3Click OK.
2. How to Stop Microsoft Service from The Startup?
Different things could drag computer system down, and then you should choose a suitable and effective way to speed up your computer.
As you know, Startup is an important part to influence computer starting speed. You can find some programs will be launched automatically when the Windows starts, the more the programs are, the slower the system is.
Want to make your Windows 8 computer system running faster?
Keep reading…
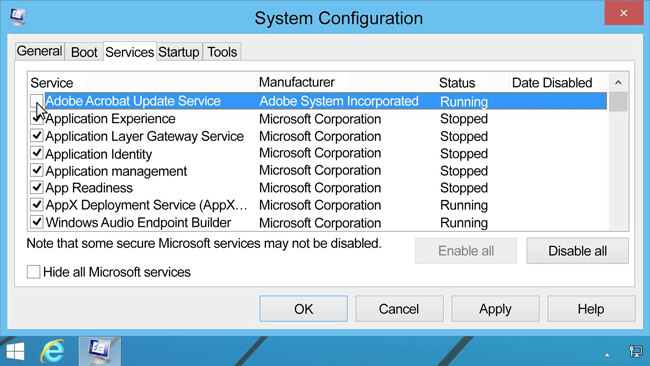
Step 1Search msconfig in the start bar. If you are using Win 10, please enter System configuration instead.
Step 2Run the program, select Services tab.
Step 3Check Hide all Microsoft services and click OK.
3. How to Turn on Laptop Touchpad?
Did you encounter that the touchpad not working for unknown reason?
If you did, please check below solution.
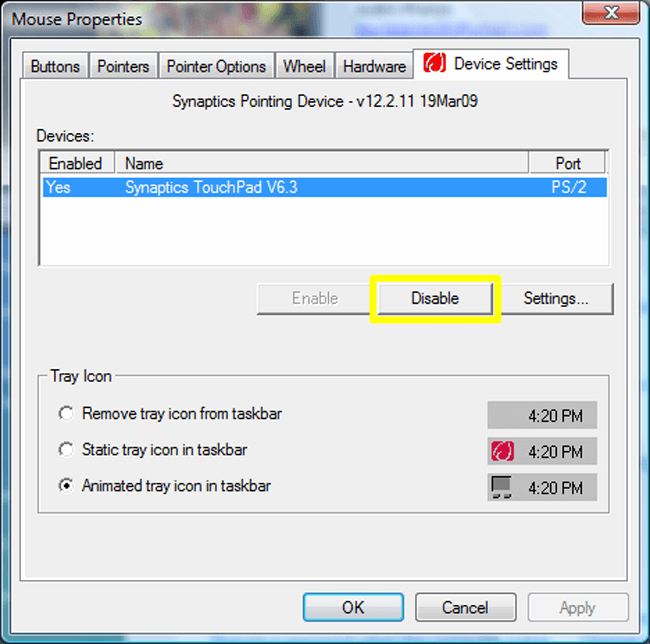
Step 1Press Windows key + C.
Step 2Click Settings > Change PC settings.
Step 3Go to PC and devices > Mouse and touchpad.
Step 4Confirm it was enabled already.
Windows 10:
1. How to Turn on System Restore?
System restore is a feature, which allows you to roll back the clock to a time when everything was working well and get the data back. It is no doubt that you won’t need to worry about the data loss and more.
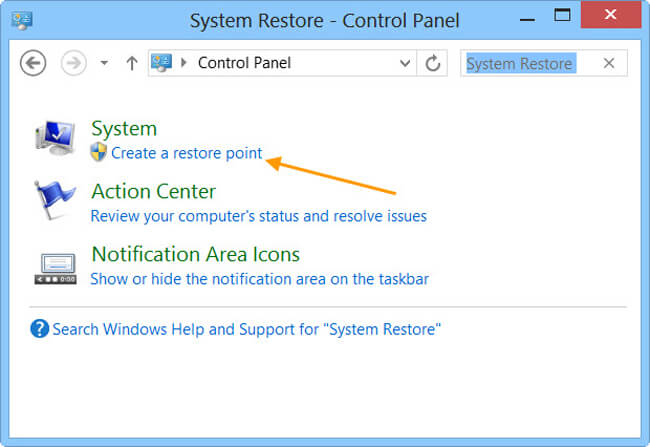
Step 1Search Create a restore point in search bar.
Step 2Click configure in the system drive.
Step 3Tick Turn on system protection, click Apply.
2. How to Stop Pop-up Advertisements in Microsoft Edge Browser
Microsoft Edge, which is the new default browser on Windows, provides a user-friendly and powerful experience for users.
Moreover, it allows you to type the Internet Explorer into the Start field and then it will be still there.
Its annoying ads can be a frustrating thing to destroy an entire day good mood, you can read below method to remove the annoying ads.
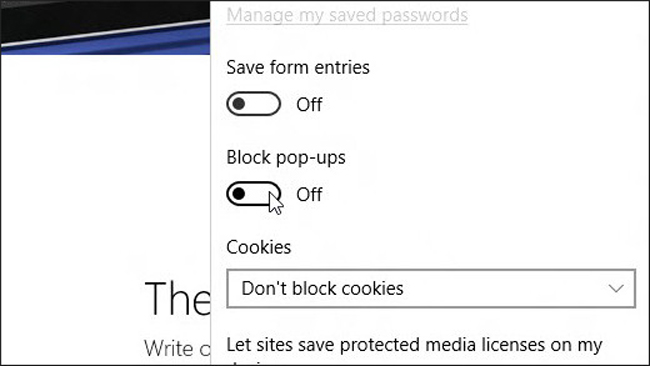
Step 1Open the browser and click the three-dot on the top-right corner.
Step 2Select Settings and find View advanced settings.
Step 3Enable the Block pop-ups.
3. How to Play a DVD?
It seems crazy that Windows 10 doesn’t come with a pre-installed DVD player, so you will need a DVD player in the Store. Just search DVD player in the store and install it.
2. Backup Windows: Your Complete Guide to PC Backup
Most of the Windows users might have encountered or heart about that sometimes the files on computer have gone without reasonable explanations. It will be painful to lose them as you might have no possibility to get them back easily.
All you can do is to find them in the recycle bin repeatedly if you didn’t make any backup for it before. It is obvious that you can get nothing.
You should have found out that it is necessary to backup computer files regularly to ensure the data will not disappear forever as you can get them back from backup without hassle.
Well, let’s go to how to backup PC.
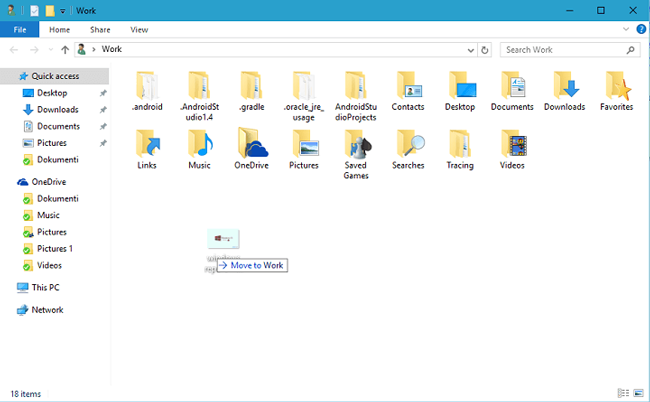
1. Backup PC Manually
Manual backup method allows you to choose backup the files to removable media or other network location.
It can be finished in a few of clicks.
Step 1Open the folder, which includes your files, and select them.
Step 2Drag the files to where you want to save them.
2. Backup PC with Default Settings
It is not a common feature for normal PC users, as they don’t have the custom to backup computer data.
Below is the simple introduction for different backup ways for PC.
Option 1. To Make a Backup File
Windows has a default feature, which enables users to backup and restore PC data. It is the easiest and convenient way to solve both two problems for user who don’t want to do many things.
Please read the following guide.
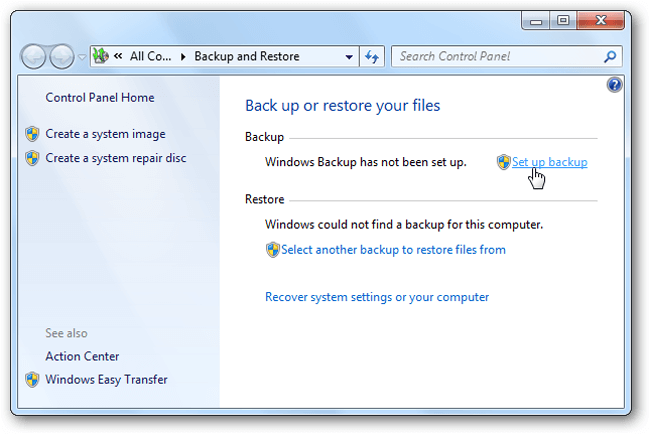
Step 1Go to Start > Control Panel > System and Maintenance > Backup and Restore.
Step 2Choose Set up backup if you have never used this feature before, choose Back up now if you want to create a new backup.
Step 3Follow the instruction to finish it.
Option 2. To Make a System Image
All of the info on your computer will be contained in system image at a particular state, so that you can use it to save these data to internal or external hard drives, internet location or other removable drives.
Please keep in mind that:
- If you want to save the system image on a hard drive or other removable drives, it will be formatted to use the NTFS file system.
- System image will be saved in drive\WindowsImageBackup\computer name\, and the new system image will overwrite the existing one. If you want to save different version of system images, you can go to the folder and copy the WindowsImageBackup folder to a new location.
Below is how to make a system image.
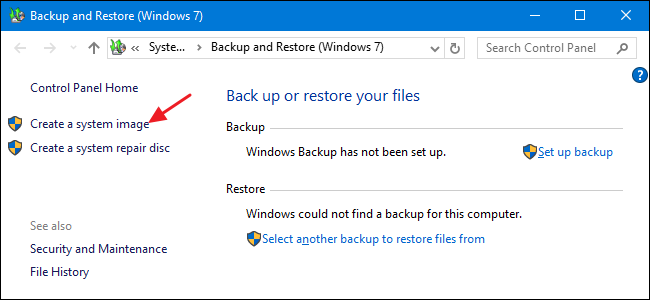
Step 1Click Start > Control Panel > System and Maintenance > Backup and Restore.
Step 2Click Create a system image in the left, and then enter the password when it prompted.
Option 3. Create a Restore Point
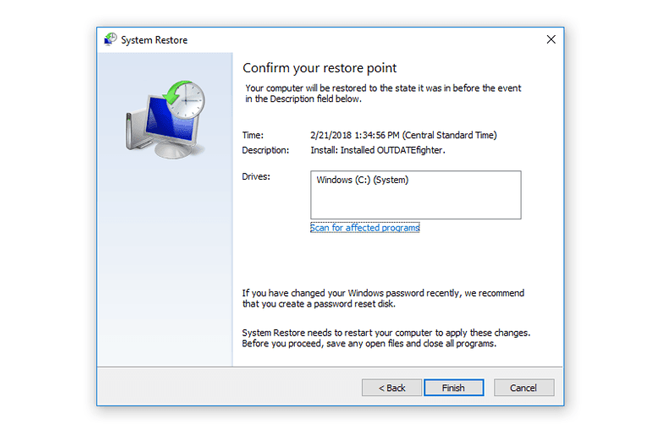
Restore point is a feature to create a backup of your system file in time once a week when it detects changes on your computer.
Here is how to create a restore point.
Step 1Click Start button, then go to Control Panel > System and Maintenance > System.
Step 2There are 4 options on the left panel, choose System Protection.
Step 3Click Create under the System Protection section.
Step 4Enter a description and select Create in the pop-up System Protection dialog box.
You can also check more information from here.
3. Backup PC to OneDrive
OneDrive is one of the top choices to save data online, so that you can access the file no matter whenever and wherever you are without data loss.
It can be a magic to save your file when you lose the original documents on computer, USB cable or other removable drives.
There are 3 different methods you can upload the PC file to OneDrive to make a backup on cloud-based storage service.
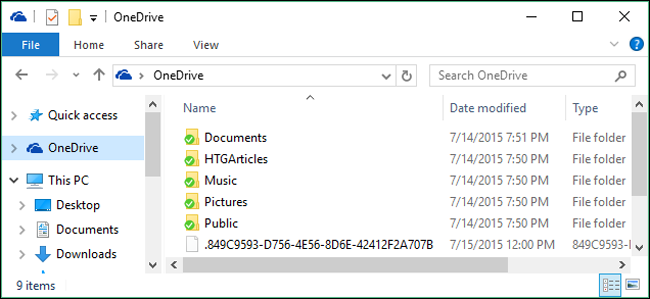
Option 1. Backing Up Files with Computer OneDrive Program
Step 1Download and install OneDrive on computer.
Step 2Open OneDrive folder.
Step 3Add files or folders to your OneDrive folder.
Step 4Check the blue sync button to begin, and then wait for the process completed.
Step 5Visit the OneDrive website, and confirm if your data have been uploaded completely after logging in your account.
If you don’t want to install the software on your computer, you can also visit the website and upload the files directly.
Option 2. Backing Up Files on OneDrive Website
Step 1Open OneDrive website in browser.
Step 2Sign in your OneDrive account.
Step 3Click Upload on the top of the window and then select Files or Folder on the drop-down menu.
Step 4Click Open or OK to finish the uploading.

Well, mobile phone is the portable drive nowadays, you can also use the OneDrive app on phone to upload data if you have already stored them on the phone.
Option 3. Backing Up Files via OneDrive Phone App
Step 1Download OneDrive on your mobile phone, and then launch it.
Step 2Log in your OneDrive account.
Step 3Locate a file or folder by tapping the + button, then tap Upload and choose files or folder.
Step 4Tap on Done
If you don’t like OneDrive, you can also use Google Drive to do this.
4. Backup PC to Google Drive
You can also upload, view, share and edit Documents, images, audio and videos with Google Drive.
Below is how to backup PC data with Google Drive.
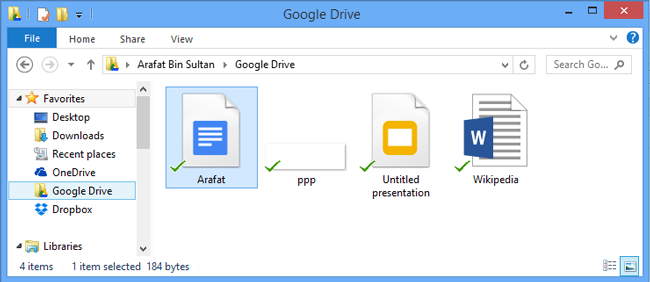
Option 1: Using Google Drive Software to Backup Sync PC Data
Step 1Search Google Drive on the PC store, and then download and follow the instruction to install it.
Step 2Open the Google Drive folder on the computer, and then drag the files or folder into this folder.
Step 3Check if the files have been uploaded into Google Drive.
Option 2: Using Google Drive Website to Upload PC Data
Step 1Go to drive.google.com on your computer.
Step 2Open a folder to save the files you want to upload.
Step 3Drag the files into the folder.
After backing up data on computer, you can begin to encrypt them if you want. As the encrypted data can not be accessed without the right password. Please ensure that all the data have backup before encryption.
3. Encrypt your Windows: Give Your Data the Best Protection
There are different methods to protect your privacy from others, the first thing you need to do is add a password when someone attends to open your computer.
1. How to Put a Password on Your Computer When You Turn It on
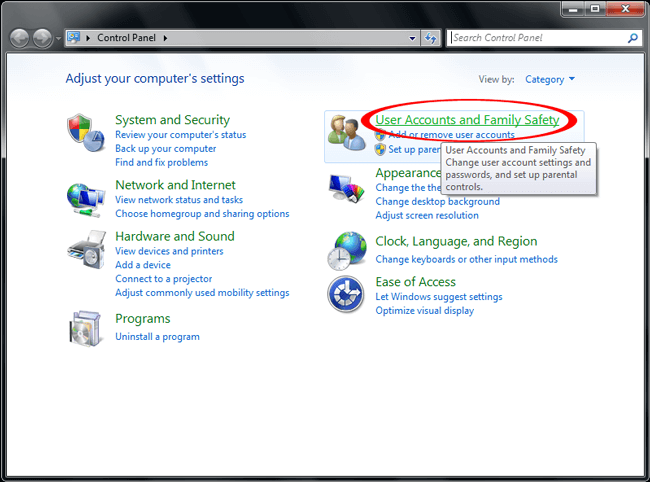
Step 1Go to Start > Control Panel > User accounts and Family Safety > Add or remove user accounts, and then click Continue is it asks for permission.
Step 2Click your account name and click Create a password.
Step 3Enter the password you want and click Create password.
Step 4Restart your computer and enter the password for your account.
2. Encrypt Your Sensitive Data on PC
Windows has a feature that enables you to encrypt files or folder if you want.
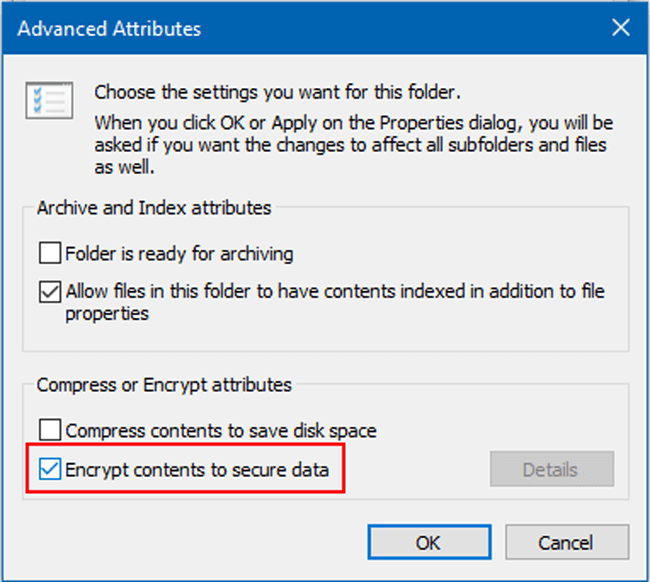
Step 1Right-click the file or folder you want to encrypt, and select Properties.
Step 2Click Advanced under the General tab.
Step 3Check the box near Encrypt contents to secure data, and then click OK.
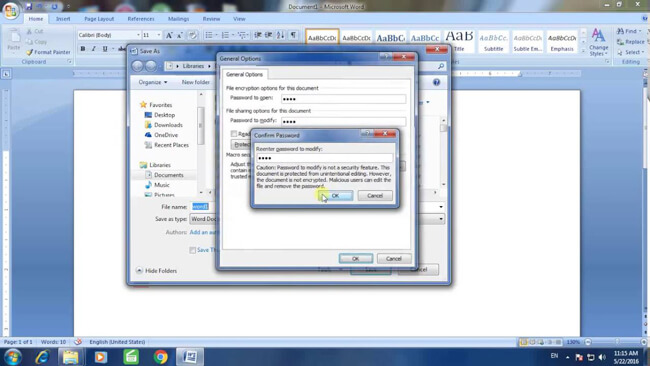
3. How to Add Password to Your Microsoft File
If you just want to lock Microsoft files, you can try below simple tips to prevent modifying or reading from other users.
Step 1Open Microsoft document file on computer, such as Word.
Step 2Click File on the left top corner, then click Info > Protect Document.
Step 3Choose Encrypt with Password, and then enter the password twice to confirm.
Step 4Click OK.
4. Compress and Add Password to File or Folder on Computer
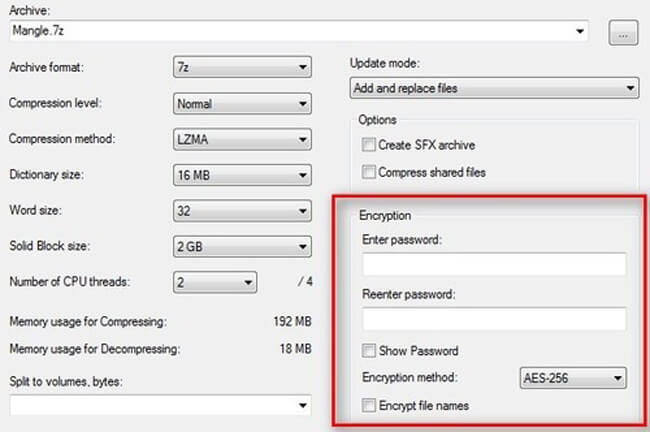
You might have tried to compress files on computer, so that you can save the free space for it. It might also surprise you that it can be used to put password in your files.
Step 1 Right-click the files for folder you want to add a password and then go to Send to > Compressed (zipped) folder.
Step 2Right-click the compressed file when it finished, click Add to Archive > Set password.
Step 3Enter the password in the box and click OK.
5. Use Password Protect Software
There are several password-protect software to make your files on computer away from disclosure. You can search on internet and choose suitable one to ensure data safety.
6. Turn on Device Encryption on Windows 10
Win 10 has a device encryption to help user to protect data unless someone has the correct password to encrypt it.
In addition, it is available for win 10 users only.
Step 1Sign in your Windows account.
Step 2Go to Start and enter encryption, and then select Manage BitLocker from the list.
Step 3Choose Turn BitLocker, follow the instruction, and lock your folder with password.
You have learned how to backup and encrypt PC data in the above sections, do you have questions about what to do if you lose them without a backup at all?
If so, please keep moving…
4. FoneLab Data Retriever | Undelete Files from Windows 10, 8, 7, XP
There are tons of reason to cause data loss on computer, such as computer crash, virus infected, accidental deletion, reboot suddenly, and more.
It can’t be a serious problem if there is not any important data on computer even you lose them, while it will be a disaster for some users as they see them as necessary part of their life.
Such as businessman saves all the files on computer, people who stored lots of precious of photos with the hard drive or others.
If you have doubt that whether you can get these data back or not, you have come to the right place to figure it out.
Of course, it has solution to solve it and there are more than one.
1. How to Recover Deleted Files from Recycle Bin
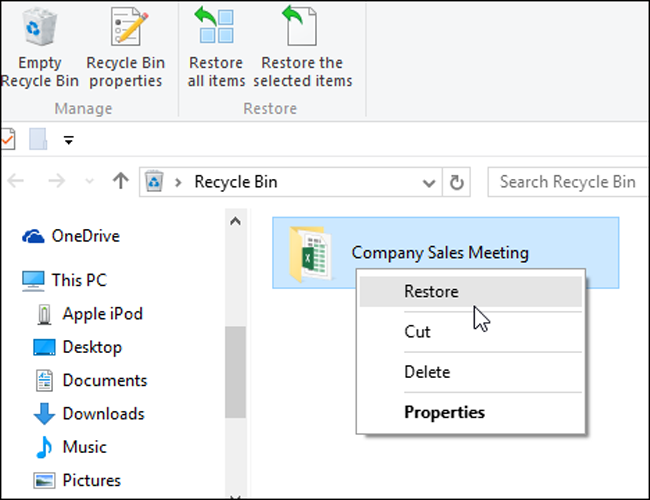
Recycle bin is where you use to store the deleted file on the computer, then you can go for it and get it back if you are regret to do that.
So,
The first place you can find your deleted file is the recycle bin. The data won’t be removed before reaching the max volume. You can right-click the files you want to recover, and then choose Restore to get them back easily.
Sometimes, you can find nothing in trash bin as you have enabled the Do not move files to the Recycle Bin to delete the file permanently.
2. Recover PC Data with FoneLab
The most recommended method to recover windows data is using a third-party data recovery software, which is called FoneLab Data Retriever.
You should have experienced that the files disappeared suddenly, and then searched and tried various ways to get them back but nothing works.
FoneLab Data Retriever helps you solve these frustrating things no matter what happened. It is a powerful software suitable for below situations:
- Delete data accidentally.
- Recover lost data from memory card, flash drive, hard drive, etc.
- Lost data after formatting without backup.
- Computer crash or virus infected.
- Supports Document, image, video, audio, email, zip, sit and more.
By the way, it is easy to use as below.
Step 1 Download and install the software on your computer, and then it will be launched automatically. Plug the removable drive into the computer if you want to recover data from drives, then it will appear under the Removable Drives tab.
FoneLab Data Retriever - recover the lost/deleted data from computer, hard drive, flash drive, memory card, digital camera and more.
- Recover photos, videos, documents and more data with ease.
- Preview data before recovery.
Step 2Check the file types you want to recover.
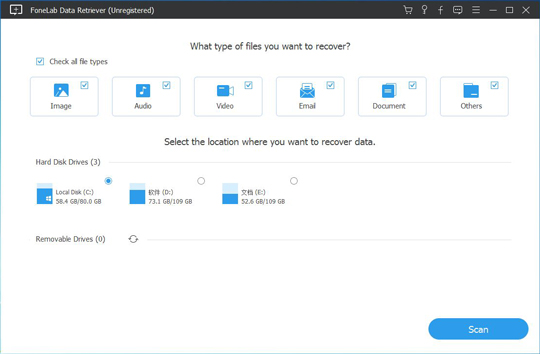
Step 3Click Scan, and you can select Deep Scan after completion if you need.
Step 4Check the box next to the data you want and click Recover.
3. Restore PC Data from Backup
If you have the good custom to make backup for PC, you can easily restore files from them.
Step 1Visit the website on your computer browser.
Step 2Log in your account, which you used to backup data.
Step 3Find the data you want to get back.
Step 4Save them into your computer folder.

4. Restore PC Data in Computer Settings
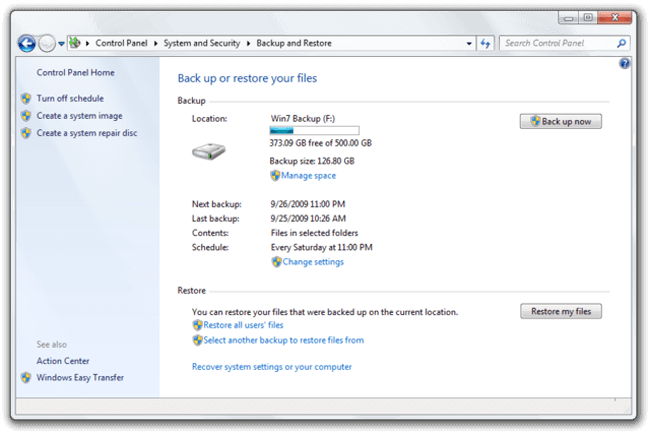
Some users used to backup computer data with system settings. So that you can restore data from these backup files within settings.
Step 1Choose Backup and Restore through Start button > Control Panel > System and Maintenance > Backup and Restore.
Step 2Click Restore my files or Restore all users’ files according to your needs, and then choose the files you want to restore.
If you are using a computer, which is in a public place, you should know how to clear PC history to protect your privacy.
If you think that your computer is too slow to play a game, you might need to clean up your PC storage.
If there are too many junk files, you need to wipe them from your limited computer storage as soon as possible.
FoneLab Data Retriever - recover the lost/deleted data from computer, hard drive, flash drive, memory card, digital camera and more.
- Recover photos, videos, documents and more data with ease.
- Preview data before recovery.
5. 3 Ways to Clean Up a Windows PC or Laptop
1. Clear Browser History in Windows
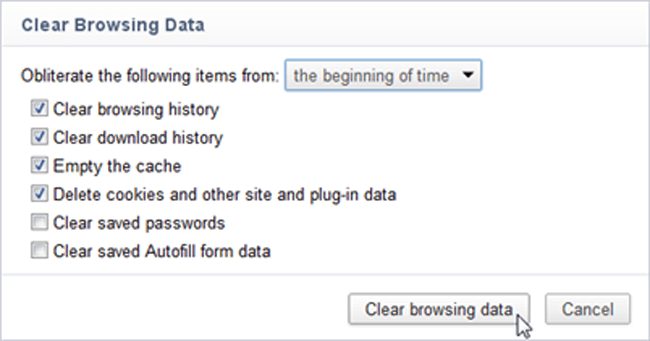
Sometimes you will have a willing to wipe browser history on PC as you don’t want others who use this computer next know what you are looking for.
Here is a clear tutorial.
Step 1Press the Ctrl + Shift + Delete buttons at once to bring up the windows.
Step 2Tick the boxes in the pop-up window.
Step 3Click Delete, Clear Now or Clear browsing data if you are using IE, Firefox or Chrome.
2. How to Clean Up Disk in Windows
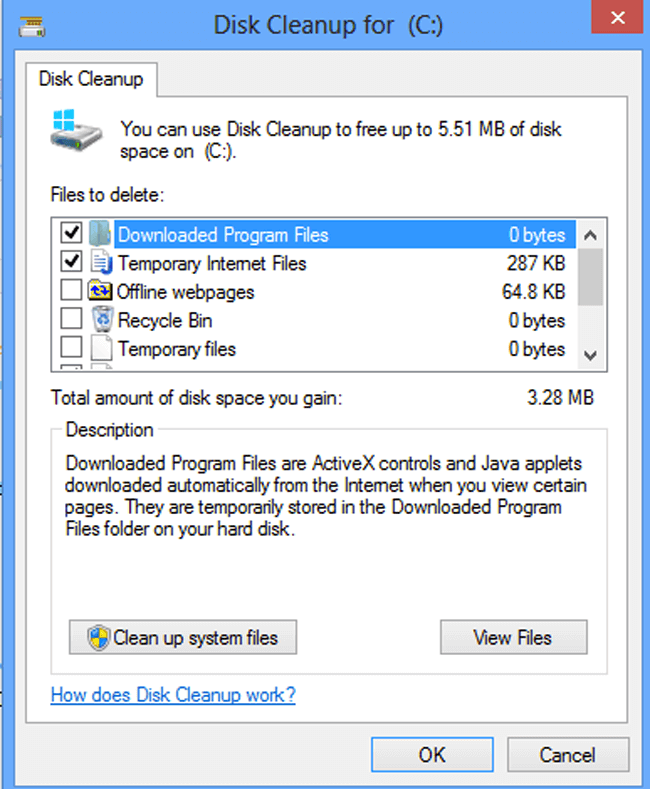
You probably know that it creates cache and other junk files during the process of using computer. It takes space and makes the computer system runs slower and slower.
It is necessary to take a bath for it at least once a week as below.
You can use a simple way to run this without any complex operations to delete temporary files.
Step 1Search Disk Cleanup in the taskbar, and then choose it from the list.
Step 2Select the items you want to remove from the disk.
Step 3Click OK.
Step 4Click Delete Files when prompted.
3. Clear App Data Files on Windows
If there are too many programs on your computer and you don’t want to delete them, there is still a workable way to clear app data files on windows.
Step 1Click Start > My Computer.
Step 2Enable Viewing for hidden files or folders through Organize > folder and search options > View.
Step 3Under the Hidden files and folders tab, check Show hidden files, folders, and drives, and click OK.
Step 4Double-click Local Disk (C:) > Users > AppData > Local > Temp.
Step 5Go to Organize > Properties, uncheck Read-only box, then click Apply > OK.
Step 6Open Temp folder, select the items and delete them.
FoneLab Data Retriever - recover the lost/deleted data from computer, hard drive, flash drive, memory card, digital camera and more.
- Recover photos, videos, documents and more data with ease.
- Preview data before recovery.
