- Convert AVCHD to MP4
- Convert MP4 to WAV
- Convert MP4 to WebM
- Convert MPG to MP4
- Convert SWF to MP4
- Convert MP4 to OGG
- Convert VOB to MP4
- Convert M3U8 to MP4
- Convert MP4 to MPEG
- Embed Subtitles into MP4
- MP4 Splitters
- Remove Audio from MP4
- Convert 3GP Videos to MP4
- Edit MP4 Files
- Convert AVI to MP4
- Convert MOD to MP4
- Convert MP4 to MKV
- Convert WMA to MP4
- Convert MP4 to WMV
- Empty Trash
- Delete Mail App
- Clear Cache on Mac
- Get More Storage on Mac
- Make Chrome Use Less RAM
- Where is Disk Utility on Mac
- Check History on Mac
- Control + Alt + Delete on Mac
- Check Memory on Mac
- Check History on Mac
- Delete An App on Mac
- Clear Cache Chrome on Mac
- Check Storage on Mac
- Clear Browser Cache on Mac
- Delete Favorite on Mac
- Check RAM on Mac
- Delete Browsing History on Mac
How to Crop Screen Recordings on Mac - Top Pick Ways You Should Know
 Updated by Lisa Ou / Oct 16, 2023 09:15
Screen recordings are performed once you want to capture the activity or your device monitor. Most of the time, it is executed for school and work-related stuff. People record their screens to have a copy of their online discussions, tutorials, meetings, and more.
What if you have screen recorded the entire screen with essential information? Cropping the recorded video is the best way you can do. However, does Mac have a built-in tool to crop a recorded video? Well, that's one of the things you can discover in this post. Please scroll down to learn how to cut a part of a video on a MacBook. Move on.


Guide List
Part 1. Can You Crop A Screen Recording in QuickTime?
QuickTime is known for playing multiple types of videos on your Mac. But can it crop them? Sadly, no. QuickTime does not have a tool for cropping screen-recorded videos. Some of the things that it can only do is rotate the videos, flip, split clip, trim, and more.
But there’s good news! Alternatively, you can have other options to crop a screen recording. Move on.
Part 2. How to Crop Screen Recordings on Mac
Here are the alternatives to the tool above. They can serve as future references. Also, you can use them now because they have special features for your videos. Let’s recognize them one by one below as we explain them. Move on.
Option 1. Photos App
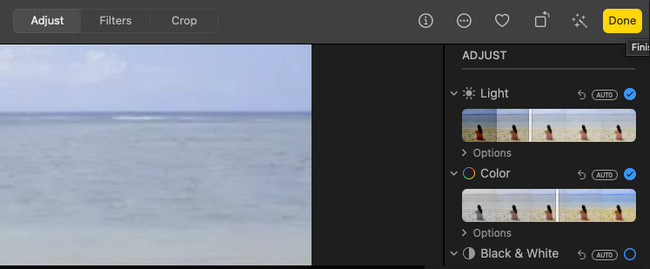
You can crop your videos from the Photos app on Mac. It is also a built-in program from Mac, like QuickTime. Aside from cropping, you can also use it to enhance the videos, trim, adjust their brightness, and more.
Please follow the detailed steps below for cropping videos on the Mac Photos app. Move on below.
Step 1Please click the Photos icon on the Dock. After that, choose the location where your Mac stored the video. Please click the video on the right. Later, click the Edit button at the top right. You will see 3 tabs at the top of the main interface. Please click the Crop button.

Step 2Trace the part of the video that you want to crop. If you have errors cropping the video, tick the Reset icon at the bottom right. Save the videos afterward by clicking the Done button.

Option 2. FoneLab Mac Video Converter Ultimate
The best alternative for cropping screen-recorded videos is FoneLab Video Converter Ultimate. Aside from cropping, this tool can also bring effects, filters, watermarks, and more to your videos. Another good thing about this tool is that you can see the preview of your work. It will appear next to the video you are editing. In this case, you know instantly their differences.
In addition, the tool can convert your videos into many file format choices. It includes MP4, MKV, AVI, FLV, WMV, and more. Additionally, it supports batch conversion. You do not need to process your videos one by one.

With FoneLab Mac Sweep, you will Clear system, email, photo, iTunes junk files to free up space on Mac.
- Manage similar photos and dulplicate files.
- Show you the detailed status of Mac with ease.
- Empty trash bin to get more storage.
Anyway, see the tool below on how FoneLab Video Converter Ultimate crops video recordings. Move on.
Step 1Please download the tool by clicking the Free Download button on its official webpage. After that, click the downloaded file and set it up. A new window will be shown on the screen. Drag the file to the Application folder. Tick its icon on the Dock to launch it.

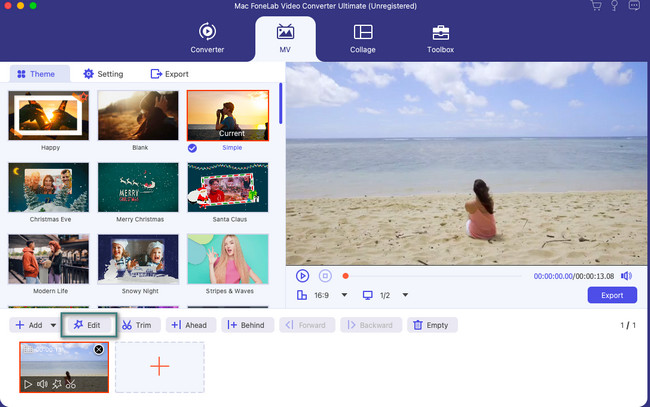
Step 2Please choose the MV button at the top. You will see the pre-made effects of the tool on the left. After that, please click the Plus icon at the bottom left corner. The Finder tool will appear. Locate the location of the video that you want to crop. Import the video that you want to crop by selecting them.
Step 3Click the Edit button on the tabs at the bottom. Later, click the Rotate & Crop button at the top. Please select the Crop Area at the bottom. You can see the results on the right. Click the OK button afterward.

Step 4It is time to save the cropped video. The software will close the editing interface. It will show you the saving interface. You only need to click the Export button on the next screen. After that, choose the path of your videos and save them.

Option 3. iMovie
iMovie is also a popular editing program for your Mac. Actually, it is a pre-installed program on some Mac models. It offers high-quality effects and features. However, the first-time users of this program appeal. They said that without the official training for editing, they have difficulties using iMovie. The reason is that the tool consists of complex features and tool. Some of them do not have labels. In this case, you do not know what their functions are.
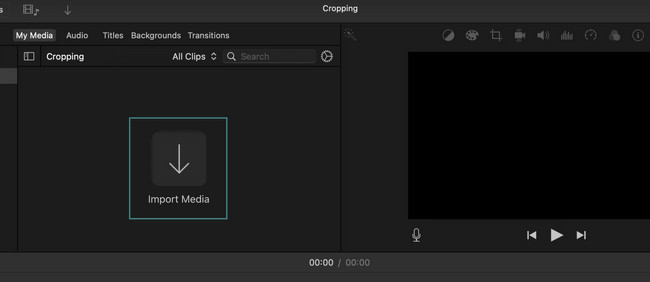
Step 1Please download iMovie first on your Mac. After that, launch it to see the interface of the tool. Please be familiar with the features and tools. Later, the tool will ask you to import your video. To do that, click the Import Media button. Alternatively, you can drag and drop the to-be-cropped video on the box.

Step 2You will see the video on the right. Please click the Crop icon at the top. The adjustable frame of the tool will appear on the screen. Please drag the frame according to your preferences on how you will crop your video. After that, save the video. To do that, please click the Save icon at the top right corner of the main interface.

With FoneLab Mac Sweep, you will Clear system, email, photo, iTunes junk files to free up space on Mac.
- Manage similar photos and dulplicate files.
- Show you the detailed status of Mac with ease.
- Empty trash bin to get more storage.
Part 3. FAQs about How to Crop Screen Recordings on Mac
1. Does Mac has a built-in screen recording tool?
Luckily, yes. Mac has a built-in screen recording tool. The good thing is that you can access it through shortcut key combinations. Press the Command + Shift + 5 key combinations on your Mac keyboard. After that, you will see the Adjustable Frame. Trace the part of the screen you want to record. Tick the Record button once you are ready for the recording. Knowing this built-in recorder can prevent you from cropping your recorded video. It is because you can now record the exact portion of the screen of your Mac.
2. How do you cut video length on Mac?
You do not need to download a third-party app to cut video length on a Mac. You can use its Photos programs. It has a built-in way of doing that. Launch the Photos app and locate the videos you want to trim. After that, click the Edit button at the top right corner. Please move the slider at the bottom depending on the length you prefer for your video. Click the Done button afterward to save it.
You have read this section of this post. We assume you already cropped your screen-recorded video because the methods are effective! Do you have more questions? Please put them in the comment section below. Thank you!

With FoneLab Mac Sweep, you will Clear system, email, photo, iTunes junk files to free up space on Mac.
- Manage similar photos and dulplicate files.
- Show you the detailed status of Mac with ease.
- Empty trash bin to get more storage.
