Recover the lost/deleted data from computer, hard drive, flash drive, memory card, digital camera and more.
Eminent Methods to Recover Permanently Deleted Emails from Gmail
 Updated by Valyn Hua / Oct 20, 2022 09:20
How do I recover permanently deleted emails from Gmail?
It is a frequently-asked question from Gmail users. It only requires 2 clicks to delete an email from Gmail. It's actually quite easy. Hence, many people can unintentionally erase emails in just a blink. And it's very frustrating because Gmail is commonly-used to send very important emails.
You use Gmail at work, business, school, and other important transactions. It is a convenient yet professional means of communication. Not only because it is free but also because it is fast and accessible to a lot of people all over the world. However, there comes a moment when you want to remove some emails to free up space and declutter. To make your emails look clean and organized, you delete the unnecessary ones from time to time. But sometimes, you tend to delete even the emails you still need by accident. Can you still recover them? The answer is yes, you can.

This post contains the prominent method to recover deleted emails from the Gmail trash bin. Also, by using a trustworthy third-party tool. Kindly read further below to be able to recover the Gmail deleted emails.

Guide List
Part 1. Recover Deleted Emails from Gmail Trash Bin
If you unintentionally delete an email from your Gmail account, you can still recover them from Gmail’s Trash/Bin. This Gmail feature makes it easy for users to recover emails. deleted emails stay in the Trash/Bin for 30 days before disappearing from your Gmail permanently. So if you’re searching for an email you can’t see in your Inbox, you can try searching for it in the Gmail Trash folder. However, if you erase an email from the Trash or Bin itself, it will be permanently deleted. Also, there is an option to empty Bin, so if you like clearing your Bin from time to time, this method might not work for you. Hence, you can proceed to the next method.
FoneLab Data Retriever - recover the lost/deleted data from computer, hard drive, flash drive, memory card, digital camera and more.
- Recover photos, videos, contacts, WhatsApp, and more data with ease.
- Preview data before recovery.
Comply with the directions below to restore deleted emails from the Gmail Trash/Bin:
Step 1Open the browser on your computer. Go to the Gmail site and log in to your Gmail account. Your Inbox will then be the one to welcome you.
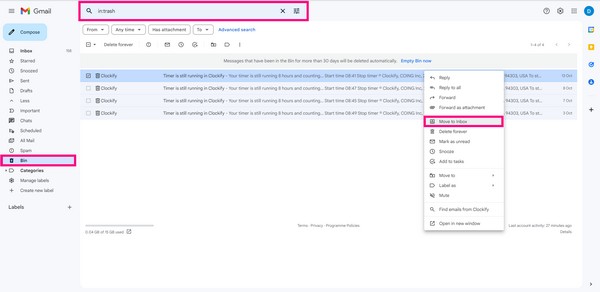
Step 2On the left column of the page are the Gmail options, such as Inbox, Starred, Snoozed, Sent, Drafts, and More. Select More for the other options to appear. From there, you will see the Bin on the lower part. Click it to view your deleted emails.
Step 3You can look for the email you want to recover by scrolling manually through the Bin. Or you can type it in the search bar above. Once you find your target email, right-click it to pick the course of action you need. There is an option to Reply, Forward, Delete forever, Mark as unread, and more. Select the Move to inbox option. The email will automatically be recovered to your Gmail Inbox.
Part 2. Recover Permanently Deleted Gmail from Computer with FoneLab Data Retriever
Now, if 30 days have passed or you have already emptied your Gmail Trash/Bin, the only perfect solution left for you is to use a recovery tool. FoneLab Data Retriever lets you recover deleted emails from Gmail and their attachments. It supports all email file formats, including MBOX, EML, and MSG. This program is accessible on both Windows and Mac. In addition, FoneLab Data Retriever can recover data from a computer, phone, memory card, flash drive, hard drive, and more.
FoneLab Data Retriever - recover the lost/deleted data from computer, hard drive, flash drive, memory card, digital camera and more.
- Recover photos, videos, contacts, WhatsApp, and more data with ease.
- Preview data before recovery.
Comply with the directions below to restore missing emails from Gmail on the computer with FoneLab Data Retriever:
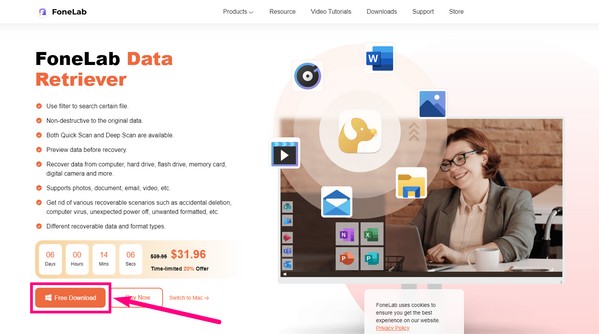
Step 1Access the FoneLab Data Retriever official website. On the lower-left part of the site, click the Free Download button to save the installer file to your computer for free. After downloading, begin the process of installation. Make sure to allow the software first to make changes to your device for it to run on your computer. The config installation will begin. Finish it, then launch the program.
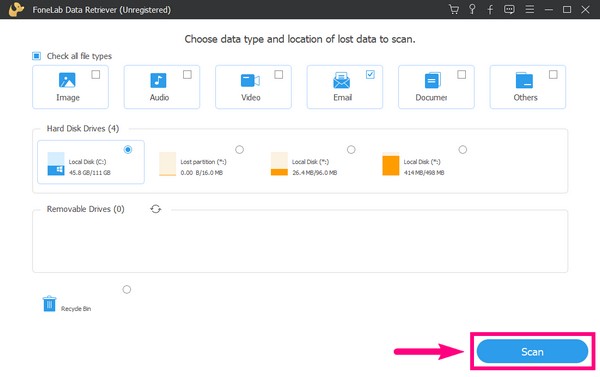
Step 2Once you see the FoneLab Data Retriever main interface, select the type and location of your lost data. In this case, tick the Email checkbox on the file type options. Meanwhile, tick the Local Disk circle on the hard disk drive options. You may also select the Recycle Bin if you want. Afterward, click the Scan tab on the lower-right corner of the FoneLab Data Retriever interface.
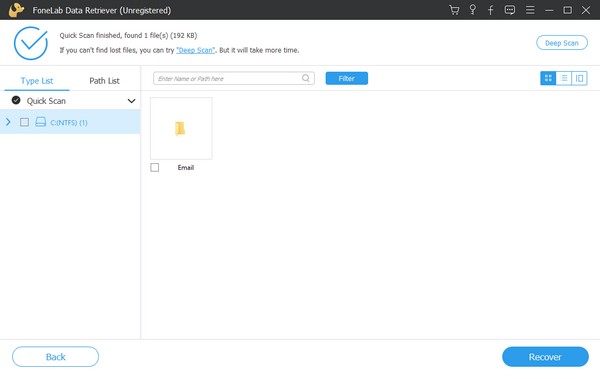
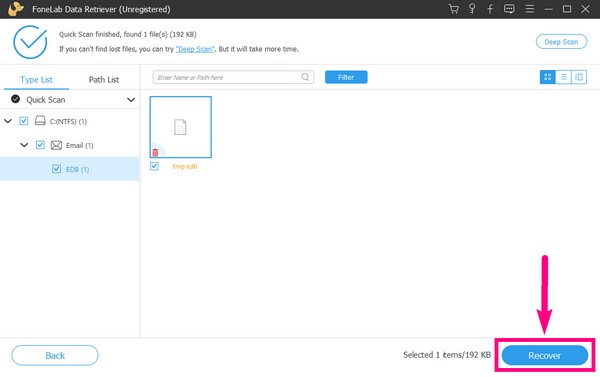
Step 3The tool will run a quick scan of your emails for a few seconds, and then you will see your lost data afterward. Select the Email folder to see if your deleted emails are there. If you don’t see them, you can try the Deep scan feature for a more thorough scanning process.
Step 4Select all the emails you want to recover. If you are having a hard time looking for them, the registered version of the FoneLab Data Retriever lets you preview the emails before the recovery. This way, you won’t need to recover everything just to find the one or few emails you are looking for. You only need to preview the emails beforehand, then select only the ones you need. And lastly, hit the Recover tab on the bottom-right corner of the software’s interface. The program will then recover your emails in only a few minutes.
FoneLab Data Retriever - recover the lost/deleted data from computer, hard drive, flash drive, memory card, digital camera and more.
- Recover photos, videos, contacts, WhatsApp, and more data with ease.
- Preview data before recovery.
Part 3. FAQs about Recovering Permanently Deleted Emails from Gmail
1. Why can't I find the Trash or Bin in my Gmail?
There are cases when the Trash or Bin folder does not show up in Gmail. That is because it is set up to be hidden in Settings. To make the Gmail Trash/Bin appear, click the Settings or clog icon on the top-left part of the page. The Quick settings will appear. Select the See all settings tab below it. Once you are on Settings, choose Labels on the options above. Then scroll down until you see the Trash/Bin feature. Click the show tab in line with it for the Gmail Trash/Bin to show up on the main page.
2. Will the emails from the Gmail Bin disappear everywhere after 30 days?
No, they won't. Once the 30 days are done, the admins still have 25 days to recover deleted emails from the Admin console. And when those 25 days pass, the admins can no longer recover them as they will be permanently deleted from the Admin console. The next choice you have is to retrieve these emails from Google Vault. But this requires several conditions and might take a long process. Hence, the more convenient way to recover deleted Trash Gmail is through using a third-party tool.
3. Can FoneLab Data Retriever restore deleted media files from a computer besides emails?
Yes, it definitely can. FoneLab Data Retriever lets you recover deleted media files, including photos, videos, audio, etc. It can also retrieve documents and other data types.
After trying out several recovery tools, we finally included the most reliable one in store in this article. If recovering emails from the Gmail Trash/Bin, which is the standard way to recover, doesn't work for you, try the FoneLab Data Retriever. It is by far the best among the rest of the recovery tools.
FoneLab Data Retriever - recover the lost/deleted data from computer, hard drive, flash drive, memory card, digital camera and more.
- Recover photos, videos, contacts, WhatsApp, and more data with ease.
- Preview data before recovery.
Below is a video tutorial for reference.
