fix iPhone/iPad/iPod from DFU mode, recovery mode, Apple logo, headphone mode, etc. to normal state without data loss.
- LINE
- Kik
- Reminder
- Safari
- Videos
- Voice Memo
- Music
- Contacts
- Calendar
- App Data
- SMS
- Notes
- Call Logs
- Photos
- Stuck in Recovery Mode
- Black Screen
- White Screen
- Red Screen
- Blue Screen
- HeadPhone Mode
- Stuck on Apple Logo
- DFU Mode
- A Frozen iPhone
- Stuck in Boot Loop
- Unlock Failure
iPhone or iPad Stuck on Verifying Update: Fix It Using Easy and Different Ways
 Updated by Lisa Ou / March 23, 2023 11:30
I updated my iPhone devices to their updated iOS versions. It was 1 hour ago but it is stuck on the update screen. Can you please help me? Thank you!
Updating iOS and iPadOS can provide the latest features of the device. But it is totally a disaster if it gets stuck on that update screen. Get rid of this problem to use your phone smoothly! This post has all the easy techniques to help if your iPhone and iPad updates are stuck with the screen. You can also use the leading third-party software to fix it. Are you ready? Move on.


Guide List
FoneLab enables you to fix iPhone/iPad/iPod from DFU mode, recovery mode, Apple logo, headphone mode, etc. to normal state without data loss.
- Fix disabled iOS system problems.
- Extract data from disabled iOS devices without data loss.
- It is safe and easy to use.
Part 1. Why iPad or iPhone Updates Are Stuck
There are many possible reasons why iPhone or iPad is stuck on the update screen. The first thing you should think about is the network connection. It is one of the essential things to update your iOS or iPadOS versions. The process will be interrupted if the Wi-Fi network or other internet connection is unstable or turned off.
Moreover, it is probably because the iPhone or iPad storage space is not enough for the new update. Whatever the reason, if something like iPhone is stuck verifying updates on iPhone 11 encounters, you can fix it using the tutorials below. Move on.
Part 2. How to Fix iPad or iPhone Updates Are Stuck
Some users are experiencing the same problem on their iPhones and iPads, which are stuck on the update screen. It includes iPhone and iPad freezes during updates. Any issues on your iPhone and iPad are stressful because you cannot use your phone correctly.
First, you should learn the proper steps to update your devices.
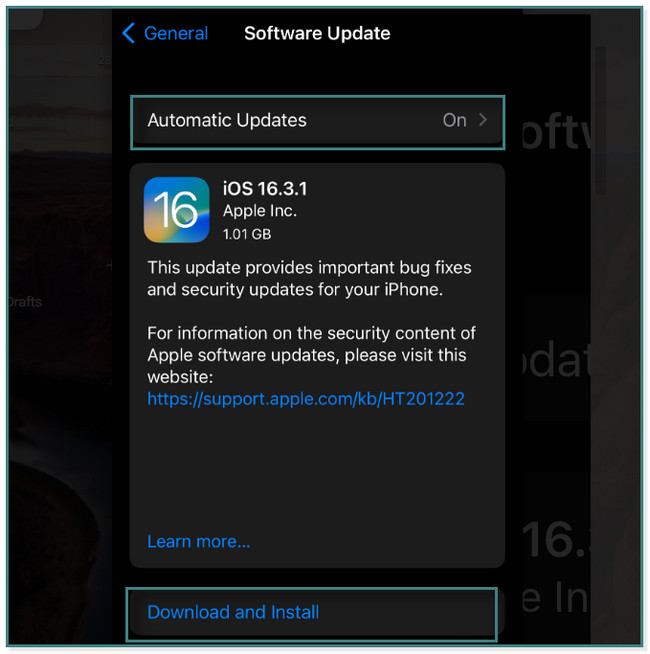
Step 1Back up your data on your devices using iCloud or other cloud services. You can also use another phone. After that, plug your iPhone into power and connect it to the Wi-Fi network. After that, tap the Settings button on your iPhone. Later, choose the Software Update button to see the available updates for your phone.
Step 2Inside the Software Update screen, you will see the current iOS version of your phone. If you see the Download and Install button at the bottom, it means it has available updates. Tap it to update.
Note: If you want your iPhone automatically update to its latest iOS version, tap the Automatic Updates button at the top of the main interface.
It is time to fix iPhone or iPad stuck on the update screen and related issues. Below are the easiest methods to do that. Move on.
Method 1. Reboot iPhone/iPad
This technique is commonly performed when there is a problem with iPhone and iPad. It is the easiest among all these methods. Scroll down.
For iPhone X, 11, 12, 13, or later: Press and hold the Volume or Side button. After that, drag the slider to the right, and after a few seconds, it will turn off. Turn on your phone or tablet by pressing and holding the Side button.
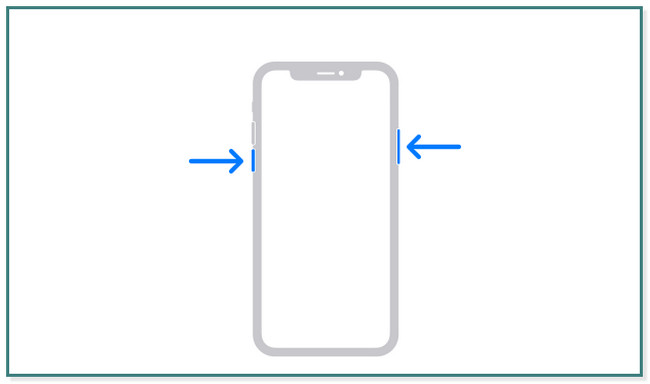
For iPhone 6, 7,8, or SE (2nd or 3rd generation): Press and hold the Side button. Drag the slider to turn it off. Turn on back the phone or tablet by pressing and holding the Side button again.
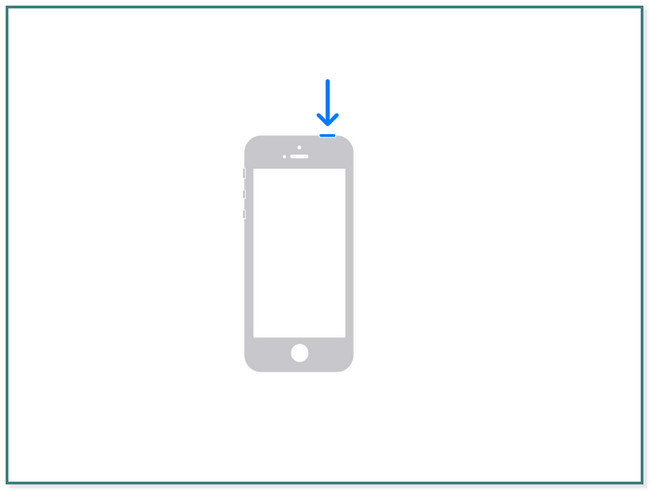
For iPhone SE (1st Generation), 5 and earlier: Press and hold the Top button. Drag the slider to the right, and the iPhone or Tablet will be turned off. Later, turn on the phone or tablet again by pressing and holding the Top button until you see the Apple Logo on the main screen.
For iPad with Face ID and Touch ID in the Top button: Press and release the Volume button close to the Top button. After that, press and quickly release the Volume button far from the Top button. Later, press and hold the Top icon until the Apple Logo icon pops up on the screen.
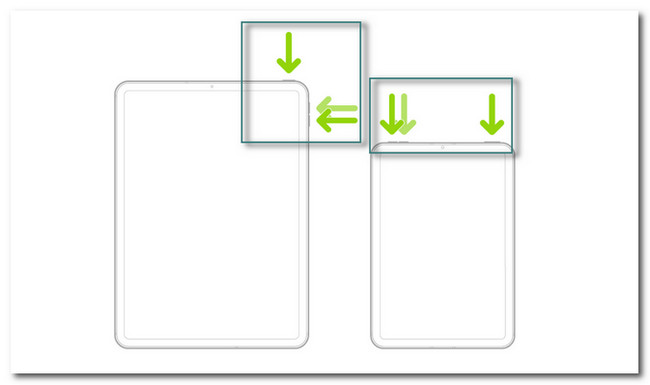
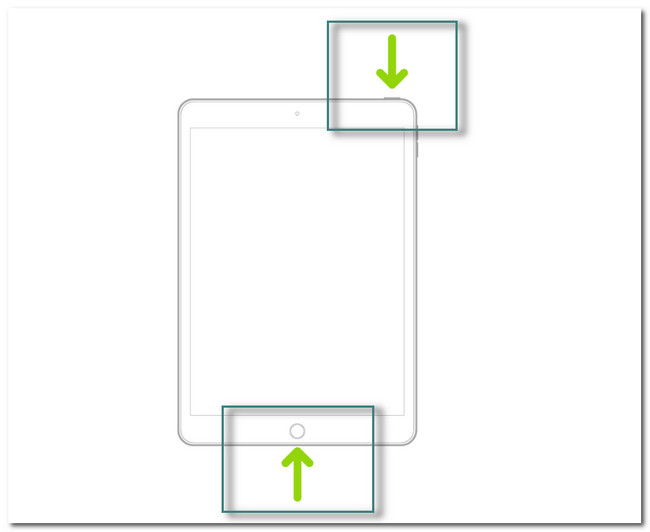
For iPad models with the Home button: Press and hold the Top button with the Home button. You only have to wait for at least a few seconds until the Apple Logo appears on the screen.
FoneLab enables you to fix iPhone/iPad/iPod from DFU mode, recovery mode, Apple logo, headphone mode, etc. to normal state without data loss.
- Fix disabled iOS system problems.
- Extract data from disabled iOS devices without data loss.
- It is safe and easy to use.
Method 2. Reset Network
The resetting network technique will delete the networks saved, like Wi-Fi or other internet connection. Why not give it a try to fix iPhone or iPad update frozen and stuck on the screen? Move on.
Option 1. Re-connect Network iPhone/iPad
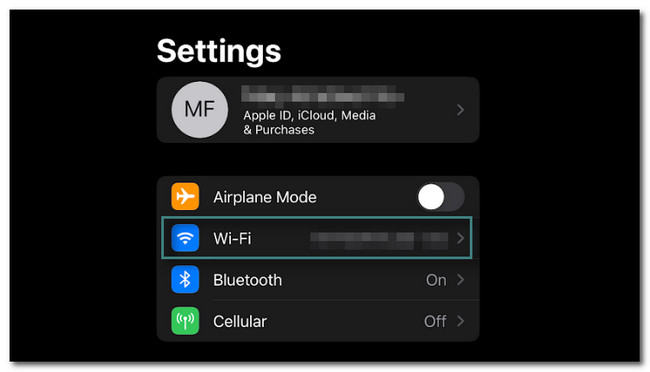
Step 1On the Settings of your iPhone device, locate the Wi-Fi section. After that, tap it to see more options for your internet connection.
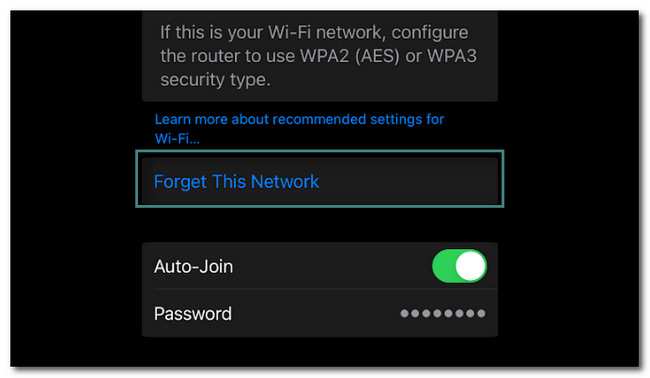
Step 2You will see many options on how you want to customize the connection for the Wi-Fi. All you have to perform is tap the Forget this Network and return to the Wi-Fi main interface.
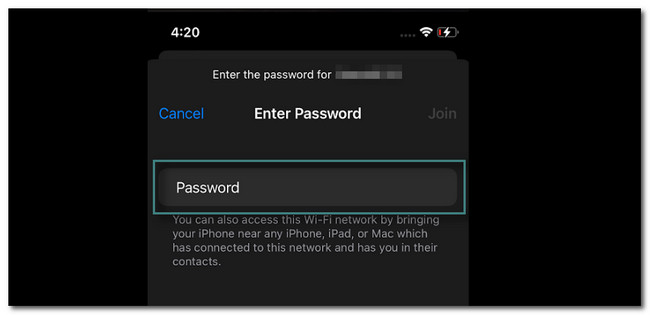
Step 3Tap the Wi-Fi Network and enter its password again. After that, wait at least a few seconds until your phone is connected to the network.
Option 2. Reset Network Settings iPhone/iPad
Step 1Tap the Settings or Gear icon of the iPhone. After that, you only need to scroll down until you find the General icon. Tap it to see more settings.
Step 2Inside the General option, you must scroll down and locate the Transfer or Reset iPhone button at the end.
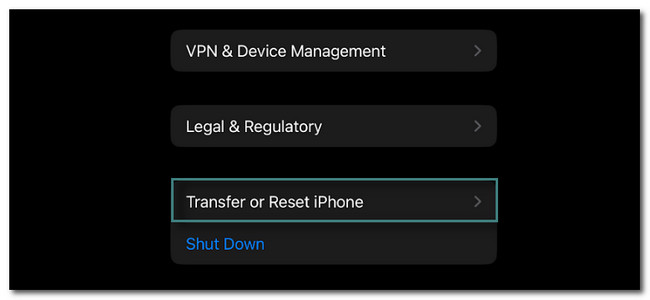
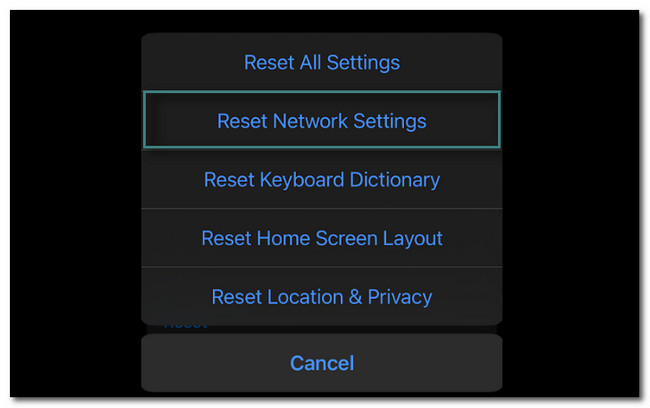
Step 3At the bottom of the main interface, choose the Reset button. You only need to tap it.

Step 4Another window will pop up. After that, choose the Reset Network Settings button. After this method, you must set up the phone again based on your preference.
Method 3. Update iOS/iPadOS with iTunes
You can use iTunes to update iOS and iPadOS using your Mac. But iTunes has been replaced on the latest macOS. You can still use it for earlier macOS and Windows. Do you want to know how to update via iTunes? Scroll down.
Launch iTunes on your computer. After that, connect the phone or tablet to it. After that, click the iPhone or iPad on the iTunes toolbar. Check for updates. Select the Download and Update and follow the onscreen instruction. Later, enter your password.
Method 4. Restore iPhone/iPad
This method can be performed in 3 ways. You can restore and get rid of iPhone or iPad updates stuck on the progress bar or screen. You can use iCloud, Finder, and iTunes. Please follow the steps below accordingly.
Option 1. iCloud
You can use iCloud to backup your data to cloud service without physical connections. Do you want to use it to restore your iPhone and iPad? Below are the detailed steps.
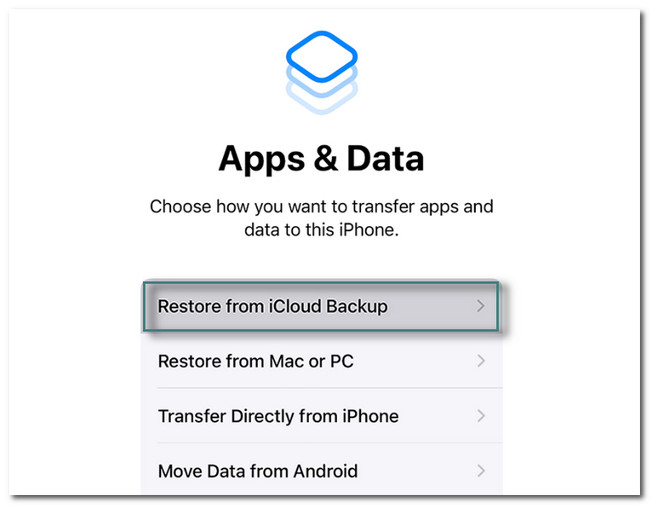
Step 1You need to perform the Erase All of Its Content on the Settings of your iPhone or iPad. After that, once you turn it on, it should show you the Hello icon. After that, you only need to follow the instructions on your iPhone or iPad screen. You will see the Apps & Data screen. Later, choose Restore from the iCloud Backup button and sign in to your account. Choose the backup that is most relevant to your phone.
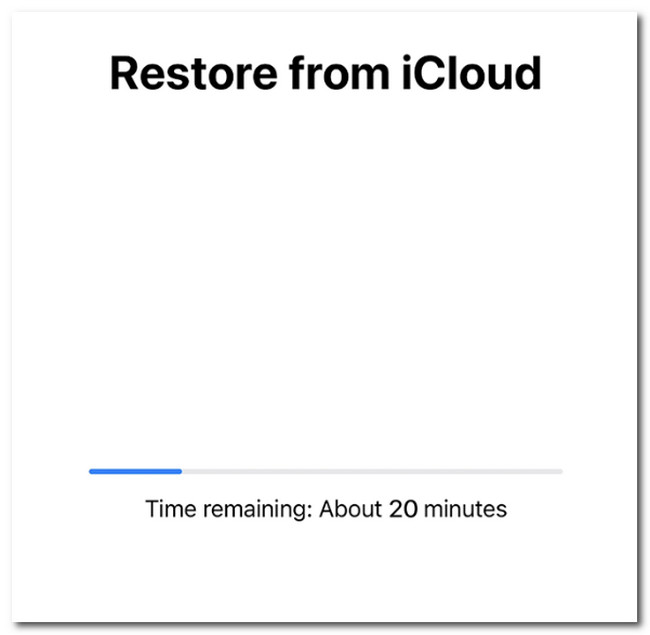
Step 2The transfer starts automatically. Suppose the phone asks for your Apple ID to restore App and Purchase. Although you can tap the Skip button, you cannot use the apps. After that, you must stay connected to the Wi-Fi network to continue the process. After that, you will see the Restore from the iCloud screen. At the bottom, you will see its progress. Please wait until it is finished. After that, set up the iPhone or iPad, depending on your preference.
FoneLab enables you to fix iPhone/iPad/iPod from DFU mode, recovery mode, Apple logo, headphone mode, etc. to normal state without data loss.
- Fix disabled iOS system problems.
- Extract data from disabled iOS devices without data loss.
- It is safe and easy to use.
Option 2. iTunes
iTunes will let you organize and play your songs on the computer. In addition, you can use it to restore your iPhone and iPad. Do you want to know how? Scroll down.
Step 1You will see the Hello icon once you turn on your device after deleting all of its content. You only need to follow the instruction given on the screen. It will also ask you to create your password and confirm it. All you have to perform is tap the Restore from Mac or PC button. Later, the screen will show that your phone needs to be connected to the computer. Perform it by connecting it using a cable.
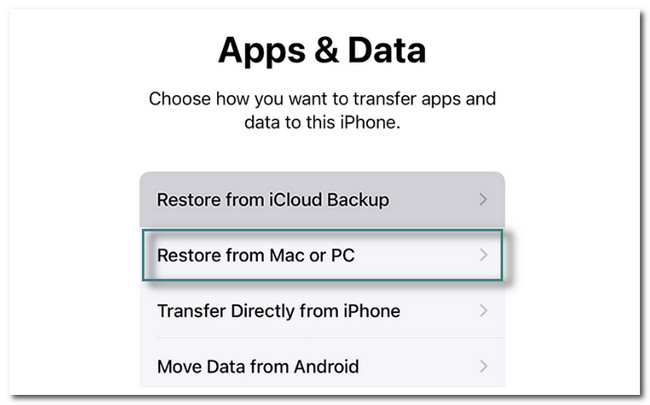
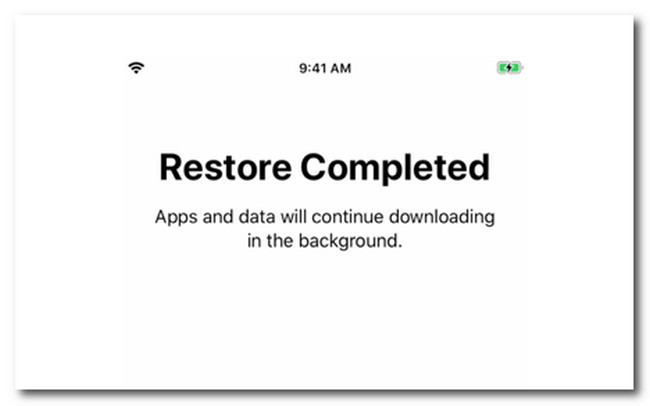
Step 2On Mac, click Restore from the Backup button, and select the iPhone you use. Later, click the Continue button, and enter the Encrypted Password of the phone. After that, click OK, and the restore will instantly occur from the computer to the iPhone. Once the process is done, the iPhone will automatically restart. You will you the Restore Completed screen. You only need to set up the phone as shown on the screen.
Option 3. Finder
After updating your macOS to the latest one, you can use Finder instead. It has similar steps to iTunes.. Below are the detailed steps.
Step 1Connect the iPhone or iPad to the Mac. After that, you will see notifications on your iPhone or iPad screen. You only need to tap the Trust This Computer button and follow the onscreen steps to connect it. Afterward, open the Finder icon on your Mac. Click the iPhone or iPad on the left side of the main interface. You will see little information about the iPhone or iPad in this case.
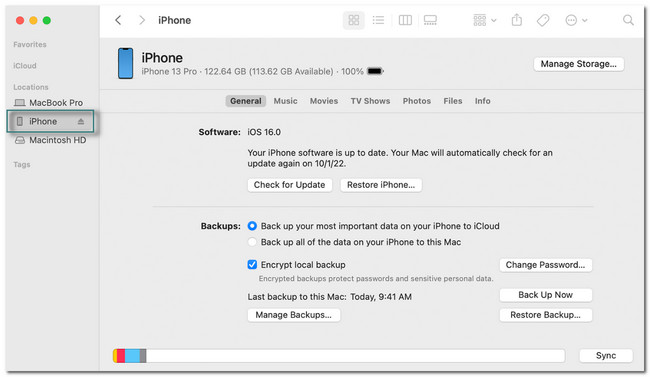
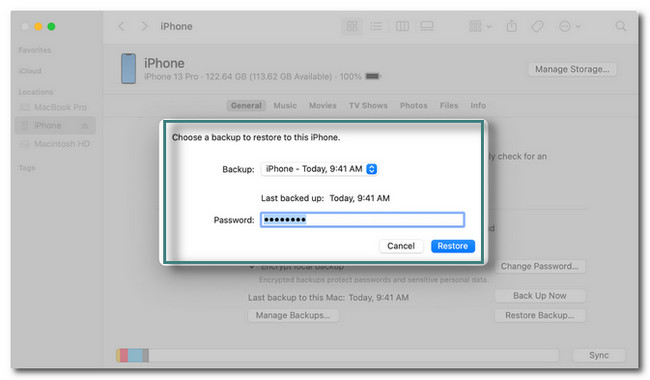
Step 2Select the Restore Backup button at the bottom part of the screen. Pick the most appropriate backup for your iPhone or iPad. After that, Click the Restore button and enter your password. You only need to wait until the restore process is finished. Do not unplug the iPhone or iPad from the computer until the Sync process is completed. Please be patient because this process will take a few minutes.
Do you think a third-party tool can fix the issue? Below is the best software to fix iPhones or iPad stuck on the update screen. Move on.
Option 5. Use FoneLab iOS System Recovery
iPad, and iPhone are stuck verifying updates on iPhone 11 with their screens. It is one of the recoverable scenarios this software supports. Aside from that, FoneLab iOS System Recovery can help your iPhone from DFU mode, recovery mode, Apple logo, headphone mode, and more to its normal state.
FoneLab enables you to fix iPhone/iPad/iPod from DFU mode, recovery mode, Apple logo, headphone mode, etc. to normal state without data loss.
- Fix disabled iOS system problems.
- Extract data from disabled iOS devices without data loss.
- It is safe and easy to use.
Moreover, it supports 2 repair modes you will know and experience upon reading its guide below. In addition, it supports both Mac and Windows operating systems. Do you want to use this tool to fix iPhone and iPad stuck on the update screen and other corresponding issues? Perform the steps below accordingly.
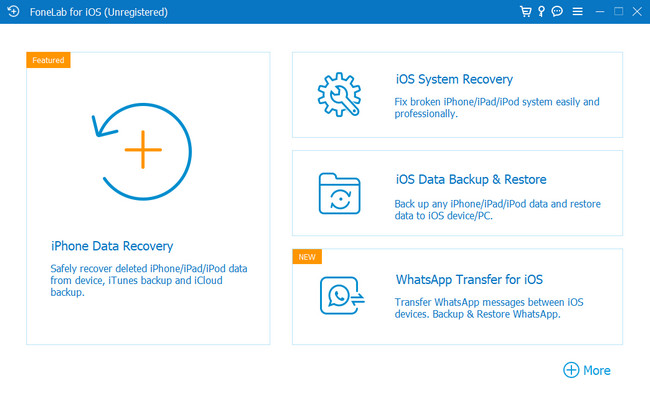
Step 1Download FoneLab iOS System Recovery then set it up on your computer. After that, launch it instantly to start the process. After that, you only need to choose the iOS System Recovery button at the top-right corner of the software. In this case, you will see features related to fixing your iPhone or iPad.
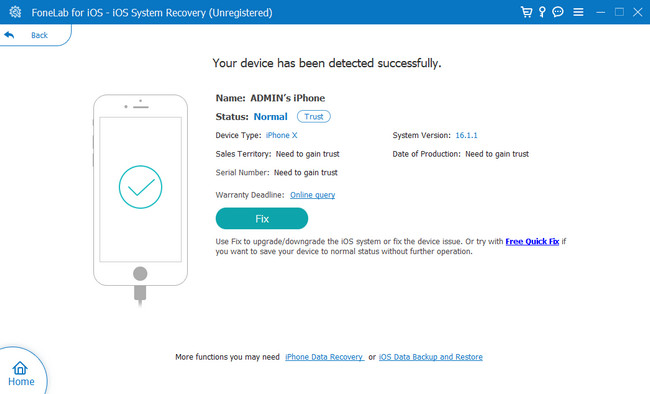
Step 2You are required to connect the iPhone or iPad to the software. In this case, you will need a cable to perform it. The tool will notify you if the iPhone or iPad is successfully connected to the computer. It will show you information about them, including their name. To proceed to the next step, click the Fix button.
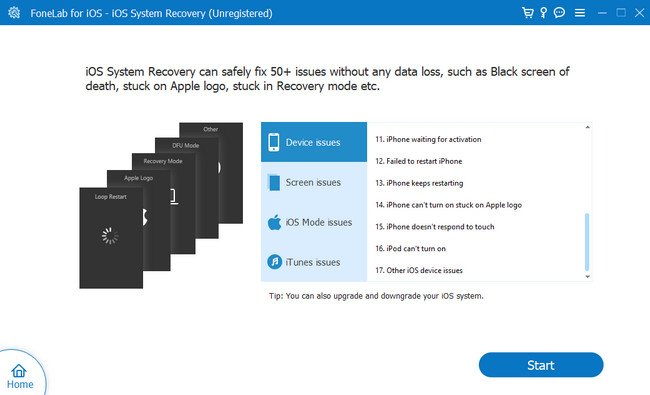
Step 3Select the issue on your iPhone or iPad on the software. You will see 4 available issues. It includes Device Issues, Screen Issues, iOS Mode Issues, and iTunes Issues. After that, choose the Start button at the bottom of the software to select the repair type you need for the process.
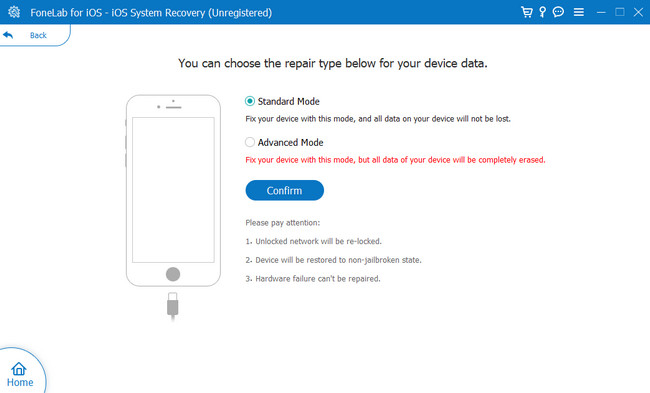
Step 4The tool will ask you about the Repair type you prefer. You can choose the Standard mode, which will not erase your data. You can also select the Advanced Mode button, but you must have a copy of your data. This process will lead you to Recovery Mode and erase all of your current data and files. It is recommended to back up all of your files. Later, click Confirm button. Click the Optimize or Repair button. The fixing process will start instantly. You must wait until the process is finished, then check your iPhone or iPad.
FoneLab enables you to fix iPhone/iPad/iPod from DFU mode, recovery mode, Apple logo, headphone mode, etc. to normal state without data loss.
- Fix disabled iOS system problems.
- Extract data from disabled iOS devices without data loss.
- It is safe and easy to use.
Part 3. FAQs about iPad or iPhone Updates Frozen
1. How long should the iOS 18 update take?
It should be around 20-30 minutes. The setting up process is already included, which is 5-10 minutes. It can lessen the time if you are fast in setting up your iPhone.
2. What are the negatives of iOS 18 version?
Some people wondered if they would update their iPhones to iOS 18. Well, this iOS version is good, but there are disadvantages when you use it, like some lock screen effects only work with specific photos.
There are many ways to fix iPhone or iPad updates stuck on the screen. These methods are the best, including FoneLab iOS System Recovery. Download the software now!
FoneLab enables you to fix iPhone/iPad/iPod from DFU mode, recovery mode, Apple logo, headphone mode, etc. to normal state without data loss.
- Fix disabled iOS system problems.
- Extract data from disabled iOS devices without data loss.
- It is safe and easy to use.
